Transcription of DCPDS Guide For Managers/Supervisors - hawaii.gov
1 DCPDS Guide For Managers/Supervisors People First, Mission Always Published by the National Guard Bureau Office of Technician Personnel This page intentionally left blank DCPDS Reference Guide for Managers/Supervisors Table of Contents Topic Page Section One General Information 1. Logging into DCPDS 1 2. Setting up Favorites 4 3. Changing Responsibility 5 4. How to Exit from DCPDS 6 5. Navigating within DCPDS 7 -Navigator Window 7 -How the Navigation List is Used 8 -Expanding and Collapsing Headings 8 -Starting a Task from the Navigation List 8 6. The Top Ten List 9 -The Navigation Top Ten List 9 -How to Add Items to Your Top Ten List 9 7. The Toolbar 10 8. List of Values 10 9. Keyboard Shortcuts 11 10.
2 Queries 11 Section Two Processing the Request for Personnel Action 1. Introduction 12 2. Mass Actions 12 3. Terms 12 4. Step-By-Step Instructions for Initiating a Request for Personnel Action (RPA) 12 5. After the Action is Processed 13 6. Types of Personnel Actions 13 7. Descriptions and Instructions for Different Types of Actions 14 -Award/One Time Payment 14 -Change Actions: Change in Hours 15 -Change Actions: Change in Work Schedule 15 -Change Actions: Name Change 16 -Details 16 -Extension of NTE 16 -Non Pay/Non Duty Status 17 -Position Actions: Establish Position 17 -Position Actions: Position Review 18 -Reassignment 18 -Recruit/Fill 19 -Return to Duty (RTD) 19 -Salary Change: Denial of WRI 20 -Salary Change: Locality Pay 20 -Salary Change: Other Pay 20 -Salary Change: Pay Adjustment 20 -Salary Change: Promotion 21 -Salary Change: Irregular Performance Pay (Quality Step Increase (QSI)) 21 -Salary Change: Termination of Grade Retention 21 -Separation 22 8.
3 Initiating a Request for Personnel Action 22 -Accessing the Request for Personnel Action 22 -Request for Personnel Action Windows 22 -Types of Data Fields 23 9. Attaching a Note to the RPA 27 10. Saving your RPA 28 11. Routing your RPA 29 -The Routing Window 29 -Refreshing your Inbox after Routing 32 12. Tracking an RPA 32 13. Accessing the RPA 32 14. Tracking History 33 15. Printing an RPA or NPA 34 16. Attaching Documents or Comments to an RPA 35 17. Accessing the Request for Personnel Action 35 18. Steps for Attaching a Document or Comment 36 19. Adding a Comment (Long or Short Text) 37 20. Attaching a File 38 21. Viewing and Printing an Attachment 40 22. Deleting an Attachment 41 Section Three Inboxes 1. Workflow Inbox 42 -Displaying an RPA using the Workflow Inbox 42 -Inbox Views 44 -Closed Actions 45 -Sorting Actions in the Workflow Inbox 46 -Searching the Workflow Inbox 47 -The Simple Search Window 48 -Personalizing Inbox Views 50 2.
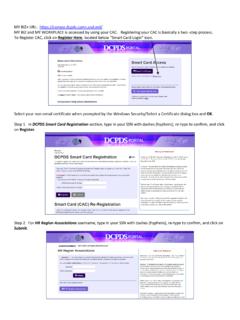
4 Civilian Inbox 55 -Displaying the RPA using the Civilian Inbox 55 -Viewing Closed Actions 56 -Searching the Civilian Inbox 56 -Sorting the Civilian Inbox 57 -The Notifications Window 58 -Customizing the Civilian Inbox 58 -Using Folder Tools 59 -Saving a Folder View 60 Sept 2009 1 Section One General Information Logging into DCPDS Step Action 1 Open your Internet Explorer. Enter the web site: Click OK on the DOD Notice and Consent banner page. This will take you to the DCPDS Portal window. Click the Login Button. 2 You should then receive a window that contains your CAC certificates. Make sure you select the certificate that is not your E-Mail certificate. You will then have to enter your CAC PIN. You will then receive the Accessing your Database window. Select NGB Region . Sept 2009 2 3 The Navigator window displays. On the left side of this window is your DCPDS responsibility for most users, this will be a secure user ID which is what DCPDS uses to control access to records.
5 4 Click on the responsibility. Some users may have more than one responsibility, in which case they will each be listed here, and you select the one needed to perform whatever function you need to do in DCPDS . 5 The center section of the Navigator screen will populate with the tasks appropriate for the responsibility you select. Sept 2009 3 On the right side of the Navigator window there's a place for you to set up "favorites" if you want to (this is optional). See Favorites, below, for instructions. 6 Once you have selected a task, the Oracle Applications 11i Java Applet window opens briefly, then (depending on what you selected this does not apply to the Workflow Inbox) the regular Navigator menu will open in a new window, with the selected task window opening next. Sept 2009 4 Setting up Favorites If you want to set up a favorites list on the new navigator, follow the steps below. This is an optional step, but it can be handy if you perform certain tasks in DCPDS repeatedly (it saves you from having to scroll through the entire navigator list).
6 Note, if you have more than one responsibility, you can set up a separate favorites list for each. Step Action 1 On the new navigator screen, click the <Edit Favorites> button. 2 On the Customize Favorites Portlet window, select the responsibility (if you have more than one), select the task you want to move onto the favorites list, and click the right arrow to move it over. Repeat to add additional items to the list. When you re done, click the <Apply> button. 1. Select Responsibility from the LOV 2. Select the functions you want to add 3. When finished, Click the Add button 4. When finished, click the Apply button Responsibility from the LOV Sept 2009 5 Changing Responsibility In most circumstances, a user may have more than one responsibility. If you have more than one responsibility assigned to your user ID, you can switch to another responsibility without exiting DCPDS and logging on again. Step Action 1 Return to the Navigator window by closing any open windows to return to the Navigator window.
7 2 Now that you are in the Navigator Window, click the Switch Responsibility icon (the top hat) on the Toolbar. 3 Select the responsibility you wish to switch to, and then click <OK>. The Navigator Window title and contents will now reflect the new responsibility. Sept 2009 6 How to Exit from DCPDS When you are done working in DCPDS : Step Action 1 Click File Exit Oracle Applications from the main menu. 2 Click <OK> on the prompt window asking, "Exit Oracle Application?" 3 Close any other windows that were opened during your session (using the Close Window control button). These may include: Sept 2009 7 Navigating Within DCPDS Navigator Window The Navigator window displays the menu of categories and tasks you can perform in DCPDS , based on the responsibilities you have been assigned (a supervisor or manager has a somewhat different list than a personnelist, for instance). If you have been assigned more than one responsibility, the Navigator menu will be for the responsibility you selected in the Responsibilities window when you logged on (each responsibility has a different menu).
8 At the top of the Navigator Window you will see the name of the responsibility to which you have logged on ( , "MGRALHRO00001). Illustration Below is a typical Navigator menu which is displayed if you log on under a supervisor or manager responsibility (actual items shown on the navigator will vary depending on your role): Toolbar Current Responsibility Expand and Collapse Sept 2009 8 How the Navigation List is used The Navigator menu contains two types of entries: headings and tasks. The tasks are the actual operations that you can perform (for example, initiate a request for Award). Headings are used to organize tasks into various categories, and are similar to the hierarchy of a file system, with main headings and subheadings. Headings and subheadings can be recognized because they have a plus (+) or minus (-) sign in front of them; every heading and subheading has at least one task associated with it. Expanding and Collapsing Headings Upon logging on, you will see a combination of headings and tasks on the Navigator menu.
9 You can expand headings that begin with a plus sign (+) to display tasks and additional subheadings (if there are any). Subheadings will display indented below the items from which they are expanded. When a heading has been expanded, a minus sign (-) will display next to it. Once a heading is expanded, you can collapse it again to see only the main category heading and thus view a shorter list. Items with no plus or minus sign are tasks and cannot be expanded or collapsed. Starting a Task from the Navigation List To start a task from the Navigator menu ("tasks" are the items that don t have a plus or minus sign next to them): Click the task on the navigation list you need to use, then click <Open>, or Double-click the task. Sept 2009 9 The Top Ten List The Navigation Top Ten List To quickly find and open menu items that you use frequently, you can create your own "Top Ten" list. The Top Ten List you create will be located on the right side of the Navigator Window.
10 To start a task from your top ten list, press the number key on your keyboard that corresponds with the Top Ten List number of the item you want to open. For instance, to submit a report request, click the [2] key on the keyboard. You can also double-click the item from the top ten list or click it once (select it), then click the <Open> button. If you have more than one responsibility, you can create a different Top Ten List for each responsibility. How to Add Items to Your Top Ten List Follow these steps to add items to your top ten list: Step Action 1 Click an item from the navigation menu you use frequently. Top Ten List Add Remove Sept 2009 10 2 Click the <Add> button. The item is now displayed in the navigation Top Ten List, with a Top Ten List number beside it. Note: the wording used for an item on the Top Ten list may vary somewhat from the wording used on the navigator list. 3 Repeat steps 1 and 2 for the other items you want to put on your list (up to ten items).