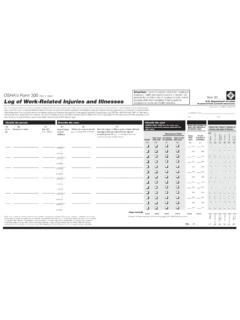
Transcription of DEMOUNTING AND MULTI-PIECERIM MATCHINGCHART
1 SERVICING MULTI-PIECE AND SINGLE-PIECE RIM WHEELS. 29 CFR DE MO U NT ING AND. MO U NT ING PRO CE DU R E S. FO R T U BE L E SS T R U CK. AND BU S T IR E S. DE MO U NT ING AND. MO U NT ING PRO CE DU R E S. FO R T UBE. U BE -T Y PE T R U CK. AND BU S T IR E S. MULTI-PIECE RIM. MATCHING CHART. OSHA 3421-10R 2014. CONTENT. CHART 1. DEMOUNTING AND MOUNTING PROCEDURES. FOR TUBELESS TRUCK AND BUS TIRES ..1. 1 BEFORE SERVICING ANY TIRE RIM/ wheel 2 DEFLATING AND DEMOUNTING TIRE FROM RIM/ wheel 3 INSPECTING TIRE AND RIM/ wheel 4 MOUNTING TIRE ON RIM/ wheel 5 INFLATING TIRE RIM/ wheel CHART 2. DEMOUNTING AND MOUNTING PROCEDURES.
2 FOR TUBE-TYPE TRUCK AND BUS TIRES ..8. 1 BEFORE SERVICING ANY TIRE RIM/ wheel 2 DEFLATING AND DEMOUNTING TIRE FROM RIM/ wheel 3 INSPECTING TIRE AND RIM/ wheel 4 MOUNTING TIRE ON RIM/ wheel 5 INFLATING TIRE RIM/ wheel CHART 3. MULTI-PIECE RIM MATCHING CHART ..15. DEMOUNTING AND MOUNTING PROCEDURES. FOR TUBELESS TRUCK AND BUS TIRES. TIRE AND RIM SERVICING CAN BE DANGEROUS. AND MUST ONLY BE PERFORMED BY. TRAINED PERSONNEL USING PROPER. PROCEDURES AND TOOLS. FAILURE TO READ AND COMPLY WITH ALL OF. THESE PROCEDURES MAY RESULT IN SERIOUS. INJURY OR DEATH TO YOU AND OTHERS. PLEASE NOTE: THIS IS CHART 1 OF A 3-CHART SET.
3 BE SURE TO ALSO READ, UNDERSTAND AND COMPLY WITH CHART 2 RE: DEMOUNTING AND MOUNTING. PROCEDURES FOR TUBE-TYPE TRUCK AND BUS TIRES, AND. CHART 3 RE: MULTI-PIECE RIM MATCHING. Completely deflate any tire by removing the valve core Any inflated tire mounted on a wheel contains explosive before removing the tire/ wheel assembly from the axle energy. The use of damaged, mismatched or improperly if there is known or suspected damage to the tire or assembled tire and wheel components can cause the wheel or if the tire has been operated at 80% or less of assembly to separate with explosive force.
4 If struck by an its recommended operating pressure. Demount, inspect exploding tire, wheel component, or the air blast, you or and match all tire and rim parts before re-inflating in a someone else may be seriously injured or killed. restraining device. Mismatching tire and rim diameters is dangerous. A. NEVER use starter fluid, ether, gasoline, or other mismatched tire and rim assembly may separate and flammable materials and/or accelerants to lubricate can result in serious injury or death. This warning applies the beads of a tire. This practice can cause the to 15 and , 16 and , 18 and , 22 and explosive separation of the tire/ wheel during servicing , 24 and tire and rim assemblies as well as or during highway use, which may result in serious other sized assemblies.
5 NEVER assemble a tire and rim injury or death. unless you have positively identified and correctly matched the tire and rim diameter. NEVER inflate beyond 40 psi to seat any tire beads. NEVER stand, lean, or reach over the tire rim/ wheel NEVER assemble a tire and rim unless you have posi- assembly in the restraining device during inflation. Even tively identified and correctly matched the tire and rim if a tire is in a restraining device, inflating beyond 40 diameter. If an attempt is made to seat the tire bead by psi when trying to seat the beads is a DANGEROUS inflating on a mismatched rim/ wheel , the tire bead will PRACTICE that may break a tire bead or the rim/ wheel break with explosive force and may result in serious injury with explosive force and possibly result in serious injury or death.
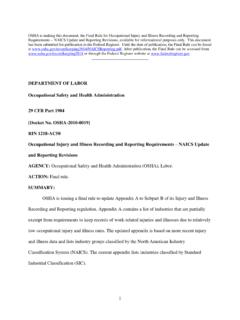
6 Or death. DE MO U NT ING AND MOUNTING PROCEDURES. FO R T U BELESS TRUCK AND BUS TIRES. PAGE 1. 1 BEFORE SERVICING ANY TIRE RIM/ wheel ASSEMBLY. ALWAYS comply with the procedures on this chart and NEVER reinflate any tire that has been operated in a in the tire/ wheel manufacturer's catalogs, instruction run-flat or underinflated condition ( , operated at 80%. manuals or other industry and government instructional or less of recommended operating pressure). Demount, materials. inspect and match all tire and rim components before reinflating in a restraining device with the valve core Use a non-flammable vegetable or soap-based rubber removed.
7 Lubricant on the beads and rim surfaces to make tire DEMOUNTING and mounting easier. If an emergency puncture repair inflater was used on a tubeless tire, deflate and reinflate the tire several times Use proper tools to demount or mount tires and rims to remove potentially explosive propellant before servic- (refer to Typical Tire Service Tools ). NEVER strike the ing the tire. tire/ wheel assembly with a steel duck bill hammer to un- seat the beads and do not strike the head of the hammer with another hard-faced hammer use a rubber mallet or plastic dead blow hammer. Slide impact bead unseat- ing tools are the preferred tools for unseating beads on tubeless tires.
8 IF YOU DO NOT KNOW HOW TO USE TIRE SERVICING TOOLS STOP! TIRE SERVICING MUST ONLY BE PERFORMED BY TRAINED PERSONNEL. FAILURE TO FOLLOW PROPER PROCEDURES CAN RESULT IN SERIOUS INJURY OR DEATH. ALWAYS wear adequate protective eyewear (or face ALWAYS use soft-faced hammers when driving tire irons shield), protective footwear, and ear protection while or assembling components. servicing tires to avoid injury. NEVER use a hammer with a loose or cracked handle. NEVER use a tire tool for anything except DEMOUNTING NEVER use a bent, cracked, chipped, dented or and mounting tires. mushroomed tool.
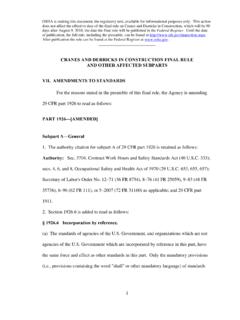
9 Keep tools clean and inspect them NEVER use an extension or cheater bar with tire frequently. irons. NEVER alter or apply heat to any tire service tool. DE MO U NT ING AND MOUNTING PROCEDURES. FO R T U BELESS TRUCK AND BUS TIRES. PAGE 2. 2 DEFLATING AND DEMOUNTING TIRE FROM RIM/ wheel ASSEMBLY. ALWAYS completely deflate the tire assembly before Loosen beads by using a slide impact bead unseating attempting to demount. Remove the valve core and insert tool, duck bill hammer with a rubber mallet, or other a wire down the valve stem to ensure complete deflation. bead unseating tools. Both beads must be loosened NEVER demount a tire from a rim unless you are sure it is before DEMOUNTING a tire.
10 Completely deflated. TUBELESS; SINGLE PIECE. 2A Steel wheel Aluminum wheel Aluminum wheel 2B 2C 2D. 2E 2E Reverse Angle 2F. 2A. Identify the short side of the drop center wheel well. Single 2D. Remove one tire iron and insert the curved end between piece tubeless rims and wheels must be demounted from the short the bead and rim. Pry the rest of the top bead over the rim flange. side of the drop center well. On steel disc wheels, the short side is Repeat this process until the first bead is entirely free from the rim. typically located opposite the disc. Aluminum wheels typically have 2E.