Transcription of Department of Industrial Relations
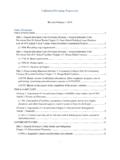
1 1 Department of Industrial Relations User Guide for Electronic Certified Payroll Reporting via XML Upload July 2016 Version 2 Contents 1. Introduction .. 3 2. Release Notes .. 3 3. System Requirements .. 4 4. How to Submit Certified Payroll Records via XML .. 4 How to Submit Corrections .. 14 5. How to Create an XML File .. 15 XML File Validation .. 15 Software Installation .. 15 How to Validate an XML file against the eCPR Schema File Using XML Notepad .. 17 Create an XML File Using as a Template .. 23 XML File Naming Convention for eCPR .. 33 3 1.
2 Introduction This manual will help you: Submit a certified payroll record via XML. (For more details, see Section 4 of this user guide.) Create an XML file using the schema template or vendor software. (For more details, see Section 5 of this user guide.) 2. Release Notes (Release , August 2016) Contractors will not need to make any adjustments to how they enter data, but the final data display screen for contractor, project, and payroll information has undergone minor layout changes. (Release , January 2016) New element in the XML schema 1. <CPR:ProjectInfo> element now contains <CPR:contractAgencyID> element to distinguish multiple contractors under a single project.
3 The Contract Agency ID serves as a placeholder only, and the value must be empty. For example: <CPR:projectInfo> <CPR:awardingBody> </CPR:awardingBody> <CPR:contractAgencyID> </CPR:contractAgencyID> <CPR:contractAgency>CA-DIR</CPR:contractAgency> <CPR:projectName> </CPR:projectName> <CPR:projectID>9</CPR:projectID> <CPR:awardingBodyID> </CPR:awardingBodyID> <CPR:projectNum> </CPR:projectNum> <CPR:contractID> </CPR:contractID> <CPR:projectLocation> <CPR:description> </CPR:description> <CPR:street> </CPR:street> <CPR:city> </CPR:city> <CPR:county> </CPR:county> <CPR:state> </CPR:state> <CPR:zip> </CPR.
4 Zip> </CPR:projectLocation> 4 3. System Requirements For submitting an XML file: The electronic reporting application supports Internet Explorer 9, 10, and the latest versions of Chrome, Firefox, and Safari. For creating an XML file: XML files can be created and edited with any standard text editor such as Notepad (PC) or Textedit (Mac). We highly recommend Notepad++ or XML Notepad for editing and validating XML files against a schema file. 4. How to Submit Certified Payroll Records via XML To get started, go to the following website: 1. The XML format must strictly follow the guidelines provided in Section 5 of this user guide.
5 2. To import the XML file: a. Select the Submit Payroll in XML File button. 5 b. Select Browse to select the XML file you want to upload and then click the Upload button. 3. The uploaded XML file will be validated. 4. If the validation is successful, the eCPR XML Validation Success page will appear. Click on the blue link in Step 1 to load the XML into the Online Form. Before doing so, read through the instructions outlined in Steps 2 6, which explain what to do to complete the process of submitting your payroll record. (These instructions are also explained here in this user guide.)
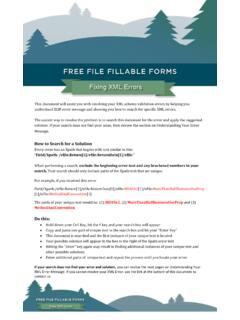
6 6 5. If you have already submitted payroll records in the system, all Contractor, Project and Payroll information should display in the format of the Online Form. (screenshot continues on next page) 7 6. If the validation of the XML file fails, an error message will appear. The message varies depending on the error in the file. 8 There are two options to correct the data and submit it again for validation: a. Correct the data in the import XML file and upload it again. b. Load the data directly into the Online Form, by clicking on the blue link in the error message box, ( load the xml into the Online eCPR form ).
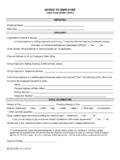
7 In the Online Form, correct the problem areas highlighted in brick red. Please note that hitting the Enter key while typing in the Notes field will lead to an error for that field. 9 7. If you are a new contractor, select Add New Contractor. 8. If the project doesn t yet exist in the eCPR database, select Add New Project. 10 9. If the system recognizes the project, it will ask you to select the entity that hired you for the project. Select it from the Contract With field. If you are the prime contractor, select the awarding body. If you are the subcontractor, select the contractor with whom you have a contract for the project.
8 Once you ve chosen the contractor, select Go to proceed. The Contract With drop-down list may contain any of the following: The awarding body The prime contractor and any subcontractors listed for this project number (DIR Project ID, also known as the PWC-100 number ) in the PWC-100 database. Contractors who have previously submitted certified payroll records on this project. 10. If you do not find the name of the contractor with whom you have a contract for the project, type that name into the Contract With field. It is critical to enter the name exactly as it appears in the PWC-100 form or on the contract (for subcontractors not on the PWC-100 form).
9 This name drives the payroll number (and amendment number) for the payroll reporting system. If the name is even slightly off (different spacing, punctuation, capitalization style or spelling), the system will create a new branch of payroll for the certified payroll records you are submitting. 11 11. If this is your first time entering payroll for this project, you will need to create an association linking the project, the awarding body or contractor with whom you have a contract for this project, and your entity. Click on the blue button, Connect To Project, to create this association.
10 You only need to do this the first time you enter payroll information for this project. 12. The Payroll Information will auto fill with the information from your XML files. Complete the Certification section below the Payroll Information section, and select Click to Sign. Be sure to review all the records carefully before you click on the Click to sign button, since you will not be able to make any edits to them afterwards. 12 13. To finish the process, select the Submit button that will appear. 13 14. After each successful submission, a confirmation page will appear which you can print out for your records.