Transcription of Design Information Designing Your Dust …
1 Design Information Designing your dust Collection System There are five simple steps to Designing an effective and efficient dust collection system. 1. Draw a floor plan of your shop Important Terms to Remember CFM - Air Volume in cubic feet per minute. 2. Determine Duct Velocity (FPM). FPM - Velocity of Air in feet per minute. 3. Determine Diameter and CFM of each Branch SP - Static Pressure. This is expressed in 4. Determine Diameter and CFM of Main Duct inches water gauge. It is resistance to air at rest in a duct, and is also commonly 5. Figure System Resistance (SP - Static Pressure) called resistance, friction, friction loss We ALWAYS recommended you do these calculations or pressure loss.
2 BEFORE you purchase your dust collector or ductwork. VP - Velocity Pressure: expressed in inches To properly size your dust collector, you NEED to know water gauge. It is kinetic pressure in the your CFM requirements and at what Static Pressure your direction of flow necessary to cause air system will be operating. Use the CFM and Static Pres- at rest to flow at a given velocity. sure to compare the performance of your dust collector. The dust collector performance ratings should show that at your given Static Pressure, the CFM it will provide. Important TIPS to Remember Machines with the biggest draw (highest CFM) should be placed nearest to the dust collector.
3 The shorter the run the better, less resistance to air flow. The final duct run entry into the dust collector should be straight pipe and not an elbow or branch fitting. Minimum of 3 x diameter of straight pipe, for example 8" diameter x 3 = 24" straight pipe. If clean air return is utilized from the dust collector, the outlet diameter should be a minimum 2" larger than the inlet to minimize resistance, slow down the air flow, and decrease the noise level. One hanger is required for every 10ft of main duct, and at least one on each 10ft branch or less. The less flex hose used the better; flex hose has approximately 3 times the resistance to air flow than straight pipe.
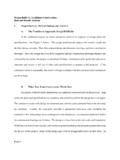
4 Lateral tees off the main trunk line should be horizontal, with elbows attached to drop vertically. This will prevent dust flowing through the main duct from falling into a lateral tee positioned vertically. Typical dust or fume collection system 6" 8" 8". 4" 4" 5" 5" 4". Table Saw Shaper Radial Floorsweep Sander dust Collector 1. The first step in Designing your system is to draw a floor plan of your shop area including the following (see example, page 13): Location of dust producing machines, indicate size & location of dust pick-ups on each machine. Remember - Machines with the biggest draw (highest CFM) should be placed nearest to the dust collector.
5 Desired location of dust collector unit. Floor to joist measurement. Any obstructions that would interfere with the run of the duct. 10 Shop anytime Design Information 2. Determine Duct Velocity (FPM). Use the chart below to determine the Velocity of your system. Type of dust Velocity in Branches Velocity in Main Metalworking dust 4500 FPM 4000 FPM. Woodworking dust 4000 FPM 3500 FPM. Other Light dust 4000 FPM 3500 FPM. 3. Determine Diameter and CFM of each Branch There are several ways to determine the diameter of the branches. If the machine has a factory installed collar, the manufacturer has determined that the machine needs that size branch under normal circumstances.
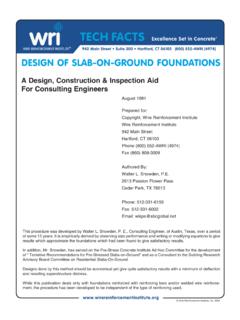
6 If the machine has a metric diameter outlet, convert it into inches, and round off to the nearest inch. When writing up your parts list you may Chart 1. need to order a custom reducer. CFM requirements at specified velocity. If the outlet is rectangular you need to determine the equivalent round diameter. This will require a Dia. 3500 FPM 4000 FPM 4500 FPM. Transition, see page 35. 3" 170 195 220. 4" 300 350 390. If the branch is smaller than 3" dia., requirement is 5" 475 550 610. high velocity vacuum, not volume dust collection, it is 6" 700 785 880. recommended to use a shop vac. 7" 950 1100 1200. 8" 1200 1400 1570. Determine CFM requirement for each branch, use Chart 1.
7 9" 1550 1800 1990. Under the proper velocity note the CFM of each branch. If 10" 1900 2200 2450. working with wood dust , use 4000 FPM in branches. 12" 2800 3175 3600. 14" 3800 4300 4800. 4. Determine Diameter of Main Duct Determine which machines are your primary machines. A primary machine is the machine(s) that will operate at the same time under the worst conditions. (If you normally operate two ma- chines, but once a week need to operate a third machine at the same time, then you must size your system for all three machines.) We generally highlight the primary machines on the drawing. Sizing the Main Trunk Line. When sizing the main trunk line start with the primary machine farthest from the dust collector.
8 Run that size duct until the next primary branch enters the main. Increase the main size at that junction to accommodate the CFM total of the two primaries. You will follow this practice all the way to the collector, sizing all primary junctions to accommodate total CFM of all primaries at that point. Do not increase main duct size when a branch other than a primary enters. your total CFM requirement is the total of all primary branches. When not using a primary machine you will close blastgate and divert suction to a secondary machine. EXAMPLE - A 4" branch will be run from the Table Saw until it joins with the 4" branch from the Shaper.
9 At this point your main starts and you need to increase the pipe to handle the combined CFM (350+350 = 700). Using the CFM Chart 1 look up 700 CFM under the appropriate velocity (3500 FPM in the main for wood dust ), then look at the corresponding diameter (6"). Run 6" pipe in the main from the Shaper until the branch of the Radial Saw joins the main. Here again you need to increase your main to handle the total CFM (700+550=1250 CFM). Using the chart again you will see that 1250 CFM is slightly more than volume for 8 diameter. Drop back to 8 diameter so as not to go below transport velocity. Run the 8 duct in your main from the Radial Saw to your dust Collector.
10 (continued on page 12). Call to Order 11. Design Information 5. Figure System Resistance (Static Pressure). Static pressure is resistance to flow caused by friction and the channeling of airflow through a round pipe. If you turn on a dust collector with out anything attached to it - pipe, flex or filter bags, it will pull max volume at free air without any resistance. Attach filter bags and 10' of pipe to the inlet and you have added resistance. Add 20' more of pipe and so on - you increase resistance as you add more pipe and fittings. It is the dust collector's job to overcome the ductwork resistance and pull the proper amount of CFM when you open a branch or branches in a central dust collection system.