Transcription of Digital Integration Digital Impression System - …
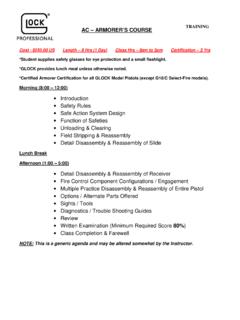
1 Digital Impression SystemIncreasedImplant Efficiency Two Visit Implant Restoration Digital Encode Impression System One-Step Implant Workflow No parts and pieces = reduced chair time Encode Healing Abutments provide essential information for abutment design and milling leading to more predictable patient outcomesiTero Delivers Outstanding Ease of Use 100% Powder Free Scanning for scanning at the time of Surgery Contact scanning eliminates cumbersome hovering and complicated specific distance scanning Single operator use allows for easy staff delegationONLY iTero Supports Comprehensive Full Function Dentistry Crown & Bridge Implants CBCT Integration Orthodontics InvisalignFor more information visit 2011 Cadent IntegrationiTero Encode Impression System Digital Implant WorkflowSTEP 1 Encode Healing Abutments placed intra-orally for scanningSTEP 4 custom abutment designed and fabricated by and exported to Cadent for model fabricationSTEP 2 Powder FREE iTero Digital Impression capturedSTEP 5 iTero models milled with custom abutment as the removable dieSTEP 3 iTero Digital Impression STL imported by dental lab into 3 Shape CADSTEP 6 Restoration fabricated by dental labEncode is a
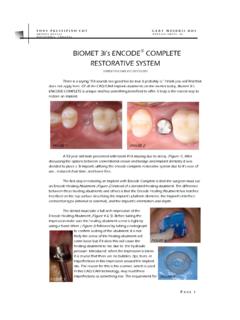
2 Registered trademark and BellaTek is a trademark of BIOMET 3i LLC. BIOMET 3i and design are trademarks of BIOMET Inc. Cadent Inc., 640 Gotham Parkway, Carlstadt, NJ 07072 Biomet 3i - MKT628 REV A 06/11 The iTero Digital Impression captures an intra-oral scan of the Encode Healing Abutments which initiates the Digital implant workflow. Embedded codes indicate the implant depth, hex orientation, platform connection and connection type (Certain Internal Connection or External Hex Connection) to design and mill the definitive abutment along with creating the iTero STL files and milled models for prosthetic creation in the dental and iTero Scan by Dr.
3 Adam Fettig, Kirkland, WALaboratory restorations fabricated by Issaquah Dental Lab, Issaquah, WASTEP 7 Restoration fit verified on milled die and abutmentSTEP 8 Custom Abutment placed STEP 9 Final restoration placed immediately following the abutment