Transcription of Digital Knight DK20 - 16x20 and DK16 - 14x16 …
1 1 Version 11-17 Digital KnightDK20 - 16x20 and dk16 - 14x16 Digital Troubleshooting.(cont.)..26. F/ C IndicatorReady/Heating IndicatorOpen/Timing/Done Bar GraphTEMP keyPRG keyUp/Down Arrow keysDefault Operating Mode of your. the. DK20. 16x20 . or. dk16 . !. This. heat. press. many. ,. which. are. meant. to. help. make. your. heat. easy. as. take. the. time. now. to. It. will. key. features,. will. save. much. time. manual,.many. areas. and. this. be. by. to. the. in. order. to. some. of. the. KnobGas ShockClamp/LinkageHeat PlatenHandleLower TableSilicone PadBase4 Setup & Suggestions Locate the press on a firm, sturdy work surface. It is recommended to bolt the press to a workbench using the rear and front mounting holes on the base frame.
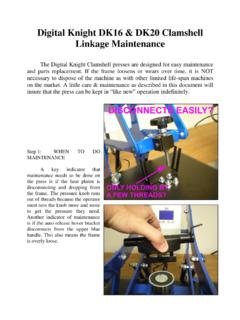
2 The clamshell presses can hop when opened abruptly, especially with the auto-release upgrade. This can cause undesireable movement of the work on the bottom table. Bolting the frame of the press to the workbench greatly reduces this. A stand on lockable casters is available from Geo Knight & Co or your distributor. The height of the bench/work space the press is located on would be ideally 27 to 32 high. The higher the press, the more difficult to close/lock. Attach the power cord from the rear to the backside of the controler. There is a power inlet on the back panel of the control box for the power cord. Make sure the power cord can not be pulled on. Make sure there is no tension on the inlet socket that the power cord plugs into The press should remain in the unclamped OPEN position when not in use. Do not leave the heater block closed on the table when not using, unless transporting.
3 Do not leave the platen down on the silicone pad when heating. Always leave the heat platen in the UP OperationNormal Operating ModeThe. press. will. the. top. the. time. right. side. the. ,.READY,. those. words,.or. none. at. all,. if. it. is. or. to. the. set. shown. only. if. the. within. 5. right. side. of. the. screen. will. also. timing. status. by. ,. the. enabled,.the. graph. will. show. ,. the. to. set. (not. the. )..Use. the. the. to. ,.press. TimeFrom. the. ,. the. set. down. either. the. Up. or. Down. for. more. than. 2. the. and. the. TimerThere. is. a. ,..This. useful. if. a. example:.If. a.
4 5. of. 20. seconds,. can. be. set. for. 5. secs,. main. timer. for. When. the. the. press,. the. When. the. the. press,. the. time. word. be. to. the. it. is. set. the. ,. the. Arrow. set. the. If. not. to. the. time,. turn. ON. the. feature,.enter. the. User. ( ). ( ) set. the. large. black. :. not. the. platen. rest. on. the. A. good. solid. is. first. doing. insure. Ka-Thunk . will. result. when..To. pressure,.turn. the. to. the. right,. top. head. will..To. pressure,. to. the. left,. top. head. will. PressureWARNING: The heat platen will become detached from the frame and drop onto the table if it is adjusted too far.
5 Please use caution when attempting to increase pressure by turning the knob to the left (unscrewing: counter-clockwise).8 The. basic. of. the. press. the. been. changed,.or. a. has. been. placed. in. the. press,. the. graph. will. not. bar. graph. is. the. pressure,.or. resistance,.being. felt. and. the. If. a. is. placed. press,. and. no. made. to. the. ,. then. will. be. greater,.and. the. bar. :A very light pressure slight clamping would be in the 0 to 3 range. A good medium pressure for most applications would be 4 to 6. Excessively high pressure for demanding items would be 7 to Pressure Bar GraphThe. DK20. and. dk16 . are. an. the. the. DK20. or. dk16 . with. auto-release,.be. sure. the. FWB.
6 ( see. page. 19). is. set. to. This. will. warn. : The magnetic device will not activate if the timer is not counting down. If the timer will not count, see page 23 for troubleshooting the come. with. a. upper. lower. the. press. in. a. resting .position,.not. fully. place,. to. the. lower. also. fully. Upgrade9 Guidelines & Standard SettingsThe following information covers some basic guidelines for pressing, as well as some generic parameters for basic heat transfer applications. When pressing shirts, it is often recommended that the shirts be quickly pressed for 2 to 4 seconds before transferring to remove wrinkles and water content. When pressing two sides of a garment, pull the garment over the table so that the printed side drapes underneath the table. This will avoid reheating previously transferred designs on opposite sides of garments.
7 It will also avoid any bleed-through of inks on lighter fabrics. Avoid laying collars, cuffs, zippers, and other bulky parts of garments on the lower table, as these can adversely affect pressing conditions, and reduce the life of the silicone pad. When pressing rigid substrates (plastics, metals, woods, etc.), be sure that any protective films or laminates are removed before heating. Always check that the transfer image is face down against the material, to avoid sealing the image against the heat platen instead of the substrate. Always follow the transfer media suppliers instructions when pressing. The information below is for general reference only, and may not be as accurate as the instructions provided by the transfer media & imprintable substrate supplier. Hot Split Supplier Transfers 350-375 F, 8-10 secs Puff Transfers 350-375 , 5-7 secs (extra heavy pressure) Ink-Jet Transfer Papers 360 , 15-18 secs ColorCopy/Laser Transfer Papers 375 , 20-25 secs Sublimation Inks (Polyester Fabrics) 400 , 35 secs Sublimation Inks (Plastics) 400 , 1 min, 15 secs Sublimation Inks (Metals) 400 , 1 min Sublimation Inks (Woods) 400 , 1 min, 15 secs Sublimation Inks (Ceramics) 400 , 4 min10 ERR the.
8 Press,. if. a. loss. of. signal. from. the. ,. the. ERR. is. a. safety. will. shut. relay. so. the. press. will. not. the. is. restored.(no. longer. broken,.or. into. the. control).the. press. will. ,. ,. AlarmIf. the. press. heats. 40. greater,. is. a. safety. warns. a. the. This. means. the. press. be. a. it. will. never. stop. heating,.to. the. sounds,.set. the. a. the. Wait. 30. then. reset. the. press. Watch. not. let. the. press. it. rise,. turn. off. the. press. and. let. it. cool. off. to. the. power. back. on. and. the. a. low. setting. like. 200 for. the. press. to. heat. When. the. READY ,. see. if. it. to.
9 A. level. that. the. If. so,. a PresetProgrammable PresetsHow Presets WorkThere. are. 70. the. a. Temperature,.Time,. ,. and. a. preset. loaded. by. the. operator,.the. ,.Time. and. (if. there. is. a. ). NOT. set. for. the. brief. the. in. the. preset. is. is. what. are. 2. main. using. the. preset. ,.and. the. where. the. preset. is. when. the. enter. the. presets,.press. the. the. to. select. a. PRG. to. the. The. Temperature,.Time. &. (if. there. is. a. that. preset).are. now. a PresetTo. edit. a. preset. and. s. values. to. ,.you. the. the. ,. press. the. SET. the. the. #. the. TEMP. The. the.
10 To. set. the. the. The. time. will. the. The. Use. the. to. set. the. Set. the. to. 00. if. only. one. to. be. used. for. that. the. The. will. Use. the. to. set. that. will. to. Bar. Graph. ,.and. will. :00. to. 10:00. the. The. screen. #.. Press. PRG. to. return. to. the. ,. or. use. the. Arrow. Keys. to. Walkthrough Tutorial for using PresetsHere. is. a. ,.and. then. using. them. in. this. 1:. ,. 2:. s. say. we. are. the. The. first. job. will. need. to. use. preset. 01,. and. later. ,. !The. press. is. now. set. for. 400 F. and. 45. will. start. to. heat. presets,.the. screen. briefly. 6. -. must.