Transcription of Digital Signing of PDF using Adobe Acrobat Reader DC - DICT
1 [Year] Digital Signing of PDF using Adobe Acrobat Reader DC PNPKI Digitally Signing PDF with Adobe Acrobat Reader DC P a g e | 1 Contents Description .. 2 Assumption: .. 2 Where to download Adobe Acrobat Reader 2 Digitally Signing PDF 3 Adding a Graphic Signature .. 6 Validating your Digital signature .. 9 Adding the PNPKI Root Certificates to Adobe s Trusted Certificates .. 9 Adding an Authoritative Timestamp .. 13 Digitally Signing PDF with Adobe Acrobat Reader DC P a g e | 2 Digitally Signing PDF with Adobe Acrobat Reader DC Description This document illustrates how to digitally sign PDF documents using Adobe Acrobat Reader DC.
2 This works for version 11 or higher Assumption: The subscriber has downloaded and installed their PNPKI Digital certificates into their windows key store. If you haven t, please follow our manual on: (1) Downloading Installation and Backup of Digital Certificates with User Generated Password using Mozilla Firefox Once you have downloaded and backed up your Digital certificates, go install them into your windows key store by following this manual: (2) How to install your certificate on to your windows key store Where to download Adobe Acrobat Reader DC Adobe Acrobat Reader DC can be downloaded from this link: ( ) Digitally Signing PDF with Adobe Acrobat Reader DC P a g e | 3 Digitally Signing PDF Documents 1.
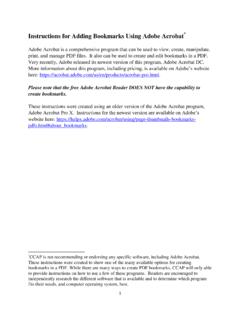
3 Once installed, open the PDF document to be signed using Adobe Reader . Next, click on the Tools menu on the upper left-hand corner. 2. Next, select the Certificates option 3. Click on the Digitally Sign Menu Digitally Signing PDF with Adobe Acrobat Reader DC P a g e | 4 4. A pop-up message will come up. You can put a check on the Do not show this message again if you do not want it to show every time you sign a document. 5. Click and drag on your mouse to draw a rectangle over the area you want your Digital signature to appear. When you finish drawing the rectangle, the Sign with a Digital ID dialogue box appears.
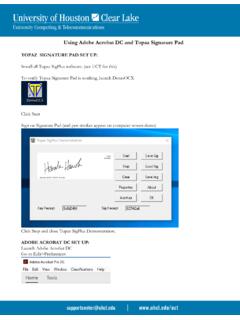
4 6. Make sure the one that says Issued by Gov- Signing CA is selected. Next, click on Continue Digitally Signing PDF with Adobe Acrobat Reader DC P a g e | 5 7. The Sign As window will open. The default Appearance will be Standard Text. Click on Sign 8. Adobe will then ask you to save the document. We recommend adding the word Signed so you will know that it is the signed document plus you get to keep the unsigned copy of the file. Click on Save to save the file. Digitally Signing PDF with Adobe Acrobat Reader DC P a g e | 6 9.
5 Your Digital signature should now appear on the document like this: Adding a Graphic Signature For most people, the standard appearance is not their preference and would like to see an image of their actual signature. So here are the steps to do so. 1. Follow the same steps 1-6 above 2. At the Sign As window, click on the Create button. Digitally Signing PDF with Adobe Acrobat Reader DC P a g e | 7 3. The Customize the Signature Appearance window will open. I. Click on Image II. Click on Browse and go to where you have saved a copy of your electronic signature (must be in PDF format) III.
6 Select the file you want then click on Open Digitally Signing PDF with Adobe Acrobat Reader DC P a g e | 8 IV. Enter the preset name you want then click on Save 4. It will bring you back to the Sign As window. Just click on Sign 5. Adobe will ask you to save the file. Again, we suggest saving it with a different file name so you will keep a copy of the unsigned file. That s it. You re done. Digitally Signing PDF with Adobe Acrobat Reader DC P a g e | 9 Validating your Digital signature Double click on the Digital signature to validate.
7 If you get the error that the signature has problems, this is because you need to add the PNPKI Root Certificates in Adobe s Trusted Certificates Adding the PNPKI Root Certificates to Adobe s Trusted Certificates Note: This process only needs to be done one time. 1. Double click on the Digital initialize a validation process. You will get this message window. Click on the Signature Properties button Digitally Signing PDF with Adobe Acrobat Reader DC P a g e | 10 2. The Signature Properties dialogue box will appear. Click on the Show Signer's Certificate button 3. Next at the Certificate Viewer window, on the left-hand panel, highlight the topmost option, which should say Philippine Root CA.
8 Click on the Trust tab. Digitally Signing PDF with Adobe Acrobat Reader DC P a g e | 11 4. Every item under Trust Settings will appear to have an X on them. Simply click the Add to Trusted Certificates button. 5. An Acrobat Security warning window will appear. Just click on OK Digitally Signing PDF with Adobe Acrobat Reader DC P a g e | 12 6. At the Import Contact Settings window, put a check on Certified Documents, check on all the three options under it, then click OK 7. Lastly, back at the Certificate Viewer window, click on OK to finish Digitally Signing PDF with Adobe Acrobat Reader DC P a g e | 13 8.
9 When you click on your signature again to revalidate, it should now show that the signature is valid. Adding an Authoritative Timestamp What is Time Stamping? By default, normal Digital Signing uses the time on the signer s computer as the time and date when the signature was applied. This makes it possible to fake the actual time the signature was applied. If you want to know when the document was really signed, Timestamping is needed. It is done to include the time and date from an authoritative time source to a digitally signed document. Note: Since Timestamping will be getting the actual time and date from an authoritative time source, you will need to have internet access on your computer to do this when applying your Digital signature.
10 Digitally Signing PDF with Adobe Acrobat Reader DC P a g e | 14 1. Once installed, open a PDF document using Adobe Reader . Next, click on the Tools menu on the upper left hand corner. 2. Next select the Certificates option 3. Click on the Time Stamp Menu Digitally Signing PDF with Adobe Acrobat Reader DC P a g e | 15 4. The Choose Default Timestamp Server window will come up. Click on the New menu 5. Enter PNPKI Timestamp Server for the Name. For the Server URL, enter (must be exact) :8442/signserver/tsa?workerName=TimeStam pSigner.