Transcription of Do not connect the printer to your computer ... - Boca Systems
1 1 1065 South Rogers Circle Boca Raton, FL 33487 Phone (561) 998-9600 Fax (561) 998-9609 Windows Driver Installation Guide Do not connect the printer to your computer s USB port until advised to. Please contact your software provider to confirm if the use of our driver is required for their ticketing software. We recommend that the print driver is installed by either your system administrator or IT support staff. These print drivers are intended to be installed on Windows PC platforms X86, AMD64 or IA64. This includes Windows 7, , 10 and Server 2012 R2. To properly install the Boca Systems printer drivers, version , follow the steps outlined below. If you currently have another version of a BOCA print driver installed, start at step #1 to uninstall it first. If this is the first time installing the BOCA driver onto the host computer then start at step #4. On the host computer you are installing the drivers on you will want to make sure you have the following: Administrate privileges as most Windows Systems require this do download drivers.
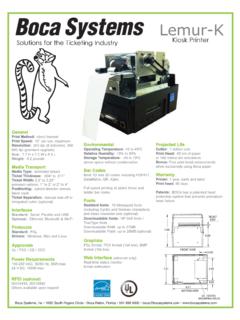
2 Access to the internet as the host computer will need to gain access to the Microsoft website to download the necessary drivers. 1. Turn off the BOCA printer . 2. Go to the Devices and Printers window. In the below image there is one BOCA driver currently installed via its default name. 3. Right click on the driver icon and then click on Remove Devices . You will be prompted with Are You Sure , select Yes. If there is more than one BOCA print driver icon then repeat this step until all are removed. 2 4. Click on the link below to download the zip file to your host computer . You will be prompted if you want to Open, Save or Save as. Click on Save as and save the file to your hard drive. You will need to denote what file folder you saved the file to. 5. Go to the file folder you saved the zip file to and right click on Click on Extract It will ask you to select a Destination and Extract Files, click on the Extract button.
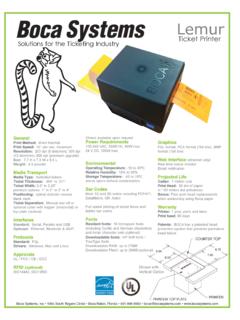
3 6. The file folder that was extracted will automatically pop up. Double click on the BocaPrintDrivers folder to open it up. Right click on and click on Run as administrator. 7. You will see two DOS command windows open. The first will be looking for an older version of file to delete so it may be replaced with new ones once the complete install process is done. The spooler will be stopped while the file is being deleted and will restart. If the PC does not have this file, a message will be displayed File not found . This is nothing to worry about as said file did not reside on the PC. 3 8. The second DOS command window will open to install the printer files as shown below. Notice the message Driver Package added successfully . This is how it is displayed on a 64 bit Windows PC. Press Enter key to close DOS command windows. On a 32 bit Windows PC it will look more like the below.
4 Click the Next button and Finish button when prompted to complete the install of the driver package onto the PC. NOTE: IF INSTALLING ON WINDOWS 8 OR 10 GO TO PAGE 9. The below steps are for Windows 7 operating system only. 1. connect the USB cable to the host computer and power on the printer . If you are connecting to the printer via Ethernet or Wi-Fi then skip to step # 4. 2. Depending on your system , a notice box similar to the following picture should appear. Click on the Click here for status. This will enable to see the status of the driver software installation. 3. The correct USB Printing Support and drivers will automatically install. The image below is of a 200dpi driver being installed on a Windows 7 system . The driver name will vary due to the printer s DPI and logic board level. Go to Page 7. 4 STEPS 4 THROUGH 15 ARE FOR ETHERNET OR WI-FI CONNECTION ONLY 4.
5 The self-test ticket that is printed when the printer s TEST button is pressed will show the IP address that the printer has. 5. Open up the Devices and printer Menu. 6. Click on Add a printer . When Add printer Wizard show up, click on the Next button. Click on Add a local printer . 7. When the printer port menu comes up. Click on Create a new port: choose Standard TCP/IP Port . Click on the Next button. 8. Type in the IP address that is shown on the self-test ticket in the Hostname or IP address: field. When typing in the address don t include the leading zeroes (If IP= then type in ). You also have the option of typing in a specific Port name or leave as the IP address. Click on the Next button. The below screen may be seen (no action is needed). It may take a few minutes for the system to move on to the next screen. This will vary depending on system and Network speeds.
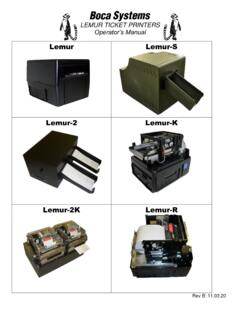
6 5 9. When the Additional Port information menu comes up click on the Next button. 10. When the Install print driver menu comes up: Under Manufacturer select Boca . Under Printers select the driver that matches your printer s protocol (FGL or PCL) and DPI. Click on the Next button. Taking a look at the printer s serial number tag the below chart should aid in determining the correct driver to select. Self-Test ticket is printed by pressing the printer s TEST button. Above is a typical FGL self-test ticket Above is a typical PCL self-test ticket 11. When the version driver menu comes up click on the Next button. Driver DPI Firmware PCL listed Boca BIDI FGL 22/42 200 DPI 200 22 or 42 NO Boca BIDI FGL 24/44 200 DPI 200 24 or 44 NO Boca BIDI FGL 26/46 200 DPI 200, 2C 26 or 46 NO Boca BIDI FGL 22/42 300 DPI 300 22 or 42 NO Boca BIDI FGL 24/44 300 DPI 300 24 or 44 NO Boca BIDI FGL 26/46 300 DPI 300 26 or 46 NO Boca PCL 22/42 300 DPI 300 22 or 42 YES Boca PCL 24/44 300 DPI 300 24 or 44 YES Boca PCL 26/46 300 DPI 300, 26 or 46 YES 6 12.
7 When the printer name menu comes up you may keep the default name or type in a different name. We recommend you keep the default name. Click on the Next button. your driver name will vary from what is shown in the above image 13. When the printer Sharing menu comes up you may choose to share this printer or not. Click on the Next button. 14. On the last menu you have the option to choose if you want to make the BOCA your default printer . Do not click on Print a test page. Click on the Finish button. your driver name will vary from what is shown in the above image 15. The next page reviews how to print a windows test page to confirm the driver is communicating with the printer . 7 Windows 7 Test Page The following will guide you through doing a Windows test page to confirm the driver is communicating with the printer . You will want to make sure the printer has stock loaded and is able to print a self-test ticket when the TEST button is pressed.
8 The printing of this ticket confirms that the printer is working properly mechanically. If the printer is not able to print a self-test ticket, then consult the Installation section of the user manual ( ). 1. Go to the Devices and Printers page. 2. When the Devices and Printers page comes up, right-click on the BOCA driver that is being used. When the drop down window pops up, left click on printer properties. your selection of driver will vary from what is shown in the below images. 3. Once the driver s properties menu comes up click on the Print Test Page button. your drive properties will vary from what is shown in the below. 8 4. The printer should proceed with printing out a Windows Test page. The printing of this ticket confirms the print driver is communicating with the printer . Below are some samples printouts for reference only and your test page may look different.
9 Above is from a 200 DPI FGL printer with 2 x stock Above is from a 300 DPI FGL printer with x stock If you were not able to install the BOCA print driver using the above steps, please take a screenshot of the printers and drivers dialog and attach it to the support form located at 9 Windows 8 and 10 Install Guide Do not connect the printer to your computer s USB port until advised to. 1. connect the USB cable to the host computer and power on the printer . If you are connecting to the printer via Ethernet or Wi-Fi then skip to step # 4. 2. Depending on your system , a notice box similar to the below picture may appear. Click on the Click here for status (for Windows 7) or the icon (for Windows 8 or 10). This will enable to see the status of the driver software installation. 3. The correct USB Printing Support and drivers will automatically install.
10 The image below is of a 300dpi driver being installed. The driver name may vary due to the printer s DPI and logic board level. Go to page 13 to print a Windows test page. STEPS 4 THROUGH 13 ARE FOR ETHRENT OR WI-FI CONNECTION ONLY. 4. The self-test ticket that is printed when the printer s TEST button is pressed will show the IP address that the printer has. 5. Below is one of many ways to get to the devices and printers menu. 1- Right-click the bottom corner of the Start screen. 2- Click All apps icon. 3 Click Control Panel. 6. When the Control Panel menu comes up, click on View devices and printers located under Hardware and Sound. Click on this icon 10 7. Open up the Devices and printer Menu. Click on Add a printer to run the install wizard. Click on The printer I want isn t listed . When the find a printer by other option menu comes up. Click on Add a printer using a TCP/IP address or hostname , click on the Next button 8.