Transcription of DuPont Performance Building Solutions Air Barrier ...
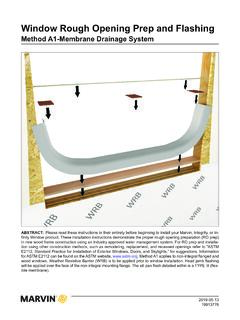
1 DuPont Performance Building SolutionsAir Barrier Installation Detail: Top And Bottom Of Wall InterfaceMethods 1 & 2 This installation bulletin is intended for use when installing DuPont tyvek WRBs at the top and bottom of wall interfaces and should be used with the DuPont tyvek Water-Resistive and Air barriers Installation Guidelines For Buildings Less Than 5 Stories and Low-Rise Multi-Family Residential Buildings Less Than 6 Stories. All installation requirements, including air Barrier specific requirements from the Installation Guidelines must be followedTop of Wall Interface Method 1 DuPont tyvek WRBT yvek WRBS ecure and SealTyvek WRB ConnectionSecure and SealTyvek WRB ConnectionTo ensure continuity of the air Barrier membrane from the top of the wall to the interior.
2 Install the tyvek WRB as shown Install the tyvek WRB onto the face of the wall according to the DuPont tyvek Water-Resistive and Air barriers Installation Guidelines For Buildings Less Than 5 Stories and Low-Rise Multi-Family Residential Buildings Less Than 6 Install the last course of the tyvek WRB as shown above so it extends beyond framing into interior of wall with adequate length so it can be overlapped by layer of tyvek WRB at Seal all horizontal seams with DuPont tyvek of Wall Interface Method 1 Secure and SealDuPont tyvek homewrap ConnectionFirst FloorTo ensure continuity of the air Barrier membrane from the bottom of the wall into the interior, install the tyvek WRB as shown above.
3 Use Method 2 for slab on grade Install starter course of the tyvek WRB so it extends into the interior and onto the vertical face of the After installation of wall framing and sheathing, fasten the tyvek WRB onto the face of the wall according to the DuPont tyvek Air and Water-Resistive Barrier Installation Seal the the tyvek WRB at the interior foundation using DuPont Residential Sealant (or recommended sealant), DuPont StraightFlash , or DuPont Flashing Tape. When sealing directly to concrete, wood, or other rough surfaces using DuPont Self-Adhered Products, use DuPont Adhesive/Primer (or recommended primer).
4 4. Continue installation of the DuPont tyvek WRB onto face of wall according to the DuPont tyvek Water-Resistive and Air barriers Installation Guidelines For Buildings Less Than 5 Stories and Low-Rise Multi-Family Residential Buildings Less Than 6 Seal all horizontal seams with DuPont tyvek Barrier Installation Detail: Top And Bottom Of Wall Interface Method 2q1. Apply DuPont Residential Sealant, or recommended sealant, along the top/bottom of the wall approximately 2 to 3 from the edge.
5 Press the tyvek WRB into the sealant using firm hand pressure or a J-roller. This will temporarily hold the tyvek WRB in place in prior to step Fasten the tyvek WRB to the studs as instructed in the DuPont tyvek Water-Resistive and Air barriers Installation Guidelines For Buildings Less Than 5 Stories and Low-Rise Multi-Family Residential Buildings Less Than 6 Considerations Use > 1/4 inch bead of DuPont Residential Sealant. Use J-Roller or firm hand pressure over sealant interface to improve bond between tyvek WRB and wood framing.
6 Check with sealant manufacturer to ensure compatibility with both substrate and tyvek WRB. Follow DuPont tyvek Water-Resistive and Air barriers Installation Guidelines For Buildings Less Than 5 Stories and Low-Rise Multi-Family Residential Buildings Less Than 6 Stories, including, but not limited to: Proper overlap of the tyvek WRB. Proper installation and spacing of fasteners. Proper sealing of all tyvek WRB seams using tyvek Tape. Use 3 tyvek Tape for both vertical and horizontal seams of DuPont tyvek StuccoWrap and DuPont tyvek DrainWrap.
7 Repair any areas of damage to the tyvek WRB. Proper sealing of all penetrations made to the tyvek more information about DuPont Performance Building Solutions , please call 1-800-448-9835 or visit us at 2020 DuPont . DuPont , the DuPont Oval Logo, and all trademarks and service marks denoted with , or are owned by affiliates of DuPont de Nemours, Inc. unless otherwise