Transcription of Editing MIDI In Reaper - Steven Trimmer
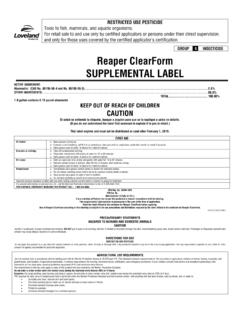
1 !1 Editing midi In Reaper !Once you have recorded a midi performance there are many tools available to help you shape the recorded data. Some of the parameters that can be changed are the note timing, velocity, and pitch. In fact, many parameters of virtual instruments can be edited and automated after your performance. This tutorial will get you started with Editing . !The picture below is of a midi clip that was saved after my last recorded performance. It s important to remember that this clip contains no actual audio. midi clips contain data about a performance that can be sent to other sound generating devices, such as the TX16WX sampler. 16 Channels of midi data can be sent simultaneously through one midi cable or routed through your DAW. !!!!!2 Dragging from left to right in the area above the recorded region creates a loop. Try selecting a region and looping playback by turning on the global loop button (the circular arrow symbol just to the right of the global record button).
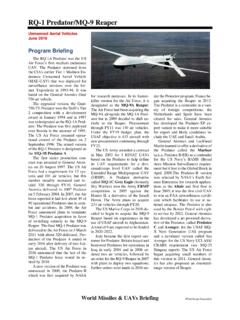
2 If you double click on the midi clip in the arrange window a midi edit window with a piano roll pops up. In the picture below you can see the loop in both the arrange window and in the midi edit window. To edit this selection we want to make it into it s own discreet loop. After you ve made your selection on the time line, look under the Item menu and select Split Item at Time Selection. !3 You can zoom into the selection by pressing the + key. You can zoom out by pressing the - key. When I zoom in on some of the notes I recorded I can see that they are not in time with the grid. !Sometimes this might add to the groove or human musicality of our performance, but on many occasions we ll want to correct the timing so that it falls in line with the grid that follows the tempo we re using. Correcting the timing by moving notes into place on the grid is called Quantization. To start the process of quantizing our performance we ll need to select the notes we want to move onto the grid.
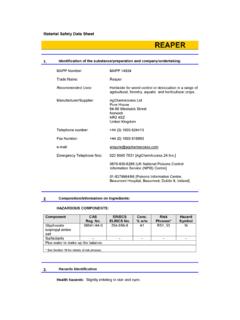
3 !There are many ways to select notes. Clicking a single note makes it a selection. Shift or Ctrl/Cmd clicking other notes will add to this selection. Ctrl/Cmd clicking a selected note will deselect it. Command A selects all notes in the midi clip. !!4!Some versions of Reaper have the following added selection abilities: -Right click and drag to select a range of notes with the lasso. -Right click one of the piano keys on the left side to select all of midi data corresponding to that key. !Selecting notes also selects corresponding Velocity and CC values. !Once your notes are selected, look for the small Q above the piano keys in the midi edit window. Pressing the Quantize button brings up a dialogue asking how you would like to quantize the selection. Position and Note End will make notes of regular duration that start in place on the grid. The quantization resolution for the grid matches the proportion for the Note resolution (pictured at 1/16 below).
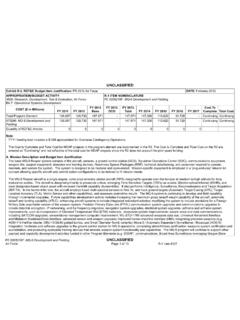
4 !!!!!!5!If you want to automatically quantize incoming notes to the grid as they are recorded you can do this by setting up Auto Quantize. Start by looking for the small grey In Out box next to the green speaker (monitor) button on the channel you want to record to. You may need to drag the lower edge of the channel box down in the arrange window to make the In Out window visible. Command Click on the grey In Out box and select Track Recording Settings. !!Turn on Quantize Track midi Recording and set the resolution to auto quantize incoming midi data to the grid. !6 Next, let s try drawing some new notes with the pencil tool. Hover the pencil tool over the area where you would like to place a note. Double click to add a note to the performance. Holding Option Command lets you paint notes with a paintbrush tool. Let s try copying the pattern we just added to a new key. This can be used to great effect when programming rhythms.
5 Select the notes you just drew and hold down Command while dragging them to a new location on the keyboard. This copies patterns from one voice to another. Another way to copy / paste notes is by using Command C to copy and Command V to paste. !7 Next, let s edit some velocities. This will get you familiar with how flexible and nondestructive midi Editing can be. Select some of your notes on the piano roll. Next, select Velocity from the drop down menu just below the piano keys. The vertical bars that show up under the notes represent the values we will be Editing . Drag the bars up or down to either raise or lower velocities. !!!!!!!!!!!!!8 Back in the arrange window, you can use Command C to copy and Command V to paste your loop. Try making multiple copies that repeat one after another. !!Glue clips together by selecting Glue Item under the Item Menu. !9!Setting Up Sends and Receives !While there are times you may want to add effects directly to the audio channel your working with, it is often useful to use a send channel for effects.
6 This allows the original signal and the effected signal to be processed separately and routed to the master output. One possible use that is quite common is setting up a reverb send. The reverb can be EQed and treated with dynamic effects separately from the original signal, thus you can exercise greater control over it s sonic footprint in the final mix. !Start by creating a new track that will serve as your reverb send. Select Insert New Track at End of Track List from the Track menu. !!!!10 Add a reverb effect to the new send track by clicking on it s FX button and selecting a reverb VST or AU. The send I just created was on track #14, so this is the FX button I look to engage in the mixer. The reverb effect I want to use is under AU : Apple : AUMatrixReverb. !Drag the Dry / Wet slider to the far right to make the send channel entirely wet with reverb. I can return to this window in a moment to further tweak the reverb parameters.
7 First, I need to route audio through the send !11To send an audio signal through the new send track, start by clicking the I/O button in the mixer for the channel you want to send. Select the drop down menu Add New Send and scroll to the track number of the send you just created. In my example, the reverb send is on track #14. !12In the picture below, I can see that the audio is now being routed from my new send and into the reverb channel. For future reference, this is also where midi data is routed from. The menu Post Fader / Post Pan has options available in case you want to process the signal in the mixer and have the original un-effected signal routed to the reverb. This can be useful for keeping the volume of the channel mixer independent of the volume of the send. !!!Try using some other effects on the send track. Distortion, Bit Reduction, Compression, Delay; all can be interesting tools in your journey as a sonic landscape painter.
8 I particularly enjoy using filters to create sounds that remind me of the worn cassettes I grew up with. Make some changes and see how those changes make you feel. We ll cover different effects, routing, and automation in future tutorials. !Contact Steven Trimmer , TA for Laptop Music MUSC80Z.