Transcription of English Fitting Instructions: Bonneville, Bonneville …
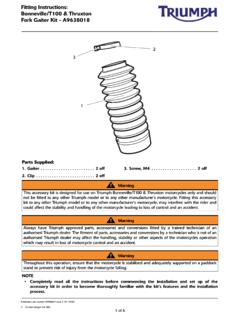
1 1 of 4 EnglishPublication part number A9900150 issue 7, DC 72182 Triumph Designs Ltd. 2015 Fitting instructions : Bonneville , Bonneville T100, thruxton , America and SpeedmasterA9758042 and A9758048 Thank you for choosing this Triumph genuine accessory kit. This accessory kit is the product of Triumph's use of provenengineering, exhaustive testing, and continuous striving for superior reliability, safety and read all of these instructions before commencing the installation of the accessory kit in order to becomethoroughly familiar with the kit s features and the installation instructions should be considered a permanent part of your accessory kit, and should remain with it even if youraccessory-equipped motorcycle is subsequently bar, left hand1 off , M121 bar, right hand1 off control plate fixing, America and Speedmaster only1 , M12 x 172 mm, America and Speedmaster only1 off bracket, Bonneville /T100 and thruxton only1 , M12 x 135 mm, Bonneville /T100 and thruxton only1 off reflector, US market, Bonneville /T100 and thruxton only2 off1235catz64782 of and support the motorcycle on a a suitable jacking device.
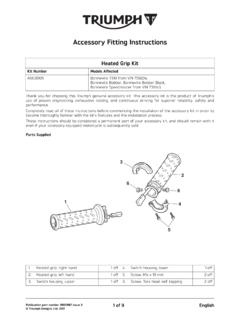
2 Support the twincradle bars beneath the and the clevis pin from the right hand the footrest and associated components,noting their positions prior to the bolt securing the right hand foot controlplate assembly to the mounting disturbing the brake hydraulics, detach thefoot control mounting plate and rear brake mastercylinder assembly and support the assembly toprevent damage to the brake , Bonneville T100 and the two electrical connectors from the hornand unscrew the mounting bracket from the US market bikes only, remove the reflectormounting bracket together with the two reflectors. Fita curved back reflector supplied with the kit to eachfork leg. Position each reflector as shown in theillustration R e f l e c t o the centre nut and remove the bracket fromthe accessory kit is designed for use on TriumphBonneville, Bonneville T100, thruxton , America andSpeedmaster motorcycles only and should not be fittedto any other Triumph model or to any othermanufacturer s motorcycle.
3 Fitting this accessory kit toany other Triumph model, or to any othermanufacturer s motorcycle, may interfere with the riderand could affect the handling, stability or other aspectsof the motorcycle's operation, which may result in loss ofmotorcycle control and an have Triumph approved parts, accessories andconversions fitted by a trained technician of anauthorised Triumph dealer. The fitment of parts,accessories and conversions by a technician who is notof an authorised Triumph dealer may affect thehandling, stability or other aspects of the motorcycle soperation, which may result in loss of motorcycle controland an this operation, ensure that the motorcycle isstabilised and adequately supported on a paddock standto prevent risk of injury from the motorcycle torque wrench of known accurate calibration must beused when Fitting this accessory kit.
4 Failure to tightenany of the fasteners to the correct torque specificationmay result in loss of motorcycle control and an mm3 of the bracket assembly as shown andreplace the original bracket with the new bracketfrom the Assembly10. Assemble the new bracket to the horn such that,when fitted to the frame of the bike, the bracket is inthe position shown B r a c k e t11. Tighten the centre nut to Refit the horn and bracket to the frame in theposition shown above and re-connect the twoelectrical connectors to the horn. Tighten the hornbracket fixing to 18 N Check the operation of the horn. When the hornbutton is pressed, the horn must sound with a clear,even tone. When the horn button is released, thesound must Models14. Working from the right hand side of the motorcycleremove the front lower engine mounting bolt andlocknut.
5 Collect the spacer from the left hand side asthe bolt is Discard the bolt and Right hand dresser bar2. Engine mounting bar, M12 X 172 mm - America and Speedmaster M12 X 135 mm - Bonneville /T100 and Thruxton16. Position the right hand dresser bar to the enginemounting point and insert the replacement enginebolt through the dresser bar, frame, engine Position the left hand dresser bar to the end of theM12 bolt and loosely fit the new M12 Loosen the two left hand cradle mounting bolts untilthe rear back plate becomes Partially withdraw the two left hand cradle mountingbolts and rotate the left-hand dresser bar Cradle mounting bolts2. Left-hand dresser bar20. Re-fit the two cradle mounting bolts locating thedresser bar and the back plate. Tighten to 55 Repeat this procedure for the right hand dresser Tighten the M12 engine mounting bolt to 80 of 4 America and Speedmaster23.
6 Position the right hand foot control plate to themounting bar and secure with the new bolt suppliedwith the kit. Tighten to 55 Refit the footrest ensuring all components arelocated as noted prior to removal. Ensure the footrestis free to pivot upwards against the force of thereturn spring. Also ensure that the 'C' clip is securelylocated at the lower end of the footrest pivot ModelsWarningAfter Fitting the dresser bar, the motorcycle will exhibitnew handling characteristics. Operate the motorcycle ina safe area free from traffic to gain familiarity with anynew handling characteristics. Operation of themotorcycle when not familiar with any new handlingcharacteristics may result in loss of control of themotorcycle, leading to an accidentWarningIf, after fitment of this accessory kit, you have any doubtabout the performance of any aspect of the motorcycle,contact an authorised Triumph dealer and do not ridethe motorcycle until the authorised dealer has declaredit fit for use.
7 Riding a motorcycle when there is anydoubt as to any aspect of the performance of themotorcycle may result in loss of control of themotorcycle, leading to an ride an accessory-equipped motorcycle at speedsabove 80 mph (130 km/h). The presence of accessorieswill cause changes in the stability and handling of themotorcycle. Failure to allow for changes in motorcyclestability may lead to loss of control or an that the 80 mph (130 km/h) limit will bereduced by the Fitting of non-approved accessories,incorrect loading, worn tyres, overall motorcyclecondition and poor road or weather motorcycle must not be operated above the legalroad speed limit except in closed-course operate this Triumph motorcycle at high speed inclosed-course on road competition or on closed-courserace tracks. High speed operation should only beattempted by riders who have been instructed in thetechniques necessary for high speed riding and arefamiliar with the motorcycle s characteristics in allconditions.
8 High speed operation in any othercircumstances is dangerous and will lead to loss ofmotorcycle control and an accident.