Transcription of Experiment 1: Equipotential Lines and Electric Fields
1 MASSACHUSETTS INSTITUTE OF TECHNOLOGY Department of Physics Spring 2006 Experiment 1: Equipotential Lines and Electric Fields OBJECTIVES 1. To develop an understanding of Electric potential and Electric Fields 2. To better understand the relationship between equipotentials and Electric Fields 3. To become familiar with the effect of conductors on equipotentials and E Fields PRE-LAB READING INTRODUCTION Thus far in class we have talked about Fields , both gravitational and Electric , and how we can use them to understand how objects can interact at a distance. A charge, for example, creates an Electric field around it, which can then exert a force on a second charge which enters that field. In this lab we will study another way of thinking about this interaction through Electric potentials. The Details: Electric Potential (Voltage) Before discussing Electric potential, it is useful to recall the more intuitive concept of potential energy, in particular gravitational potential energy.
2 This energy is associated with a mass s position in a gravitational field (its height). The potential energy difference between being at two points is defined as the amount of work that must be done to move between them. This then sets the relationship between potential energy and force (and hence field): ()G =UUBdUBA U= GFs d in 1DF= (1) Adz We earlier defined Fields by breaking a two particle interaction, force, into two single particle interactions, the creation of a field and the feeling of that field. In the same way, we can define a potential which is created by a particle (gravitational potential is created by mass, Electric potential by charge) and which then gives to other particles a potential energy.
3 So, we define Electric potential, V, and given the potential can calculate the field: () = GVVBGdVBA V= Es d in 1DE= . (2) Adz Noting the similarity between (1) and (2) and recalling that F = qE, the potential energy of a charge in this Electric potential must be simply given by U = qV. E01-1 When thinking about potential it is convenient to think of it as height (for gravitational potential in a uniform field, this is nearly precise, since U = mgh and thus the gravitational potential V = gh). Electric potential is measured in Volts, and the word voltage is often used interchangeably with potential. You are probably familiar with this terminology from batteries, which maintain fixed potential differences between their two ends ( 9 V in 9 volt batteries, V in AAA-D batteries).
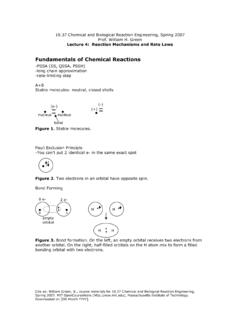
4 Equipotentials and Electric Fields When trying to picture a potential landscape, a map of Equipotential curves curves along which the potential is equal can be very helpful. For gravitational potentials these maps are called topographic maps. An example is shown in Fig. 1b. (a) (b) Figure 1: Equipotentials. A potential landscape (pictured in 3D in (a)) can be represented by a series of Equipotential Lines (b), creating a topographic map of the landscape. The potential ( height ) is constant along each of the curves. Now consider the relationship between equipotentials and Fields . At any point in the potential landscape, the field points in the direction that a mass would feel a force if placed there (or that a positive charge would feel a force for Electric potentials and Fields ).
5 So, place a ball at the top of the hill (near the center of the left set of circles in the topographic map of Fig. 1b). Which way does it roll? Downhill! But what direction is that? Perpendicular to the Equipotential Lines . Why? Equipotential Lines are Lines of constant height, so moving along them at all does not achieve the objective of going downhill. So the force (and hence field) must point across them, pushing the object downhill. But why exactly perpendicular? Work done on an object changes its potential, so it can take no work to move along an Equipotential line. Work is given by the dot product of force and displacement. For this to be zero, the force must be perpendicular to the displacement, that is, force (and hence Fields ) must be perpendicular to equipotentials.
6 Note: Potential vs. Potential Difference Note that in equation (2) we only defined V, the potential difference between two points, and not the potential V. This is because potential is like height the location we choose to call zero is completely arbitrary. In this lab we will choose one location to call zero (the ground ), and measure potentials relative to the potential at that location. E01-2 APPARATUS 1. Conducting Paper Landscapes To get a better feeling for what Equipotential curves look like and how they are related to Electric field Lines , we will measure sets of Equipotential curves for several different potential landscapes. These landscapes are created on special paper (on which you can measure Electric potentials) by fixing a potential difference between two conducting shapes on the paper.
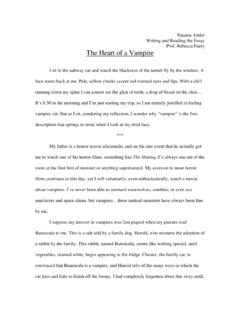
7 For reasons that we will discuss later, these conducting shapes are themselves Equipotential surfaces, and their shape and relative position determines the Electric field and potential everywhere in the landscape. One purpose of this lab is to develop an intuition for how this works. There are four landscapes to choose from (Fig. 2), and you will measure equipotentials on two of them (one from Fig. 1a, b and one from Fig. 1c, d). (b) (a) (c) (d) Figure 2 Conducting Paper Landscapes. Each of the four landscapes the standard (a) dipole and (b) parallel plates, and the non-standard (c) bent plate and (d) filled plates consists of two conductors which will be connected to the positive (red) and ground (blue) terminals of a battery. In (d) there is an additional conductor which is free to float to whatever potential is required.
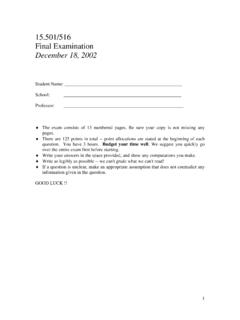
8 The pads are painted on conducting paper with a 1 cm grid. 2. Science Workshop 750 Interface In this lab we will use the Science Workshop 750 interface (Fig. 3) both to create the potential landscapes (using the OUPUT connections that act like a battery) and to measure the potential at various locations in that landscape using a voltage sensor (see below). There are two connections to the output, just like there are two sides of a battery. E01-3 The one marked with a sin wave is the positive terminal and the one marked with a triangle (the ground symbol ) is the negative terminal. The potential of this terminal is what we will call zero. We will set the potential difference between the two to 5 V. ChannelA Battery Figure 3 The Science Workshop 750 Interface. 3. Voltage Sensor In order to measure the potential as a function of position we use a voltage sensor (Fig.)
9 4). One side of the sensor plugs into Channel A on the 750, the other has two leads, red and black. When the 750 records the potential, it really measures the potential difference between the two leads, the potential at the red lead minus that at the black lead. Figure 4 Voltage Sensor GENERALIZED PROCEDURE For each of the two landscapes that you choose, you will find at least four Equipotential contours by searching for points in the landscape at the same potential using the voltage sensor. After recording these curves, you will draw several Electric field Lines , making use of the fact that they are everywhere perpendicular to Equipotential contours. END OF PRE-LAB READING E01-4 Expt. 1: Equipotential Lines and Electric Fields Pre-Lab Questions Answer these questions on a separate sheet of paper and turn them in before the lab 1.
10 Equipotentials Curves Reading Topographic Maps Below is a topographic map of a mi square region of San Francisco. The contours shown are separated by heights of 25 feet (so from 375 feet to 175 feet above sea level for the region shown) From left to right, the NS streets shown are Buchanan, Laguna, Octavia, Gough and Franklin. From top to bottom, the EW streets shown are Broadway, Pacific, Jackson, Washington, Clay (which stops on either side of the park) and Sacramento. (a) In the part of town shown in the above map, which street(s) have the steepest runs? Which have the most level sections? How do you know? (b) How steep is the steepest street at its steepest (what is its slope in ft/mi)? (c) Which would take more work (in the physics sense): walking 3 blocks south from Laguna and Jackson or 1 block west from Clay and Franklin?