Transcription of Experiment 4 ~ Resistors in Series & Parallel
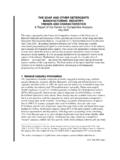
1 Experiment 4 ~ Resistors in Series & Parallel Objective: In this Experiment you will set up three circuits: one with Resistors in Series , one with Resistors in Parallel , and one with some of each. You will be building circuits similar to the ones you will be working with in homework and exam problems. This Experiment should show you the difference between Resistors in Series and Parallel . If you understand what we are doing in this Experiment , you will be all set to do well on the midterm questions about circuits! Equipment: Resistors (R1 = k , R2 = k , and R3 = k ), multimeter, and DC power supply. Theory: In the first part of this Experiment we will study the properties of Resistors , which are connected in Series . Figure 1 shows two Resistors connected in Series (a) and the equivalent circuit with the two Resistors replaced by an equivalent single resistor (b), as we discussed in the lecture.
2 Remember from lecture that, when Resistors are connected in Series , each one sees the same current. Recall the water analogy: If you have two pipes that have different diameters but are connected in Series and you send water through them, each receives the same amount of water, there are no branches into which the water can split. In lecture, we showed that the equivalent resistance for Resistors in Series is Req = R1 + R2. Of course, this equation can be extend to any number of Resistors in Series , so that for N Resistors the equivalent resistance is given by Req = Ri (for i=1,2,3,..,N) or Req = R1 + R2 + R3 + .. + RN. (a) The actual circuit. (b) The equivalent circuit Figure 1. Resistors connected in Series . You (hopefully!) remember from lecture this isn't the only way to hook up Resistors in a circuit. In the second part of this lab we'll hook them together as in Figure 2.
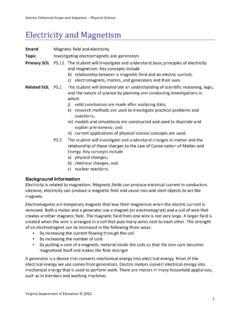
3 We say these Resistors are connected in Parallel . In Series they were connected one after the other, but in Parallel , as the name suggests, they are 'side by side' in the circuit. When Resistors are in Parallel , the current flowing from the battery will come to a junction where it has a choice as to which branch to take. Therefore, they see different amounts of current, just the way water branching into two different pipes will flow more through the larger pipe (lower resistance) than through the narrower pipe (greater resistance). Resistors in Parallel see different currents, but they each experience the same potential difference (voltage). In lecture, we used this property of Resistors in Parallel to derive an equation for calculating the equivalent resistance. In this case, the equation is a bit more complicated than for Resistors in Series .
4 Instead of the resistances adding directly, we calculate 1 Req = 1R1 + 1R2 It s important to remember that after you do this calculation, you will have gotten 1/Req. You have to flip that over in order to get Req! Here s an example: If we have R1 = 270 and R2 = 330 we would find Req as follows: 1 Req = 1R1 + 1R2 = 1270 + 1330 = .0037037 -1 + .003030 -1 = .006734 -1 So, Req 148 We can generalize this equation to any number of Resistors , just the way we did for Resistors in Series . As in the case for Series we can generalize this law to any number of Resistors : = Figure 2: Two Resistors in Parallel The Experiment Part 1 1. Take three Resistors . Measure the resistance of each resistor individually using the ohmmeter ( , the multimeter). Record the values in Data Table 1. 2. Determine the resistance of each resistor , using the resistor Color Code Chart on page 17.
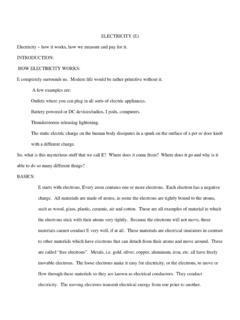
5 Record the values in Data Table 1. 3. Now, connect the Resistors in Series , as shown in Figure 3a, and connect them to the power supply that is set at 12 V. Record the voltage across each resistor , using the multimeter. Record the measured values in Data Table 1. Data Table 1 R1 (measured) R1 (from color code) V1 (measured) I1 (calculated) R2 (measured) R2 (from color code) V2 (measured) I2 (calculated) R3 (measured) R3 (from color code) V3 (measured) I3 (calculated) (a) The actual circuit (b) The equivalent circuit Figure 3 : The voltages across Series Resistors . Questions: Part 1 1. Are the voltages V1, V2 and V3 equal to each other? Why or why not? 2. Calculate the total voltage V = V1 + V2 + V3. Explain why it has the value it does. 3. Use Ohm s law to calculate the current through each resistor .
6 ( , V1=I1*R1, so I1=V1/R1). For this calculation, use the measured value of the resistances. Record these calculated values in the table above. Is the result what you expected? Why? Part 2 In this part of the Experiment , you will experimentally test the addition law for Resistors in Parallel . 1. Take two Resistors . Measure the resistance of each resistor individually using the ohmmeter ( , the multimeter). Record the values in Data Table 2. 2. Calculate the resistance of each resistor , using the resistor Color Code Chart on page 17. Record the values in Data Table 2. 3. Now, connect the Resistors in Parallel , as shown in Figure 4, and connect them to the power supply that is set at 12 V. Record the voltage across each resistor , using the multimeter. Record the measured values in Data Table 2. 4. Calculate the equivalent resistance (Req) of the circuit, based on your measured values of R1 and R2.
7 Enter the value at the top of Data Table 2. 5. Measure the equivalent resistance of the circuit using the ohmmeter. This is the resistance between points P and Q in Figure 4a. Record the value at the top of Data Table 2. 6. Use Ohm s law, with your measured value of Req, to calculate the total current in the circuit. Enter the value at the top of Data Table 2. Figure 4: Two Resistors attached in Parallel Data Table 2 Req (calculated) _____ Req (measured) _____ Itotal_____ Questions: Part 2 4. Are the measured values of R1 and R2 equal to the values calculated using the color code chart? How much do they differ (calculate percent error)? Is this within the specified tolerance? 5. Is your measured value of Req similar to your calculated value? Explain. 6. Are V1 and V2 equal to each other? Explain. 7. Are I1 and I2 equal to each other?
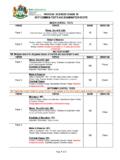
8 Explain. 8. Compare Itotal to the I1 and I2. What do you notice? Part 3 Now for the grand conclusion. We are going to use our techniques on a circuit that has Resistors in both Series and Parallel connections. Below we have a circuit with three Resistors . The two which are connected in Parallel , R1 and R3, are in Series with R1. 1. Write down the resistor values from their color codes in Table 3. 2. Measure their individual resistances using your multimeter and record these values in Table 3. 3. Calculate the equivalent resistance, Req, for the three Resistors hooked up as in Figure 5, first using your measured resistances (record as Measured Req in Table 3), and then using the values from the color code chart (record as Color Code Req in Table 3). 4. Now connect them to the power supply that is set at 12V. 5. Measure the voltage across R1 and then across R2 and R3.
9 R1 (measured) R1 (from color code) V1 (measured) I1 (calculated) R2 (measured) R2 (from color code) V2 (measured) I2 (calculated) Figure 5: A Series / Parallel combination R 1 R 2 R 3 V o + - V 3 V 2 V 1 Data Table 3 Questions: Part 3 9. Are the voltages V1, V2 and V3 equal to each other? Why or why not? 10. Calculate the total voltage V = V1 + V2. Explain why it has the value it does. How does this sum compare with V0? Is it the same as V1 + V3? Why or why not? 11. Use Ohm s law to calculate the current through each resistor . ( , V1=I1*R1, so I1=V1/R1). For this calculation, use the measured value of the resistances. Record these calculated values in the table above. Is the result what you expected? Why? V0 (measured) R1 (measured) R1 (from color code) V1 (measured) R2 (measured) R2 (from color code) V2 (measured) R3 (measured) R3 (from color code) V3 (measured) Req (measured) Req (from color code) V1+V2