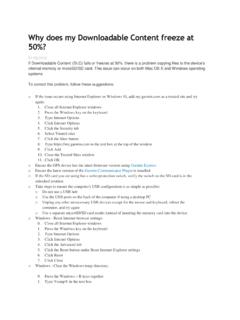
Transcription of GARMIN GPS to PC Wiring Instructions
1 GARMIN GPS to PC Wiring Instructions Introduction This will outline the basics for connecting most GARMIN GPS receivers to a PC serial connector for data transfer. Since the GPS needs to both send and receive information from your PC, the data connection will consist of three wires: Transmit Data (TxD), Receive Data (RxD), and Signal Ground (SG). The SG wire is common for both power and data grounding. Supplies Serial connector- Most PCs on the market use a standard 9 pin male serial port, also referred to as a DB9.
2 Older systems may have a male 25 pin DB25 port. Don't confuse this with the parallel (printer) port, which has a 25 pin female connector on the back of your computer. You will need to obtain the appropriate female connector to connect your computer. Most electronics or computer supply stores should carry this item. GPS Power/Data cable- If not standard equipment supplied with your receiver , may be purchased from GARMIN or a GARMIN dealer. Soldering iron & solder Optional items you may need or use DC power source- Check with GARMIN , a GARMIN dealer, or an electronics supply store.
3 Cigarette lighter adapter or extra wire for supplying power to GPS. Check with an automotive or electronic supply store. Wire strippers/cutters Multimeter- Handy for testing the connections when completed. Cautions I. Be certain all cables are disconnected from the GPS unit, PC, and/or power supplies before soldering. If you do not wish to perform the soldering/ Wiring steps, please seek the assistance or services of an electronics repair/service shop or comparable professional. When in doubt seek professional assistance.
4 When soldering, be sure to observe all safety methods and wear the proper protective equipment. If you are supplying external power to your GPS, be sure to observe the proper voltage ranges for your unit. Failure to do so may result in damage to your GPS! PCs do NOT generate the proper DC voltage to power a GPS unit. 1. Assembly Steps 1. Make sure the parts to be soldered are clean and dry. Wiring should be stripped to appropriate lengths to ensure proper fit into the connector. If the serial connector already has wires attached, use appropriate wire connectors for the assembly as opposed to soldering the connections.
5 2. Refer to the Wiring diagram on pages 3-4 which applies to your GPS unit's type of interface connector. 3. Solder the power/data cable Data Out to the Receive Data (RxD) pin 2 of the DB9 (DB25 pin 3). 4. Solder the power/data cable Data In to the Transmit Data (TxD) pin 3 of the DB9 (DB25 pin 2). 13 7 3 2 1 5 4 3 2 1. 25 14 9 8 7 6. DB25 (Female) - Cable View DB9 (Female) - Cable View 5. Solder the power/data cable Ground to the Signal Ground (SG) pin 5 of the DB9 (DB25 pin 7). F If you are also supplying external power to the GPS, you will need to split the GPS Signal Ground (SG) wire and attach it to both the PC Signal Ground (SG) pin and the negative (-).
6 Portion of your power source. The Ground is common to both power and data. Also, connect the positive (+) power lead to the positive side of your power source at this time. For the voltage ranges & fuse amperages of your GPS unit, please consult the owner's manual specifications. Once the connections are soldered Connect the power/data cable to the GPS and connect the serial connector to the serial port on the back of your computer. The cable assembly should now be ready to transfer data between your GPS and PC. If it doesn't work, try checking the following All cables are plugged in firmly.
7 Continuity of the cable connections (use a multimeter or continuity checker). Make sure the serial port on the PC is enabled and not in use by another device. Contact PC maker for assistance. Interface on GPS is set properly in order to transfer data. Refer to the GPS User's Guide. If you are still having problems, please contact GARMIN Customer Service. 2. UNITS WITH (-). DC POWER. (+). 7 PIN PLUG DB-9. Serial Connector*. Power/Data Cable Fuse (1) RED: POWER INPUT. (2) BLACK: GROUND PIN 5: GROUND (SG). 4. 3 (3) BLUE: DATA OUT 9.
8 5 4. PIN 3: TRANSMIT (TxD) 8. (4) BROWN: DATA IN. PIN 2: RECEIVE (RxD) 7. 2 6 (5) WHITE: NOT USED 6. (6) GREEN: NOT USED 1. 1 7 (7) YELLOW: ALARM. UNITS WITH (-). DC POWER. (+). DB-9. 13 PIN PLUG Serial Connector*. Power / Data Cable Fuse (2) RED: POWER INPUT. (1) BLACK: GROUND PIN 5: GROUND (SG). 1. 2 (4) BLUE: DATA OUT 9. 4. PIN 3: TRANSMIT (TxD) 8. (5) BROWN: DATA IN. PIN 2: RECEIVE (RxD) 7. (6) YELLOW: ALARM. 6. (3, 7-13) NOT USED 1. 13. UNITS WITH (-) (+). 6 PIN PLUG DC POWER. DB-9. Power / Data Cable Serial Connector*.
9 Fuse (1) RED: POWER INPUT. (2) BLACK: GROUND PIN 5: GROUND (SG). 9. (3) BLUE: ALARM 4. PIN 3: TRANSMIT (TxD) 8. (4) BROWN: DATA OUT 7. PIN 2: RECEIVE (RxD). (5) WHITE: DATA IN 6. 1. (6) RED/BLK: NOT USED. (-) (+). UNITS WITH DC POWER. DB-9. 4 PIN ROUND PLUG Serial Connector*. Power / Data Cable Fuse (1) RED: POWER INPUT. 1 (2) BLACK: GROUND PIN 5: GROUND (SG). (3) BROWN: DATA OUT 9. 4. 4 3 (4) WHITE: DATA IN PIN 3: TRANSMIT (TxD) 8. PIN 2: RECEIVE (RxD) 7. 6. 2 1. * Note: DB-9 connectors normally have pin numbers printed next to each pin.
10 3. UNITS WITH (-) (+). DC POWER. DB-9. 18 PIN PLUG Serial Connector*. Power / Data Cable Fuse (15) RED: POWER INPUT. 2 1 (18) BLACK: GROUND PIN 5: GROUND (SG). 3 (17) BLUE: DATA OUT 9. 6 4. PIN 3: TRANSMIT (TxD). 8. (16) BROWN: DATA IN. 11 7 PIN 2: RECEIVE (RxD) 7. (11) YELLOW: ALARM. 6. 15 12 (1-10,12-14) NOT USED 1. 18 16. UNITS WITH 4 PIN, DB-9. RECTANGLE PLUG Serial Connector*. Data Cable (4) BLACK: GROUND PIN 5: GROUND (SG). (3) WHITE: DATA OUT 9. 4. (2) GREEN: DATA IN PIN 3: TRANSMIT (TxD). 8. PIN 2: RECEIVE (RxD) 7.