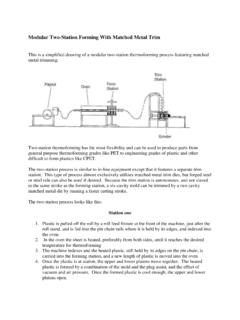
Transcription of General Thermoforming and Cutting Troubleshooting Guide
1 General Thermoforming and Cutting Troubleshooting Guide Forming Defects 1. Poor Detail 1. Material is too cold 1. Check oven temperature 2. Check heat time 3. Check to be sure circulating pump is running 2. Form Pressure too low 1. Check seals and vents 2. Check hoses for leaks 3. Be sure compressor and vacuum pump are functioning 3. Plastic is too hot 1. The plastic is cloudy due to overheating. The cloudy condition is caused by heat induced crystallinity 4. Plastic has been heated for too long 1. Time and temperatures under 190 degrees Fahrenheit will induce crystallinity that is transparent and will make the sheet very stiff 5. Inadequate seal in tool or sheet clamp 1.
2 Check hoses and seals for leaks 2. Vacuum hole may be plugged 1. Clean mold and clear vents 2. Probe vents after texturing to clear obstructions 6. Sheet over gauge 2. Too Much or unwanted Detail 1. Vent holes too large 2. Plastic is under gauge 3. Air Pressure too high 3. Webbing or bridging 1. Material is stalling instead of flowing 1. Plastic or mold surface may be too cold 2. Adjust timing of forming 3. Adjust vacuum timing 4. Be sure vacuum is adequate and effective 5. Adjust Air pressure timing 6. Platen speed too fast 7. Failure in temperature control system 8. Blown fuse to thermocouple or controller, bad wire 9. Index length too short 10.
3 Adjustment in zone heating profile needed 11. Thin spot in the plastic 12. Perimeter sheet clamp failure 4. Distorted geometry or warped parts 1. Cooling time too short 1. Part coming off mold too hot 2. Surface temp of mold too warm 1. Increase coolant efficiency through turbulence inducing inserts 2. Be sure water circulating pump is running 3. Insufficient cooling to the mold 1. Heat transfer inefficient between mold and cooling plate 1. Consider improving efficiency by redesigning and eliminating the cooling plate 2. Water circulating pump has not kicked off 4. Part is hanging up on mold during ejection 1. Scrapes and wrinkles are observed 5.
4 Air pressure too low 1. Check to be sure air eject ports in mold are not plugged 2. Make sure hoses are not kinked or cut 3. Check status of compressor 5. Dents or wrinkles in parts 1. Part is sticking to the mold 1. Mold surface may need maintenance 2. Platens opening too fast 3. Air eject ports may be obstructed 4. Timing adjustment in air eject cycle needed 5. Air eject pressure too high 1. Bottom of part is caved in or wrinkled 6. Inadequate clearance for parts in trim die relief or stacker 7. Chain rails out of synchronization side-to-side or out of parallel 8. Sheet advancing before parts clear the mold 9. Parts hit an obstruction during conveyance 10.
5 Stacker needs adjustment 6. Poor material distribution 1. Adjust mold temperature 1. Mold surface usually too cool 2. Surface temp of mold inconsistent 2. Adjust form air timing 3. Adjust vacuum timing 4. Adjust platen speed 5. Thickness of plastic out of specification 6. Sheet temperature inconsistent 1. Check heat zone temps 2. Adjust heat zone profile 7. Plug geometry or plug timing needs adjustment 1. Increase plug radii 2. Eliminate sharp corners 3. Adjust depth of plug travel 4. Adjust plug speed 5. Plug may need texturing 6. Be sure plug is not too fat 8. Plug material is non-insulative 1. Plugs should not remove heat from the sheet 1.
6 Plug Marks 1. Realign plugs in cavity 2. Plug mounting screws are loose 3. Plug geometry needs streamlining 4. Plug depth-of-travel needs adjustment 5. Plug material is non-insulative 6. Plug is too fat 2. Thin spots in Parts 1. Adjust sheet temperature 2. Plug is too fat 3. Surface of Parts is dimpled 1. Adjust mold temperature 2. Mold surface needs maintenance 3. Air Trapped between sheet and flat mold surface 1. Add vent holes to flat surface 2. Clear existing vent holes 3. Enlarge existing vent holes 4. too much release agent on sheet 4. Chill Spots 1. Water leaking out of mold 2. Water channel blocked in cooling plate 3. Sheet touching metal surfaces during index 4.
7 Mold too cold 1. Condensation dripping on mold surfaces 5. Plug material non-insulative 6. Air draft cooling area of sheet 1. Be sure fans are not blowing toward forming station 2. Check hoses for air blowing on the sheet while indexing 5. Hot Spots 1. Be sure vacuum is turned on 1. Check all valves and breakers 2. Check for loss of vacuum due to leaks in mold 1. use good cigar or canned smoke, talcum powder or corn starch to find leaks 2. 3. Mold surface may need maintenance 4. Adjust timing of form air 5. Adjust timing of vacuum cycle 6. Inconsistent forming process 1. Oven operation is impared 1. Be sure the oven is adequately pre-heated 2.
8 Drafts are effecting even heating in oven 3. Heater elements operating inconsistently 1. Check wiring and other power connections 2. Heaters may be dirty, corroded, or worn out 4. Check unwind stand and sheet feed system 1. Sheet may not feeding off roll smoothly 2. Sheet may be binding in duck bill 3. Pin chain is slipping 1. check for sheared pins in sprockets 5. Sheet clamps are ineffective 6. Mechanical sheet clamps are worn out 7. Seal on pressure box has failed 1. Be Sure pressure box is holding pressure during the cycle 7. Blowing Holes 1. Air eject pressure too high 2. Air trapped in cavity 1. Plug is too fat 2. Dog bone plug 3.
9 Flute sides of plug 4. Larger radii needed on leading edges of plug 5. Plug surface needs attention 6. Bring vacuum on earlier in cycle 7. Decrease plug speed 3. Plug does not reach material early enough 4. Material is freezing to non-insulative plug material 5. Plug surface is too rough 8. Thick bottom 1. Decrease plug speed 2. Bring vacuum on sooner 3. Increase size of radii on plug 4. Plug is made from a non insulative material 5. Be sure vacuum bleed valve is functioning 9. Thin Bottom 1. Increase plug depth 2. Increase plug speed 3. Dog bone plug 4. Generalize the plug geometry 5. Be sure vacuum bleed valve is functioning 6. Check forming air pressure timing o Trimming Defects o Location of trim is not centered 3.
10 Adjust or repair die o Angel Hair, chaff and fuzz 5. Check die sharpness 6. Cut against a hardened plate 7. Cut lines in trim plate 8. Be sure there are no burrs on Cutting edge 9. Check backer plates for flatness 10. Check platens for parallelism 11. Check the clearance between punch and die 12. Check die and punch for galling 13. Check conveyance and stacking fixture clearances 14. Peen die to closer tolerances o Feathered edges 16. Check die sharpness 17. Cut against a hardened plate 18. Cut lines in trim plate 19. Be sure there are no burrs on Cutting edge 20. Check backer plates for flatness 21. Check platens for parallelism 22. Check the clearance between punch and die 23.