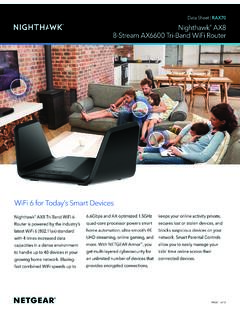
Transcription of Getting to Know Your 2016 Equinox - Chevrolet
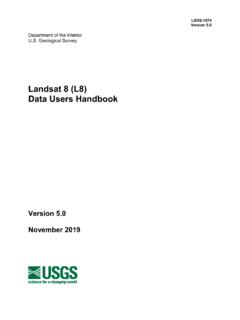
1 EquinoxGetting to Know YourReview this Quick Reference Guide for an overview of some important features in your Chevrolet Equinox . More detailed information can be found in your Owner Manual. Some optional equipment described in this guide may not be included in your vehicle. For easy reference, keep this guide with your Owner Manual in your glove box. 2 Center Vent Open/Close ControlTurn Signal Lever/ Exterior Lamp ControlDriver Information CenterTilt/Telescopic Steering Wheel LeverWindshield Wipers LeverInstrument Panel Illumination ControlCruise Control/Forward Collision AlertF/Lane Departure WarningF ButtonsInstrument PanelAudio Steering Wheel ControlsF Safety Belt Reminder Check Engine Low Tire Pressure Brake System Warning Antilock Brake System Warning Charging System Oil Pressure Airbag Readiness Security Fog Lamps Symbols3 Infotainment System/Navigation SystemFAccessory Power OutletHazard Warning Flashers ButtonDriver Information Center ControlsLTZ model shownClimate Controls/ Heated Seat ButtonsFCenter Vent Open/Close ControlRefer to your Owner Manual to learn about the information being relayed by the lights.
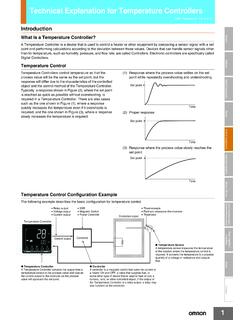
2 Gauges and indicators of the instrument In Brief in your Owner Optional equipment Cruise Control On/Set Traction Control Off StabiliTrak/Traction Control Off StabiliTrak/Traction Control Warning Lights On4F Optional equipmentTilt/Telescopic Steering Wheel With the vehicle in Park, push down the lever on the left side of the steering column to adjust the steering wheel. The steering wheel can then be moved up or down and in or out. After adjustment , pull up the lever to lock the steering wheel in Instruments and Controls in your Owner Keyless Entry Transmitter Remote Vehicle StartFPress and release the Lock button and then press and hold the button until the turn signal lamps flash to start the engine from outside the vehicle. After entering the vehicle, turn the ignition to the On position. During a remote start, the engine will run for 10 minutes. Repeat these steps for an addi-tional 10 minutes. A remote start can be extended once. Press and hold the button until the parking lamps turn off to cancel a remote : To change the remote lock, unlock, and remote start settings, go to Remote Lock, Unlock, Start in the Vehicle Settings Keys, Doors and Windows in your Owner Manual.
3 Unlock Press to unlock the driver s door. Press again to unlock all doors and the liftgate. The Unlock setting can be changed in the Vehicle Settings menu. Lock Press to lock all doors and the liftgate. The driver s door will not lock if open. Liftgate Press and hold to open/stop/close the power liftgateF. Vehicle Locator/ Panic Alarm Press and release to locate your vehicle. The turn signal lamps will flash and the horn will and hold to activate the alarm. The turn signal lamps will flash and the horn will sound until the button is pressed again or the ignition is turned Optional equipmentA. Seat Fore/Aft adjustment Lift the handle under the front of the seat to manually slide the seat forward or Seat Height adjustment Press the vertical control to raise or lower the Lumbar adjustment Press the horizontal control to adjust the amount of lumbar Seatback Recline adjustment Lift the lever to manually recline or raise the Driver s SeatPower Driver s SeatFA.
4 Seat adjustment Move the front horizontal control to move the seat forward or rearward and to raise, lower or tilt the Seatback Recline adjustment Move the vertical control to recline or raise the Lumbar adjustment Press the rear horizontal control to adjust the amount of lumbar Driver s SeatFSet Memory Positions1. Adjust the driver s seat and power outside mirrors to the desired Press and hold the MEM button and button 1 on the outboard side of the driver s seat until a beep Repeat these steps using button 2 for a second Memory Positions Press and hold button 1 or 2 until the memory position is : To change the memory recall and exit settings, go to Comfort and Convenience in the Vehicle Settings Seats and Restraints in your Owner s Seat Adjustments ABACDBC6F Optional equipmentExterior/Interior LightingAutomatic Headlamp System HeadlampsManual operation of the headlamps. Parking LampsManual operation of the parking Automatic Headlamp SystemActivates the Daytime Running Lamps (DRLs) in the daytime and the headlamps and other exterior lamps at night or when necessary.
5 Off/On Fog LampsFRotate the inner band to turn the fog lamps on or off. Rotate the outer band to operate the exterior lamps. TIP: Push the lever to turn on the high beam headlamps; pull the lever to return to low beam operation. Pull the lever to activate the flash-to-pass Panel LightingThe control knob is located on the left side of the instrument panel. Instrument Panel BrightnessTurn the knob to increase or decrease the instrument panel LampThe dome lamps are controlled by a three-position switch on the front over-head console. Dome Lamp Override/Off Door Open (Default position) OnSee Lighting in your Owner : The second-row dome lamps also can be turned on/off using the buttons by the Seat Fore/Aft adjustment Lift the bar under the front of the seat to manually slide the seat forward or Folding/Reclining Seatback Unbuckle the rear safety belts and place the front seatbacks in the upright position. Lift the lever on top of each seatback to fold down the seatback.
6 Lift and hold the lever to adjust the seat -back to any of three recline Seats and Restraints in your Owner Seat AdjustmentsAB7F Optional equipmentWipers and WashersWindshield Wipers and WasherHI Continuous High SpeedLO Continuous Low SpeedINT IntermittentRotate the band to adjust the delay between Mist Washer Fluid Pull the lever toward you to spray washer fluid on the Wiper and WasherThe rear wiper switch is located on the end of the wiper ON Continuous Low SpeedB. OFFC. INT Intermittent Washer Fluid Push the lever away from you to spray washer fluid on the rear window. See Instruments and Controls in your Owner the lever up or down to operate the windshield Programmable LiftgateFProgramming the Liftgate Height1. Turn the power liftgate switch to the 3/4 mode Open the liftgate by pressing the RKE transmitter liftgate button or the touchpad on the center of the Stop the liftgate at the desired height by pressing any liftgate button. Adjust manually to the desired height if To save the setting, press and hold the button next to the liftgate latch for three seconds.
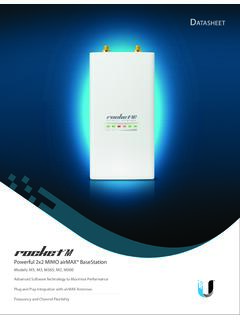
7 The taillamps will flash when the setting is Keys, Doors and Windows in your Owner open the liftgate. 3/4 Open the liftgate to the programmed the liftgate System Power/ VolumeHOME HOME: Main screenBACK Move back one level in the menus1 6: Preset radio stationsSOURCE Select radio band or auxiliary sourceFAV Display pages of favorite radio stationsMENU/SEL Tune radio stations/ Open and select a menuSee your Infotainment System Owner to your Owner Manual for important safety information about using the infotainment system while driving. SEEK Previous/ Next radio station or track CONFIG Configure system settings Phone/MuteRPTF Repeat Navigation voice guidanceNAVF Map screenDESTF Open the Navigation Destination menuINFO Display available song informationAS Autostore presets listPLAY/ PAUSEF Optional equipment9F Optional equipmentAudio SystemSetting the Time1. Press the Clock Touch the Set Time screen Touch the + (plus) or (minus) screen button to adjust the hours, minutes or Touch the OK screen button to confirm the Favorite StationsRadio stations from all bands (AM, FM or XMF) can be stored, in any order, on up to six pages of favorites.
8 1. Tune in the desired radio Press the FAV button to display the page where the station is to be Press and hold one of the six preset screen buttons until a beep is Repeat the steps for each desired Audio DevicesAn accessory power outlet, auxiliary input jack and a USB portF are located in the center console. An iPod , iPhone , MP3 Player, a USB flash drive or a USB mass storage device can be connected to the USB port. Chevrolet MyLinkF will read the device, build a list of voice commands, and fill in missing song information and album graphics. Search for music on-screen or by voice commands. A portable audio device connected to the auxiliary input jack can be con-trolled only by using the portable device controls. To optimize speaker volume, fully increase the volume level of the portable Noise Cancellation (4-cylinder models only)The Active Noise Cancellation (ANC) system monitors and effectively cancels out poten-tially undesirable vehicle noises at certain vehicle speeds.
9 For optimal ANC performance, do not block the rear speaker located on the right side of the cargo your Infotainment System Owner Optional equipmentBluetooth SystemBefore using a Bluetooth-enabled device in the vehicle, it must be paired with the in-vehicle Bluetooth system. Not all devices will support all functions. The pairing process is disabled when the vehicle is moving. For more information about Bluetooth pairing, device compatibility and text messaging, visit a Phone1. To use voice recognition, press the Push to Talk button on the steering wheel; after the beep, say Pair. To use the screen buttons, press the CONFIG button and then touch Phone Settings > Pair Device. 2. Start the pairing process on the phone. Locate your vehicle name or MyLink on the Enter the four-digit code that appears on the touch screen into the phone or confirm the six-digit code on the If your phone prompts you to accept the connection or phone book download, select Always Accept and MessagingFText messages can be displayed or played back over the audio system; or a predefined message can be sent.
10 Only SMS text messages are supported. 1. Touch the Messages screen button on the home page. 2. Once all messages are retrieved, the Text Message Inbox Select a text message to view (available only if the vehicle is not in motion) or listen pop-up screen will display when there is an incoming text your Infotainment System Owner Steering Wheel ControlsF Next/PreviousRotate up or down to go to the next or pre vious favorite radio station or track. Push to Talk Press to answer an incoming call or use voice Call/Mute Press to end or reject a to mute the vehicle speakers. See Instruments and Controls in your Owner Manual.+ VOL VolumePress + or to adjust the SourcePress to select an audio Optional equipmentChevrolet MyLinkFMyLink uses a Bluetooth or USB connection to link a compatible smartphone, cell phone, USB flash drive or portable audio player/iPod to the touch screen infotainment display. It offers a variety of entertainment options and features enhanced hands-free voice con-trol, music information and the ability to play music files from a USB flash assistance with the operation of the MyLink system, contact Customer Assistance at 1-855-4-SUPPORT (855-478-7767) or visit Internet RadioListen to personalized radio stations based on favorite artists or genres.