Transcription of Glock Pistol Disassembly / Assembly
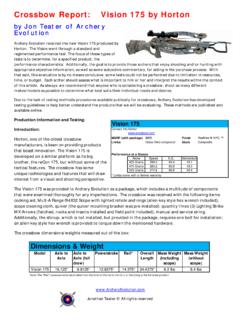
1 Glock Pistol Disassembly / Assembly GlockTriggers are to be used for Competition Only Parts shown are Glock factory parts. Unload your Glock Pistol . Move all ammunition to another room. Double check chamber, that there is no round present and the magazine is removed. Check again that the gun is unloaded. Wear eye protection. Some parts are spring loaded. Eye injury can occur. Read your Glock owners manual. Field strip your Glock . SAFETY FIRST! Field Stripped Glock You will need a Glock Disassembly tool or a 3/32 punch, to take apart your Pistol completely. Slide Disassembly Using a Disassembly tool push down the polymer spacer sleeve as shown. Hold the sleeve down for the next step. Slide Disassembly WARNING! The extractor spring Assembly can "shoot out" of the slide during this step. Great care should be exercised and eye protection worn!
2 With the polymer spacer sleeve held down carefully slide the slide cover plate off the slide. Do this carefully, the firing pin Assembly and extractor depressor plunger (EDP) spring Assembly are both spring loaded and will tend to "shoot out". Slide Disassembly Remove the firing pin Assembly and extractor depressor plunger pin Assembly Extractor depressor plunger Assembly Slide Disassembly Depress and hold the small, round, silver-colored button (firing pin safety) on the bottom of the slide as shown. Keep the firing pin safety depressed during the next step. Firing pin safety Firing pin safety Slide Disassembly With the firing pin safety fully depressed from the last step, rotate the extractor out of the slide. Extractor Slide Disassembly Remove the firing pin safety and firing pin safety spring from the slide. This is also a step where you can replace the firing pin safety spring in the firing pin safety.
3 Insert the spring in to the bottom area of the firing pin safety push and twist (counter clockwise) until it is seated. IMPORTANT: Make sure the firing pin safety moves up and down freely once installed. Check this by depressing it, you should feel upward pressure when releasing. Firing pin safety spring Slide Disassembly The slide is now disassembled. There is still a liner in the firing pin channel which generally does not get replaced. Your slide is now fully disassembled. Now you can move on to replacing the firing pin spring. Replacing the Firing Pin Spring To remove the spring cups and replace the firing pin spring, place the assembled firing pin (with spring, spring cups, and spacer sleeve) into the slide (firing pin channel) with the firing pin lug turned and resting where the slide cover plate is when installed. Replacing the Firing Pin Spring Wrap your hand around the slide for support while pulling down on the firing pin spring remove each of the spring cup set.
4 (CAUTION: These spring cups and spring can fly off and possibly cause eye injury, make sure to wear safety glasses). Replacing the Firing Pin Spring Now you can remove the spring and replace it. Replacing the Firing Pin Spring Replace the spring cups: This can be difficult; grasp the spring firmly in the middle of the spring, and pull down until there is enough clear space on the striker to replace the spring cups. Make sure the spring cups fit together flush and the thinner ends are inside of the spring. Replacing the Firing Pin Spring Slowly release tension on the spring until the spring cups are pressed against the thicker portion of the striker. Re-assemble the slide and all of it s parts, by reviewing the previous steps. You now have completed the steps necessary to to upgrade the slide Assembly . Before you move on to the frame upgrade, we will do a safety check on the slide Assembly .
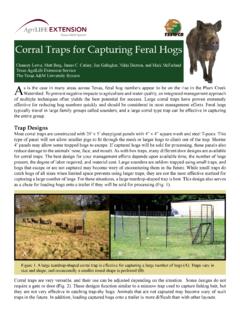
5 Firing Pin Safety Check Safety Check: While pressing down on the firing pin safety when the slide is assembled and facing muzzle end down, the tip of the firing pin should be visible through the breach face. You should also be able to hear the firing pin move freely in the channel while lightly shaking the slide with the firing pin safety depressed. Do not clip springs to reduce power, use a whole reduced power spring if desired. DO NOT let oil or debris gather under or around the firing pin safety. A disabled firing pin safety due to improper maintenance can result in a very dangerous condition known as slam firing. It is the firearm owner s responsibility to maintain his or her firearm properly. Frame Disassembly Push the locking block pin all the way through the frame until it drops out. This pin may not be present on some earlier models (some models had only 2 pins). Locking Block Pin Trigger Pin Trigger Housing Pin Frame Disassembly The slide stop lever is spring loaded into a groove in the trigger pin.
6 Slowly wiggle (up & down and front to back) the slide stop lever while pushing on the trigger pin until you can feel the trigger pin start to move. Do not apply excessive force, keep manipulating the slide stop until the pin moves. Then push the trigger pin out of the frame. Slide Stop Lever Frame Disassembly The slide stop lever is now free and can be removed. NOTE: When re-assembling, the slide stop lever must be installed after the locking block pin. Insert the lever with the spring facing upward and slide it into the first groove on the left side of the frame. Gently push forward and hold in place while pushing the trigger pin through the frame. You will most likely need to wiggle the slide stop lever to allow the trigger pin to pass through. Slide stop lever Frame Disassembly Gently pry the locking block out of the frame. These can be very tight in a new gun. Locking Block Frame Disassembly Push out the trigger housing pin.
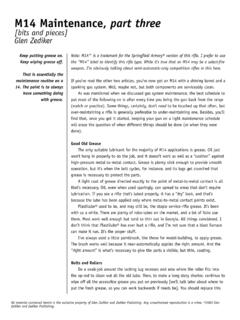
7 Trigger Disassembly Gently lift the trigger housing by pulling up underneath the ejector. Ejector Trigger Disassembly Grab the trigger housing on both sides and simply pull the trigger Assembly out of the frame. Trigger Disassembly Hold the trigger housing in one hand and the trigger bar (behind the trigger tab) in the other. Pull the trigger bar straight back toward the ejector end of the trigger housing when the cruciform (cross shaped) part of the trigger bar hits the inside of the trigger housing then rotate out and away from the housing. Pull Back Rotate out Trigger Disassembly You have now disconnected the trigger w/ trigger bar from the trigger housing. Now remove the trigger bar from the spring. Trigger Disassembly Next push the connector all the way out of the trigger housing from the opposite side. Connector Push through Opening for Tool Trigger Disassembly Now the trigger Assembly is completely disassembled.
8 Trigger Housing Trigger Assembly Push the connector back into the trigger housing. Insert the trigger spring open end down (as shown). The spring goes over the back lip of the housing and threads through the hole below the small notch. Then rotate upward. Trigger Spring Guide spring hook through this hole Trigger Assembly The open end of the S shape made by the trigger spring faces forward toward the ejector. The trigger spring should always be installed with this same S shaped configuration. S shape Trigger Assembly The hook part of the spring will be inserted through the hole in the trigger bars trigger spring arm. Trigger Assembly When the spring is attached pull the trigger bar back at an angle turned outward and drop the spring arm into the housing. Cruciform Trigger Assembly Finally rotate the cruciform into the channel on the high side of the trigger housing and release.
9 You have successfully assembled the trigger group. Frame Assembly Place the trigger group back into the frame. Replace the locking block, slide stop lever and pins and you have a completely assembled frame. Insert barrel and recoil spring into slide and attach slide to frame. Your Glock Pistol is now completely assembled. Trigger Safety Check With your Glock re-assembled, check to make sure it is UNLOADED With the gun pointed in a Safe Direction grab both sides of the trigger, making sure not to depress the trigger safety. Push the trigger toward the rear of the trigger guard. A functional trigger safety will hit the frame and stop the gun from disengaging (dry firing). If the gun disengages (dry fires), have it repaired immediately! Trigger Safety Thank You There are few who know the thrill of our sport. Shoot straight, have fun, and above all practice SAFETY FIRST! products are for Competition Only!
10