Transcription of Guide for MEIS Application Filing
1 Guide for meis Application Filing 1. Setup your system for DGFT Application Filing with the instructions available at 2. Open DGFT Homepage 3. On left Side Quick Links Menu Panel, a. Select Online Application to DGFT -> Online Ecom Application b. Select Merchandise Exports from India Scheme 4. Below Screen appears. Login with Digital Signature Certificate 5. Below Screen appears: Please refer the below link for detailed instructions on Shipping Bill Repository Following steps are to be completed for attaching a Shipping Bill to meis Application 1. Add shipping bills to repository 2. Attach eBRC to Shipping Bill 3. Update Freight, Insurance and Commission values, if any , in eBRC. Step-by-step instructions are available on above link 4.
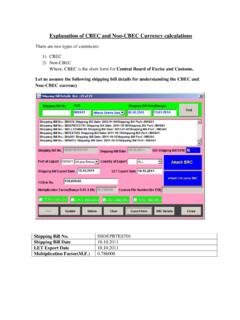
2 Create meis Application From Top Menu Panel, Select File Create. An Ecom Reference No will be generated. Click OK 5. meis Application Main Screen Opens as below: a. Select the Export License Period based on LEO Date from the drop-down Menu b. Select the Port of Registration From the Drop Down Menu c. Click Add Button d. Below message appears on screen 6. Click the button SB REPOSITORY to select and attach Shipping bills to this Application Eligible shipping bills will be listed on left panel. Move the shipping bills to right panel and click OK. Shipping Bills gets attached to the Application . Shipping Bills of multiple EDI ports can be attached to one meis Application . In the SB selection window ( diagram shown above) , you can attach SBs from different EDI ports by selecting the desired port from the drop down box.
3 Note: It is mandatory that at least one Shipping Bills should be included in the Application for the Port of Registration selected on main screen. Maximum number of shipping Bills allowed in an Application is 50 How to attach the disallowed Shipping Bills in new Application : On the Shipping Bill Selection Screen, (see the picture below) type the Disallowed SB No in the box and TICK the Check Box Attach Disallowed Shipping Bills Shipping Bill will be shown in the List of Available Shipping Bill box below. Move the SB to the right side ie. List of Selected Shipping Bill Box. Click OK - Shipping Bill gets attached to the Application . NOTE: Use this Option ONLY for Disallowed SBs. If meis benefit awarded SBs are attached, your Application will be rejected and necessary action will be taken under FTDR Act Handicraft Item Rate Updation: For Shipping bills with handicraft items, open the Shipping Bill screen Product Details Screen Tick the Checkbox is it a Handicraft item?
4 meis benefit will be recalculated with Handicraft Rate 7. Click on PAY ONLINE button and make online payment 8. Click on VERIFY PAY and verify your payment 9. Click on Submit Button Select the DGFT Regional Office to which meis Application to be submitted and click Generate Button. A document will be displayed in the box. Select the Document and click Submit A pink coloured page appears, go to the end of the page , click on SIGN AND SUBMIT Your Application will be submitted to the DGFT office and File number will be displayed.