Transcription of Gustav Stickley Poppy Table - Popular Woodworking …
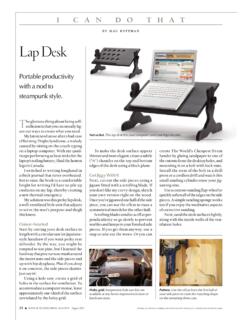
1 36 Popular Woodworking December 2007 Poppy Tableb y r o b e r t w. l a n gbefore developing the rectilinear Craftsman style, Gustav Stickley experimented with curvaceous art nouveau look from an old design. This small tea Table was originally made more than 100 years ago by Gustav Stickley . His sense of proportion and design was not limited to straight 37lead Photo by al ParriSh; illuStrationS by the authorIn 1898, Gustav Stickley took a working vacation. With more than 20 years of expe-rience as a furniture maker, he was ready to change direction, and he headed across the Atlantic Ocean for inspiration. The Arts & Crafts movement was strong in England, while in France the latest thing was L Art 1900 Stickley debuted several new designs marketed as New Furniture by the Tobey company of Chicago. This Table was one of the most striking of those pieces, heavily influenced by Art Nouveau and a far cry from the rectilinear designs of the Craftsman style furniture he would become best known is a hint of things to come, however.
2 The edges of the top, shelf and legs are all sinu-ous curves, but the surfaces are essentially flat, and the corners are just barely broken. It also presents an interesting engineering problem. Beneath the carved surfaces and waving edges, the Table is based on a pentagon, so the angles between the stretchers, shelf and five legs are at 72 , not 90 .This Poppy Table has been on my to-do list for a long time, and when I came across some good photos from an auction, I decided that the time was right to go FirstWhen I began working on the design, my first concern was the shape of the pieces. I soon realized that this project would also be a structural challenge. In the original, face-grain plugs are visible on the outside of the legs, centered on the shelf. Usually this means a screw is beneath the plug, but it seemed to me that these joints needed more than a mechanical don t really know how the original is held together at the intersection of the leg and shelf.
3 Loose tenons seem the obvious solution to us today, but at the time a dowel or two flank-ing the screw would have been more likely. I decided to use Festool Dominos for loose tenons, along with a screw to pull the assembly together. It s hard to clamp a the top of the legs, stretchers seemed necessary, but it was a puzzle deciding how to connect them to the legs. There isn t any structure visible in the photo I was working from, so my solution is a best guess. I used a lapped dovetail at each end of the 2"-wide stretchers, and in the center made a five-sided hub piece that holds them all Twice to Make it NiceAll the parts for this Table came from a single plank of mahogany about 14" wide and 12' long. I made all the joints and dry-assembled the entire Table before doing any of the deco-rative hub is the piece I worried most about. It is like a keystone that affects the location of the other joints. Any variations in this piece and the legs would twist and throw off the joints at the shelf.
4 Because it was too small to safely cut on the Table saw or miter saw, I cut it on the band saw. I then made a small shooting board, shown in the photo below, and trimmed the hub to size with a low-angle block plane. I made a full-size printout of my drawing (you can purchase one for download online at for $3, or create one yourself using the scale drawings on page 39) and used that to check the parts The hub is the keystone. All of the structural parts of the Table radiate from this small piece, so it needs to be precise. This shooting jig lets me trim it down in tiny the plan. A full-size layout aids in making the parts and the joints accurately. As the Table was assem-bled, I compared the actual pieces to the lines on the lapped dovetails. The stretchers con-nect to the hub and the leg with 1 2"-thick lapped dovetails. They are 3 4" wide at the hub end and 1" wide at the Popular Woodworking December 2007and assemblies as I made them.
5 I cut a rabbet at each end of the stretchers with a tenoning jig on the Table saw, leaving 1 2" thickness for the dovetails. I hand cut the dovetails and used them to lay out the sockets in the hub and the top of each leg. Numbering each stretcher and its hub location helped keep the parts in the hub was so small, I couldn t use a router to remove the waste for the sock-ets, so I used a Forstner bit at the drill press to establish the f lat bottom of the sockets and cleaned up the sides with a chisel. For the sockets in the legs, at the other end of the stretchers, I used a 1 4" spiral upcut bit in a small router with a fence to cut a smooth bottom and back for each socket. Again, I cleaned up the corners with a I dry-fit the hub to the stretchers, and test-fit the assembled hub and stretch-ers to the legs. After a bit of tweaking to the joints, I glued the stretchers to the hub, but left the stretcher-to-leg joints cut the shelf to size, and made sure that it fit the perimeter of the legs and assembled top hub.
6 I centered a Domino in each edge of the shelf at the maximum depth and at the center of each leg at the minimum depth, with the top of the shelf 71 8" above the bottom of the leg. I glued the Dominos into the shelf only, drilled a counterbored hole and drove a #8 x 11 2" screw through each leg and into the tenons in the fitting. All the joints were made and all parts dry-assembled before doing any of the shaping to the legs and cutting the outside shape of the legs at the band saw, I drilled holes near the ends of the cutouts, and I used a jigsaw with a narrow blade to rough-cut the shapes. I clamped the pattern to the legs, then trimmed the outside edges and the cutouts with a 1 4"-diameter flush-cutting bit in a small layout. Gluing a full-size paper pattern to the shelf blank eliminates transferring the pat-tern. The paper will stay in place through the cutting a stab at marking. Cutting through the pattern with the point of a knife establishes the layout lines for the to be seen.
7 These joints won t show in the finished Table , but they must be strong. The sock-ets in the legs were wasted with a small router; the sockets in the hub with wasted with a Forst-ner bit. I then pared them all to size with a squaring up the shelf and legs, I was ready to cut the parts to final shape. When I was satisfied that everything was tight and square, I took it apart to cut the Shape of ThingsI used spray adhesive to glue full-size paper patterns to the blanks for the shelf and top. I also glued a full-size pattern to a piece of 1 2" Baltic birch plywood to make a template for the legs. The top and shelf were cut to shape at the band saw. Where the shelf meets the legs, I left a flat area in the curve for the joint. I ended the curves about 1 2" away from the intersections with the legs so I could trim right to the meeting point after the legs were shaped and plywood pattern I made for the legs has the pattern on only one side.
8 After cutting the pattern just outside the lines on the band saw, I smoothed the plywood edges back to the lines with a marked one side of each leg, then flipped the pattern over to mirror the outline on the vertical centerline. This saved some time in making the pattern, and it ensured that the legs would be 391 Square =1"1 Square =1"1 Square =1"161 16 167 8"3 4 47 8 13 16 513 16 2 1 161 16 167 8"3 4 47 8 13 16 513 16 2 1 161 16 167 8"3 4 47 8 13 16 513 16 2 1 For additional photos and text, and to pur-chase full-size patterns in pdf format, go Online EXTRASleg PatterntoP PatternShelF PatternPlan below toPStickley Poppy Table No. item dimeNsioNs (i Nches) material commeNts t W l 1 top 13 16 213 16 225 16 Mahogany 1 Shelf 13 16 161 16 167 8 Mahogany 5 legs 13 16 47 8 2211 16 Mahogany 1 hub 13 16 31 16 31 4 Mahogany 5 Stretchers 13 16 2 613 16 Mahogany 1 2" dovetail both endshub PlanStretCher40 Popular Woodworking December 2007A Little CarvingBefore removing the paper pattern from the top and shelf, I traced the lines of the carving with the sharp point of my knife.
9 After dark-ening these thin lines with a pencil, I used a 60 V-tool to establish the depth and sides of the lines. I followed that with a 1 8"-wide #11 gouge. The profile of the lines is mainly the profile of the U-shaped tool, so the only real challenge in carving was getting smooth, consistent lines that define the lobes were rounded slightly at the top with a skew chisel. The central portion of the carving is slightly domed. This is the only portion of the top sur-face that isn t flat. After carving, I smoothed the flat surfaces of the top with a plane, follow-ing up with a scraper and #240-grit Abranet (a new abrasive on a flexible mesh-like base that s not paper. Abranet cuts fast, leaves a smooth surface and doesn t load up).Living on the EdgeThe band-saw marks on the edges of the top and shelf were removed with a rasp. The edges were further refined with a modeler s rasp. One of the good things about using a hand-stitched rasp is that the surface left by the tool is a series of tiny grooves.
10 A cabinet scraper quickly removes the high spots between the grooves, leaving a smooth surface. The corners were broken with a few strokes of the fine-cut modeler s rasp, followed by sanding with a small piece of Abranet, folded to make a slight radius. When the top and shelf were complete, it was time to move on to the edges of the advantage to using the rasp is the ability to use the half-round side to shape inside curves as seen in the photo below at left. Many of the curves on this piece closely matched the curve of the rasps, so I believe that the original maker likely used the same technique and used the same procedure and sequence of tools to smooth the edges of the legs and the cutouts at the top of each leg. The router bit left a decent surface, but there were a few chatter marks on long surfaces, and some burning in the tight inside corners. I wanted these edges to be as nice as the flat surfaces so I planned on it taking it took quite awhile.