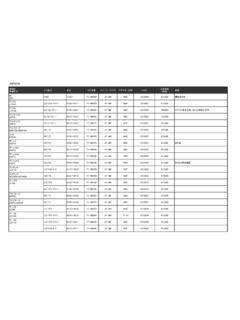
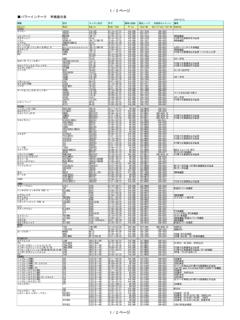
Transcription of Hardware Installation Manual - nistune.com
1 Hardware Installation Manual Copyright 2014-2017 Nistune Developments Table of Contents Overview .. 3. Flex Fuel .. 4. Launch Control 21. Variable Cam Timing Output .. 24. Page 2 of 33. Overview This is the first edition of the Nistune feature pack. The feature pack offers enhanced features over the standard ECU. for a selected range of vehicles. The standard ECU code has been modified using patch code to provide the most customers requested features. We do plan to add more features when possible in the future. This document covers the ECU modifications required to use Flex fuel and Launch Control features Page 3 of 33. Flex Fuel Flex fuel sensors measure the ethanol content of fuel passing through it and report the rating as a percentage.
2 The sensors output a frequency and a converter is required to translate this into a voltage which can be read by the ECU. Nistune will read the flex fuel input via diagnostic connector input on the ECU. This requires modification of the Nissan ECU Hardware . A flex fuel kit comprising a sensor and content analyser is required. Nistune Flex Converter Nistune have developed a content analyser board which is internally mounted to the ECU. It will be sold with the board and flex cable. Flex fuel sensors can be purchased separately. The flex board is mounted to the top of existing components using durable double sided table. BLACK - GND. RED 12V. GREEN Input Run a 5 volt line from the regulator to the 5V input Sensor Installation WARNING: Competent professionals must install the flex fuel sensor according to the manufacturer's instructions.
3 The flex fuel sensors are normally installed on the return line to the fuel tank. Flex sensor: Continental #13577394. Page 4 of 33. Image: Flex fuel sensor connected to fuel return line on S14 200SX. Zeitronix ECA 2. Zeitronix sell a content analyser in various packages, including with and without a display. The ECA-2 module includes wiring information. For wiring to your ECU Red is wired to the ECUs switched 12V power line and Black is wired to the Ground line. Note: Special modifications are required for the ECA-2 module to some ECUs to correct pull up voltage ( volts). See next page Image: HCR32 ECU with two end pins connected to flex converter power Page 5 of 33. Z32 VG30 DETT (Type 2).
4 Remove R241 (marked 112). S13 SR20 DET / RNN14 SR20 DET. Remove resistor R225 (marked 112). Page 6 of 33. B13 SR20DE / S13 SR20DE / P10 SR20DE / S13 KA24DE. Remove resistor R225/R226 (component marked 112, depending on ECU type). Page 7 of 33. Nissan ECU Connectors Z31 VG30 / R31 RB30 / VL RB30. Pin 27 is power, Pin 28 is ground S13 CA18 DET, S14 SR20 DET, HCR32 RB20 DET, BNR32 RB26 DETT, Z32 VG30 DET etc Pin 49 is Power and pin 50 is Ground S13/S14A/S15 SR20 DET, P11 SR20DE, B13 SR20DE, S13 KA24DE etc Pin 38 is Power and pin 39 is Ground ER34/WC34 RB25 DET. Pin 67 is Power and Pin 25 is ground Page 8 of 33. Diagnostic Potentiometer Removal Earlier Nissan ECUs are fitted with a diagnostic potentiometer.
5 This will require removal in order to fit the flex fuel sensor line to the ECU. Remove the diagnostic connector by unscrewing (or desoldering if surface mounted) and then fit the flex fuel sensor line in place to the diagnostic input. Image: HCR32 ECU diagnostic potentiometer Page 9 of 33. 1. Z31 300ZX VG30 / VL RB30 / R31 RB30 ECU. - Cut both lines to the diagnostic connector - Connect top line (GND) to Ground input on flex fuel converter - Connect bottom line (Diag input) to OP on flex fuel converter - Source 5V supply from OPAMP board Pin 21. - Source 12V supply from ECU power line on ECU connector pin 27. Page 10 of 33. Z31 300ZX VG30 1988. - Cut both lines to the diagnostic connector - Connect top line (GND) to Ground input on flex fuel converter - Connect bottom line (Diag input) to OP on flex fuel converter - Source 5V supply from regulator (middle pin).
6 - Source 12V supply from ECU power line on ECU connector pin 27. Page 11 of 33. 2. S13 CA18 DET ECU. - Cut both diagnostic wires and connect LHS line to flex fuel sensor output line. - For the Nistune Flex Converter, power the unit using the RHS line which provides 5 volts Page 12 of 33. - 3. HCR32 RB20 DET ECU. - Cut both diagnostic wires and connect RHS line to flex fuel sensor output line. - For the Nistune Flex converter, power the unit using the 5 volt output from the ECU as marked Page 13 of 33. 4. BNR32 RB26 DETT ECU. - Cut both diagnostic wires and connect RHS line to flex fuel sensor output line. - For the Nistune Flex converter, power the unit using the 5 volt output from the ECU as marked Page 14 of 33.
7 5. Z32 300ZX VG30DE/DETT ECU. - Cut both diagnostic wires and connect LHS line to flex fuel sensor output line. For the Nistune Flex converter, power the unit using the 5 volt output from the Q101 middle pin as marked Page 15 of 33. 6. S13 SR20DE/SR20 DET ECU. - Remove VR229 (variable resistor). - Solder flex fuel input line as pictured to lower solder pad - For the Nistune flex converter, power the unit using the 5 volt output from the middle pin as marked Page 16 of 33. 7. S13 KA24DE / B13 SR20DE ECU. Remove VR229 diagnostic port and lower ground wire. Reuse top variable input wire to flex board - Solder flex fuel input line as pictured to lower solder pad - For the Nistune flex converter, power the unit using the 5 volt output from the middle pin of the voltage regulator as marked Page 17 of 33.
8 8. S14 SR20 DET ECU. - - Remove resistors J200 and J201. - Solder flex fuel input line as pictured to lower solder pad - For the Nistune flex converter, power the unit using the 5 volt output from the middle pin as marked Page 18 of 33. 9. S13 SR20 DET (Type R/X) / S14A SR20 DET / S15 SR20 DET / P11 SR20DE ECU. S13 (Type X) // S14A/P11 ECU rear of ECU. S15 next to diagnostic connector - Removed marked resistor R226. - Solder flex fuel input line as pictured to middle solder pad of V200. - For the Nistune flex converter, power the unit using the 5 volt output from the middle pin of the voltage regulator as shown Page 19 of 33. 10. ER34 / WC34 RB25 DET / Y33 VQ30DE ECU. - Remove resistor R347.
9 - Solder flex cable as marked to LHS pad of V300. - For the Nistune flex converter, power the unit using the 5 volt output from the middle pin of the voltage regulator as shown Page 20 of 33. Launch Control Operation External Switch Trigger Launch control can be triggered either using the speed input, or using an external switch. Disconnect the Power Steering line from the ECU and connect directly to a clutch switch to trigger the launch control externally. Image: Wiring external trigger between ground and power steering line Z31 VG30 / R31 RB30 / VL RB30. Pin 28 - Ground Pin 27 - 12V power RB30. Pin 30 - MAF calibration signal (RB30 only). Wire as per S13 CA18 DET with switch VG30. Pin 15 - Fuel temp input (VG30 only) wire this end switch as above, and other side of switch to Pin 28 (GND).
10 S13 CA18 DET. Pin 37 - MAF Calibration signal (non-cat models have a line, cat models will need this pin inserted). Pin 60 - Ground Pin 49 - 12V power To reuse the MAF calibration signal, hold down the line using around 100K ohm resistor and use a pull up to 12V via clutch switch or similar. We use pull up here because of capacitance held on the line. Page 22 of 33. Other ECUs Cut the power steering line at the ECU and connect to a shielded cable with shield connected to ground. The switch can be operated by clutch or otherwise. A momentary push of the switch will enable/disable the launch control output. S14 SR20 DET, HCR32 RB20, BNR32 RB26, Z32 VG30 etc Pin 19 HCR32 / BNR32: Power steering switch trigger Pin 34 - S14 SR20 DET/Z32 VG30: Power steering switch trigger Pin 60 Ground S13/S14A/S15 SR20 DET etc Pin 43 S13/S14A/S15/P11: Power steering switch trigger Pin 39 - Ground ER34/WC34 RB25 DET.