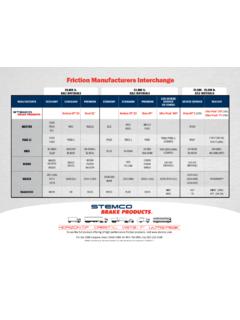
Transcription of Heavy Duty Bearings - Bearing Adjust - STEMCO
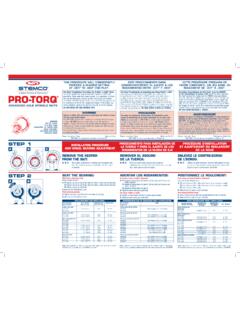
1 Proper wheel Bearing adjustment is critical to the performance of wheel seals and other related wheel end products. For that reason, we are proud to be a part of TMC s Wheel End Task are happy to bring these standards to you in the form of this technical guide. Working together, in this way, STEMCO helps keep your rigs following seven step Bearing adjustment recommendation for standard spindle nuts was developed by TMC s Wheel End Task Force. It represents the combined input of manufacturers of wheel end s Recommended Wheel Bearing Adjustment Procedure for Standard Spindle NutsSTEP End Play:The dial indicator should be attached to the hub or brake drum with its magnetic base.
2 Adjust the dial indicator so that its plunger is against the end of the spindle with its line of action approximately parallel to the axis of the the wheel or hub assembly at the 3 o clock and 9 o clock positions. Push and pull the wheel-end assembly in and out while oscillating the wheel approximately 45 degrees. Stop oscillating the hub so that the dial indicator tip is in the same position as it was before oscillation began. Read the Bearing end-play as the total indicator : Acceptable end-play is .001 - .005 .For single nut self-locking systems, consult manufacturers assumes no responsibility for Bearing warranty. STEP Lubrication:Lubricate the wheel Bearing with clean lubricant of the same type used in the axle sump or hub Adjusting Nut Torque:Tighten the adjusting nut to a torque of 200 ft-lbs, while rotating the Back Off:Back the adjusting nut off one full Adjustment:Re-Torque adjusting nut to 50 ft-lbs while rotating the Back Off: *Install cotter pin to lock axle nut in Nut Torque:BEARINGADJUSTMENTSTEMCO - USA Box 1989 Longview, TX 75606-1989 (903) 758-9981 1-800-527-8492 FAX: 1-800-874-4297 - Canada 5650 Timberlea Blvd.
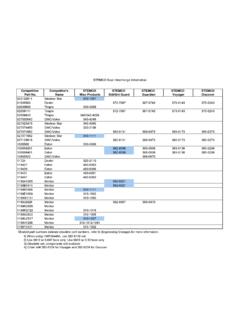
3 Unit B Mississauga, ON L4W 4M6 (905) 206-9922 877-232-9111 FAX: 877-244-4555 ISO 16949 STEMCO and Pro-Torq are registered trademarks of STEMCO LP 2015 STEMCO LPPrinted in the USA Part No. 571-2902 Hudson 10-245 Rev. 12/15an EnPro Industries company AXLE TYPE THREADS PER INCH FINAL BACK OFF STEER 12 1/6 Turn* (Single Nut) 18 1/4 Turn* STEER 14 1/2 Turn (Double Nut) 18 1/2 Turn DRIVE 12 1/4 Turn 16 1/4 Turn TRAILER 12 1/4 Turn 16 1/4 TurnAXLE TYPENUT SIZE / TYPETORQUE SPECIFICATIONSSTEER(Double Nut)
4 Less Than 2-5/8 200 - 300 ft-lbsDRIVED owel Type Washer300 - 400 ft-lbsTang Type Washer200 - 275 ft-lbsTRAILER2-5/8 and Larger200 - 300 ft-lbsan EnPro Industries companyISO 16949 STEMCO and Pro-Torq are registered trademarks of STEMCO LP 2015 STEMCO LPFailure to follow this instruction could cause the wheel to come off and cause bodily injury. The PRO-TORQ Spindle Nut is sold as an assembly with the keeper in place. DO NOT attempt to place the nut on the spindle or tighten or loosen the nut on the spindle while the keeper is locked inside the nut. Doing so may deform the keeper and allow the nut to unthread during operation. DO NOT bend or manipulate keyway tang in any way.
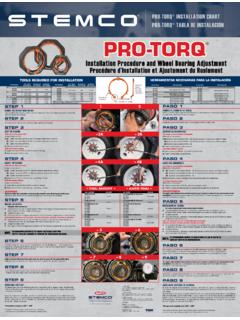
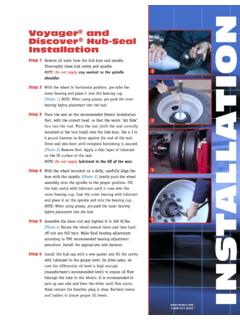
5 Doing so may cause the tang to break off in service. Failure to back off the nut will cause the Bearings to run hot and be Installation Procedure for PreSet or LMS Hubs: Pro-Torq spindle nuts may be used with PreSet or LMS hub assemblies. When used with these systems, it is important to follow the hub manufacturers product specific installation instructions. For PreSet and LMS hub assemblies, torque the Pro-Torq spindle nut to a minimum of 250 ft-lbs. Engage the keeper. If the keeper can not be engaged, advance the spindle nut until it can be engaged. DO NOT BACK OFF THE SPINDLE ADJUSTMENTPro-Torq Installation Procedure for Hubs with Manually Adjusted Wheel BearingsIMPORTANTWARNING STEP 1.
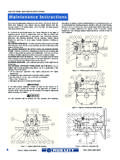
6 Remove The Keeper From The Nut:Use a screwdriver to carefully pry the keeper arm from the undercut groove on each side until the keeper is released. STEP 2. Seat the Bearing :With hub or hub/drum only: With hub/drum/wheels:Using a torque wrench: Using a torque wrench:1 (A) Tighten the nut to 200 ft-lbs. 1 Tighten the nut to 200 ft-lbs Spin the wheel at least one full rotation. while the wheel is rotating. (B) Tighten the nut to 200 ft-lbs. 2 Back the nut off until it is loose. Spin the wheel at least one full rotation. (C) Tighten the nut to 200 ft-lbs. 2 Back the nut off until it is 3. Adjust The Bearing :With hub or hub/drum only: With hub/drum/wheels:Using a torque wrench: Using a torque wrench:1 (A) Tighten the nut to 100 ft-lbs.
7 1 Tighten the nut to 100 ft-lbs Spin the wheel at least one full rotation. while the wheel is rotating. (B) Tighten the nut to 100 ft-lbs. 2 Back the nut off one raised Spin the wheel at least one full rotation. face mark (according to chart). (C) Tighten the nut to 100 Back the nut off one raised face mark (according to chart).STEP 4. Install the Keeper: Orange side facing out For Steering Spindle Nut 1 Insert the keeper tab into the undercut 448-4836, 448-4839, 448-4840, 448-4863, groove of the nut and engage the keyway 448-4864, and 448-4865, tang in the axle keyway. Insert keeper tab 1 Align the flat of the keeper with the milled flat on with the orange side facing out.
8 The spindle and insert the single keeper tab into 2 Engage the mating teeth. the undercut groove of the nut. Insert keeper tab 3 Compress and insert the keeper arms, with the orange side facing out. one at a time, into the undercut groove 2 Engage the mating teeth. with a screwdriver. 3 Compress and insert the keeper arms, one at a time, into the undercut groove with a screwdriver.
9 NOTE: Recommended practice is to replace the keeper each time the Pro-Torq nut assembly is removed for maintenance 5. Inspect the Installation:Failure to follow this instruction could cause the wheel to come off and cause bodily injury. Make sure that the keeper tab and keeper arms are fully seated into the undercut groove. Inspect keyway tang to insure it does not contact the bottom of the keyway. If contact exists, immediately notify your PRO-TORQ procedure will consistently produce a Bearing setting of .001 to .003 end play. STEP 6. Acceptable End Play:The dial indicator should be attached to the hub or brake drum with its magnetic base.
10 Adjust the dial indicator so that its plunger is against the end of the spindle with its line of action approximately parallel to the axis of the spindle. Grasp the wheel or hub assembly at the 3 o clock and 9 o clock positions. Push and pull the wheel-end assembly in and out while oscillating the wheel approximately 45 degrees. Stop oscillating the hub so that the dial indicator tip is in the same position as it was before oscillation began. Read the Bearing end-play as the total indicator movement. NOTE: Acceptable end-play is .001 - .005 . For single nut self-locking systems, consult manufacturers specifications. STEMCO assumes no responsibility for Bearing BACKOFF Application Part Numbers Backoff Trailer Axle Nut 447-4723, 447-4724, 449-4973 1/8 turn Trailer Axle Nut 447-4743 1/4 turn Steering Spindle Nut 448-4836, 448-4838, 448-4839, 448-4863, 448-4865 1/4 turn Steering Spindle Nut 448-4864 1/4 turn Steering Spindle Nut 448-4837, 448-4840 1/3 turn Drive Axle Nut 449-4904, 449-4973, 449-4974, 449-4975 1/8 tur