Transcription of HOW TO INSTALL A 200 AMP ELECTRICAL SERVICE
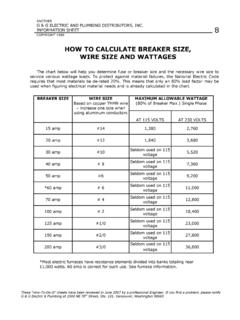
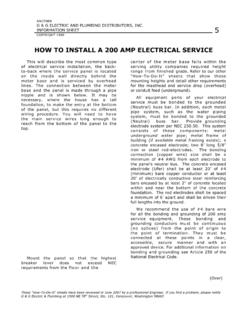
1 ANOTHERG & G ELECTRIC AND PLUMBING DISTRIBUTORS, SHEETCOPYRIGHT 19895 These How-To-Do-It sheets have been reviewed in June 2007 by a professional Engineer. If you find a problem, please notifyG & G Electric & Plumbing at 1900 NE 78th Street, Ste. 101, Vancouver, Washington 98665 HOW TO INSTALL A 200 AMP ELECTRICAL SERVICEThis will describe the most common typeof ELECTRICAL SERVICE installation, the back-to-back where the SERVICE panel is locatedon the inside wall directly behind themeter base and is serviced by overheadlines. The connection between the meterbase and the panel is made through a pipenipple and is shown below.
2 It may benecessary, where the house has a tallfoundation, to make the entry at the bottomof the panel, but this requires no differentwiring procedure. You will need to havethe main SERVICE wires long enough toreach from the bottom of the panel to the panel so that the highestbreaker lever does not exceed NECrequirements from the floor and thecenter of the meter base falls within theserving utility companies required heightrange from finished grade. Refer to our other How-To-Do-It sheets that show thesemounting heights and detail other requirementsfor the masthead and SERVICE drop (overhead)or conduit feed (underground).
3 All equipment parts of your electricalservice must be bonded to the grounded(Neutral) buss bar. In addition, each metalpipe system, such as the water pipingsystem, must be bonded to the grounded(Neutral) buss bar. Provide groundingelectrode system per NEC This systemconsists of these components: metalunderground water pipe; metal frame ofbuilding (if available metal framing exists); aconcrete encased electrode; two 8 long 5/8 iron or steel rod-electrodes. The bondingconnection (copper wire) size shall be aminimum of #4 AWG from each electrode tothe panel s neutral bus.
4 The concrete encasedelectrode (Ufer) shall be at least 20 of #4(minimum) bare copper conductor or at least20 of electrically conductive steel reinforcingbars encased by at least 2 of concrete locatedwithin and near the bottom of the concretefoundation. The rod electrodes shall be spaceda minimum of 6 apart and shall be driven theirfull lengths into the recommend the use of #4 bare wirefor all the bonding and grounding of 200 ampservice equipment. These bonding andgrounding conductors must be continuous(no splices) from the point of origin tothe point of termination.
5 They must beconnected at these points in a clear,accessible, secure manner and with anapproved device. For additional information onbonding and grounding see Article 250 of theNational ELECTRICAL Code. (Over)ANOTHERG & G ELECTRIC AND PLUMBING DISTRIBUTORS, SHEETCOPYRIGHT 19895 These How-To-Do-It sheets have been reviewed in June 2007 by a professional Engineer. If you find a problem, please notifyG & G Electric & Plumbing at 1900 NE 78th Street, Ste. 101, Vancouver, Washington 986651. Select an approved location for the meterbase and drill the holes for meter topanel nipple.
6 Also drill the holesthrough the eave and roof where themast will go through (if overhead).2. Knock out the appropriate hole in the paneland secure the nipple to the panel witha locknut on each side and the Position the panel and anchor it in Fasten the meter base to the other end ofthe nipple with a locknut on each sideand then the plastic bushing. Screw themeter base to the Screw the conduit mast tightly into the hubof the meter INSTALL u-bolts or conduit straps (perserving utilities requirements) aroundthe mast and, if it is possible, throughthe stud Push the SERVICE wires up the conduitmast and leave 24" out of the top Cut the two main conductor wires andconnect them to the top terminals of themeter : Apply a liberal coating of corrosioninhibitor to all aluminum wire once theinsulation has been removed.
7 Also use onthe lugs and their threads as thelubrication that it provides allows theconnection to be made up more Bare the neutral (white or smallest ofthe 3 wires) at the meter base andconnect it under the center lug of themeter socket (see illustration). If all thewire are black use white marking tape ateach end to identify the neutral Place the roof flashing over top end ofmast, properly fit upper edge underroofing materials, fasten in place andcaulk as Remove the top from the weather the head onto the conduit. Bendthe wires over and reinstall the Cut the remaining main conductor wireto reach from the bottom lugs of themeter base socket into the main lugsat the panel.
8 Push all three wiresthrough the nipple into the the main conductor wires tothe bottom lugs of the meter If the panel you are installing uses amain breaker that has not yet beeninstalled, do it now. Connect the mainconductor wires to the lugs on thebreaker or to the main lugs of the the neutral wire to one of thelarger lugs on the grounded (neutral)buss INSTALL a #4 bonding wire from theground bushing to the ground Connect the bonding strap or screw tothe ground bar. Differentmanufacturers employ differentmethods to accomplish thisgrounding of the INSTALL a #4 ground wire from theground buss of the panel to all locationspreviously INSTALL the branch circuit Check and tighten all connections onceagain!
9 !