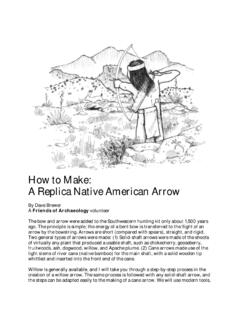
Transcription of How To Make: A Replica Native American Bow.
1 How To make : A Replica Native American Bow. By Dave Brewer, A friends of Archaeology volunteer. The Native American 's in the Southwestern United States did not begin using bow and arrow technology until about 1,500 years ago. Prior to the advent of the bow and arrow, the atlatl (an Aztec word from Mexico) was the primary hunting weapon. Most "arrowheads" that are found today which are longer than 1 inch were really points for the long, spear-length atlatl shafts that were used to bring down large animals. What are often referred to as "bird-points", were the true arrowheads. They were used for everything from hunting bison and rabbits to warfare, not just for hunting birds. Bows then were different from the large and elaborate hunting bows used by hunters today. They were much lighter. The English longbow (of Robin Hood fame) didn't lend itself to the requirements of early hunters on the American continent; where dense forests had to be threaded through, and a cumbersome long bow would get hung up in vines and brush!
2 2 So a short, stout bow was used pretty much by all tribes. While it didn't shoot as far as a long bow, that was not the idea. American hunters relied on stealth, tracking skills, and patience to get close to their quarry in order to shoot an accurate lethal shot. In order to accomplish this, the hunter (or hunters, if a hunting party was assembled for hunting large game), would set up a blind (a rocky wall or brush construction behind which to hide) and wait near a creek, spring, or river where animals were known to drink on a daily basis. As the animals came by, the hunter would shoot at them. Before the bow, the hunter would have to rise up with his arm extended to throw the spear, making it much more likely that he would startle the animal before getting off a throw. If the animal wasn't killed, but only wounded, the hunter would track the animal until he could kill it. Tradition taught these hunters to offer thanks to the slain animal's spirit for providing food for his family.
3 When an animal allowed itself to be killed, it was a gift, and the hunter needed to acknowledge that gift. Weapons and hunting gear were a man s means of livelihood and a source of pride. A young boy would practice with the bow and arrows made for him by his uncles. As his skills improved, so did his equipment. Girls and women could hunt with bows and arrows as well, but hunting was more traditionally a role for men. 3 A child s practice with a small bow and arrows was no small thing. In perfecting hunting skills he could bring down rabbits and squirrels and other small game. They were welcome additions to the cooking pot, contributing to the family s well being. SAFETY TIP NUMBER ONE: A bow turns an arrow into a deadly weapon. If an arrow hits something, either intentionally or accidentally, it will cause damage, harm, and even death. The same rules apply to arrows as would apply to a gun. Use your bow and arrow only with adult supervision.
4 Aim only at targets, not people or animals. make sure that nothing is behind the target that could be hurt if you miss. Practice for safety as well as for improving your skill with the bow. SAFETY TIP NUMBER TWO: "Making a Bow" is recommended for children only with adult supervision, both in making and using the bow. Shaping of the bow is accomplished by whittling with a knife, or using a drawknife, and it is ironic that a sharp edge can be safer than a dull edge. A dull knife requires more force to cut the wood and can behave unpredictably as a result. A sharp knife allows the whittler to remove small amounts of wood at a time with only a small amount of well-controlled force. Always cut away from your body, never use the knife in a way that someone else might be cut if you slip, and if you find yourself applying a lot of force, stop and rethink what you are doing. Never use a folding knife that doesn t have a secure lock to keep the blade open!
5 4 Even a relatively short bow (3 to 5 feet) is capable of shooting an arrow quite a distance. The power of a bow isn t only in its length, however, but its power is really in its stiffness. After an archer learns the basic skills with a light bow, they can make a longer and stiffer bow for shooting targets at greater distances. There is a little lesson in physics at the end of this How to guide. Native Americans used all kinds of wood for bows, but some wood is better than others for the finest bows. Bows were usually made with the best wood that was locally available in their territory, but some woods had such a good reputation for bows that people would trade bow wood over hundreds of miles. One such wood is Osage Orange, from the Ozark Mountains. Osage orange is a hardwood that becomes bright orange in color when its bark is peeled, and it is stiff and strong. Ash, oak, yew, hickory, elm, black locust, juniper and other local woods can be used for bows, although they may be more fragile.
6 The selection of the right piece of wood helps in the creation of the bow, including length, straightness, and grain (lack of side branches). Bow makers debate whether it is best to make a bow out of seasoned (dry) wood or fresh (green) wood. Dry wood can be harder to whittle but there is less chance you will be unhappily surprised by splitting after the bow is made. Green wood is more readily available, it s a little easier to whittle, but the finished bow may split and become fragile as it dries. 5 Look for a shoot or limb that is nearly straight for 3 to 5 feet in length and is about 1 to 1 inches in diameter. REMEMBER to ask permission before cutting wood on another person's property. You may find that this is the hardest part about making a bow. Side twigs are ok, but side branches are not since they distort the grain of the limb. In some cases, you can cut a thicker limb with side branches if all of the side branches are one side of the limb.
7 The thick limb can be split down the middle (by an adult, using an axe or wedge), and the side without the branches can be used for a bow. The piece of wood that you cut probably will be thicker at one end than at the other. Begin at the thinner end, trimming off side twigs and whittling off the bark. Don t cut into the wood very deeply, because any notches into the wood will create weak spots, which in turn can cause the bow to break .. Something you do not want to happen. When the bark and twigs are removed for the entire length of the limb, you have a blank or bow staff. Locate the center of the bow staff, and allow a six-inch space for the handgrip (this will be the thickest part of the finished bow). The thinner end of the bow staff should be shaped (whittled) first because there is less wood to remove and it will serve as the "model" for the reduction of wood in the thicker end of the staff. The thickness of each bow end should taper smoothly and continuously from the handgrip to the tip, but the tip needs to be thick enough to hold a notch for the bow string without breaking.
8 A typical thickness will be to 1 inch at the handgrip to inch at the tip. The cross section through the bow end should be more and more like a flattened oval as you move away from the rounded oval of the handgrip. 6 Once both ends have been whittled into their tapers, notches can be cut to hold the bowstring. The bowstring will be attached (tied) permanently to one end, while the other end should have notches whittled so that the bowstring loop can be slipped on and off. This means that the notch must hold the loop securely in place while the bow is bent for use and the string is tight. When the bow isn t in use, the bow should be bent and the loop should be slipped off the notch so the bow can be stored in a relaxed position. Once the notches are designed and cut, the ends and handgrip can be sanded smooth. The real art to making a bow is in designing the tapers and thickness so that the bow is both strong and flexible.
9 The bow needs to bend without breaking when the arrow is pulled back to its full length, but it needs to be stiff enough that the bow string delivers a lot of force to the arrow when the arrow is released and the bow snaps back to it s ready position. If the bow is too stiff, the arrow can t be shot with accuracy, or if you pull a stiff bow with all your strength, you can actually break the bow and you will have to start over. If the bow is too flexible (light), there will be little power behind the arrow. For beginning archers, it's best to start with a light flexible bow, even if the arrow doesn t shoot very far. They can graduate to a stiffer bow once their skill improves. Once the ends have been shaped and the notches are ready, all you need is a bowstring. The bowstring can be made from heavy hemp twine, heavy monofilament fishing line, rawhide, or animal sinew. The bowstring can be a single strand, or more commonly it is made by spinning or braiding multiple thin strands together.
10 The string needs to be thick enough not to break when the arrow is pulled to its limit, and it needs to be thin enough to fit into the nock of the arrow. Animal sinew and yucca string were used in the past. The animal sinew came from the tendons of deer and elk. It was a superior material for bowstrings although it would stretch to the point of 7 becoming worthless if it got too wet. You can purchase imitation sinew from craft stores that works well. It consists of nylon dental tape that has been impregnated with a yellow-brown wax. It comes in spools and can be braided into strong and long-lasting bowstrings. The easiest braids are made with three strands. Alternate placing each outer strand between the other two. Try to maintain an even tightness to the braid for its entire length, which should be at least 12 inches longer than the bow to give you enough room to make the loops. make a loop in one end of the bowstring that fits tightly in the notches of one end of the bow.