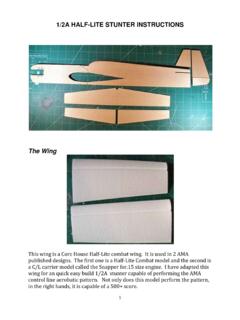
Transcription of How to Sheet a Foam Wing - AeroManiacs
1 1 How to Sheet a foam wing By Bob Hunt The Molded Leading Edge Cap One of the most overlooked aspects of stunt model construction is the accuracy of the leading edge radius. If the top and bottom radii of each of the leading edges is not absolutely perfect, the result will be a model which will have trim issues to one degree or another. Bill Werwage had a few models that should have flown well, but didn t. He studied the models in detail and concluded that the common denominator in the ones that didn t fly well was inconsistent leading edge profiles. In several cases he stripped the leading edges from the models and glued on new ones and then carefully shaped them to insure complete accuracy and instantly the models few much better!
2 This is what led us to develop molded leading edges for our Lost- foam built-up wings. Molding leading edge shells around a mold buck - that is accurately cut with a hot wire - yields absolutely repeatable results that insure perfectly shaped pieces. If these pieces are in turn accurately attached to the wing frames, the result is a perfectly shaped leading edge. This has been working just fine on the built-up wings for quite a while now. It seems that adapting this technology to foam core wings has been somewhat of an issue, however. The truth is that it is extremely easy to use this procedure on a foam core wing as well.
3 The key again to accuracy is the ability to hot wire cut a perfect radius on the leading edge of the foam core and then attach a molded cap, which is formed over an accurately cut mold buck. I ve worked up a photo essay that will (hopefully) explain the procedure: Photo No. 1 shows the 1/16 inch thick balsa LE cap already formed around the foam mold buck. There are a number of things to talk about here: The first step is to make/obtain the foam LE mold buck. You can either make your own if you have the required equipment, or order one from one of the foam wing cutting services.
4 Note that the rear edge of the LE mold buck is reinforced with a piece of plywood. This stiffens the mold buck so that it will not bow during the wrapping process, insuring a straight, accurate molded piece. The balsa is wrapped onto the mold buck in exactly the same manner as you would use to 2 mold a balsa LE shell for a built-up wing (This entire process is described and shown in detail in Robin s View Productions Lost- foam wing Building System DVD set). Before the LE cap sheeting is wetted and molded, it must be edge trimmed. I do this with a straightedge and a #11 blade knife.
5 After the edge is trimmed with the knife, I sand the edge perfectly square. I use a 24 inch long Permagrit sanding bar for this operation. The Permagrit sanding bar is made from an aluminum extrusion that can be set on its side to allow the balsa Sheet to be slid against it and achieve a 90 degree sanded edge (This process is also detailed in the Lost- foam DVD set). Photo 1: I prefer to make my foam core leading edge caps from a piece of 3-inch wide balsa. Trimmed and sanded this piece will be just shy of 3 inches wide ready to mold. After the balsa cap is trimmed and sanded, a centerline should be drawn down the entire length of the piece on the side that will ultimately seat against the wing core.
6 Do this using a ball point pen. Thoroughly wet the balsa blanks in a bath of hot water and then position the blank on the LE mold buck. Align the centerline on the blank with the centerlines on the ends of the mold buck at either end, and hold the blank in place by inserting a straight pin through the blank and into the mold buck. Now wrap the blank down around the mold buck fairly tightly using an elastic Ace bandage. Tape off the end of the wrap and let the molded LE cap 3 dry thoroughly (Usually 24 hours at least!) Photo #2 When dry, unwrap the Ace bandage and the results should look like Photo #3.
7 Note be sure to carefully remove the pins that were installed to hold the molded cap onto the mold buck to prevent marring the surface of the molded cap. Photo 3: 4 Now it s time to prepare to install the molded LE caps onto the foam cores. Photo #4 shows all the materials necessary to begin this process. The foam core should be thoroughly cleaned with a vacuum cleaner to remove any foam dust from sanding. The glue will not stick effectively to a dusty surface! You will need a good laminating resin. I use and highly recommend Z-Poxy s Finishing Resin for this process. It has adequate working time (pot life), is easy to apply and it cures up fairly quickly.
8 It also cures very hard, insuring added strength. Some epoxy resins never get completely hard, and I m quite certain they do not yield as strong a bond as the Z-Poxy material. You will also need a masking tape dispenser and an acid brush. 5 Photo 4: Mix up about a half ounce of Z-Poxy Finishing Resin in a cup and then begin brushing it onto the inside face of one of the molded LE caps as shown in Photo #5. Only a very thin application of the resin is required. Too much resin will only add unnecessary weight! Be sure that all the balsa surface that will contact the core is coated before proceeding.
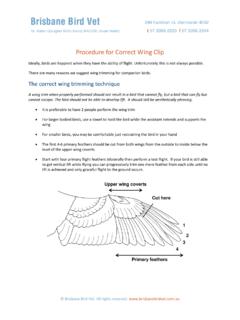
9 6 Photo 5: Position the molded balsa LE cap onto the leading edge of the corresponding core and align the centerline on the cap to the centerlines on either end of the core. Pin the blank to the core accurately as shown in Next, tape the molded LE cap to the surface of the core in several places along the span as shown in Photo #7. 7 The next step is critical. The core must be positioned in the cradles (pieces of foam from which the core was cut) accurately, and in such a manner that the core is supported equidistant from the surface of the core. This requires placing a piece of balsa in the aft end of the cradle that is the same thickness as the balsa you used for the molded LE cap.
10 See Photo #8. Position the core in the lower cradle and then place another piece of balsa on 8 top of the core, as shown in Photo #9, to support the top cradle equidistant from the surface of the core. Double check to insure that the core and the two cradles are in perfect alignment, and then weight down the leading edge as shown in Photo 10. It is imperative that the bench on which this assembly is placed is absolutely flat. Note that we are weighting it down against a piece of inch thick granite. I highly recommend investing in a piece of this material. 9 Photo #11 shows the leading edge cap securely and accurately glued to the core.