Transcription of Induction Motors - Washington University in St. Louis
1 Induction Machines - 1 THREE-PHASE Induction motor March 2007 A. PREPARATION 1. Introduction 2. The Rotating Field 3. Rotor Currents 4. Induction motor Equivalent Circuit 5. Torque and Power Characteristics 6. Operation Beyond the Range 0 < s < 1 7. Determination of motor Constants 8. Bibliography B. EXPERIMENT 1 . Equipment List 2. Speed and Direction of Rotation 3. Starting Current 4. No Load Test 5. Locked Rotor Test C. REPORT Induction Machines - 2 Induction Machines - 3 Induction Machines - 4 Induction Machines - 5 Induction Machines - 6 Induction Machines - 7 Induction Machines - 8 Induction Machines - 9 Induction Machines - 10 Induction Machines - 11 Induction Machines - 12 Induction Machines - 13 Induction Machines - 14 Rather than the equivalent circuit of Fig.
2 10, we choose one more akin to Fig. 9 to yield the result shown in Fig. 13. Based on past experience, the following simplifying assumptions can be made for this model: Induction Machines - 15 X0 >> X1 , R0 + jX0 >> R2 + jX2 , and X1 X2 . NOTE WELL: This is based upon a WYE model and therefore represents but one of the three phases. For the rotor locked, s = 1 so that the following equations can be written from the equivalent circuit of Figure 13 assuming R0 + jX0 >> R2 + jX2 : Z11 = (R1 + R2) + j(X1 + X2), Z11 = V1/I1 , and PPH = (R1 + R2)I12 These equations can be solved for R2, X1 , and X2 as follows: R2 = (PPH/I12) R1 and (by assumption) X1 = X2 = Z11 2 (R1 + R2)2 . Assuming that the stator resistance R1 is measured at DC and that phase power PPH , phase voltage V1 , and phase current I1 are measured, R2, X1, and X2 can be calculated for the motor from the locked rotor test data.
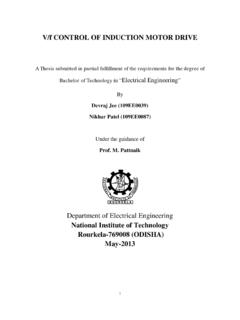
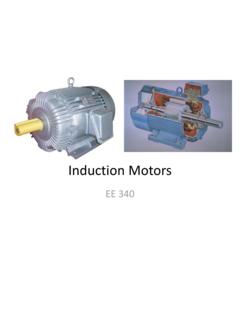
3 From the data obtained from the no-load test, we can determine the values for the series circuit elements R0 and X0. To find these values, we draw graphs of power and line current versus applied voltage as shown in Figure 14. First the measured I1 and the measured phase power PPH are used to calculate PC + PFW = PPH I12R1 , where I12R1 is the copper loss in this no-load case, PC [W] is the per-phase core loss and PFW [W] is the per-phase friction-and-windage. The derived values are then appropriately plotted and a suitable approximating curve put through them; this curve is then cleverly extrapolated backwards to the voltage origin, and because core loss varies as V1 , its intercept gives the friction-and-windage power loss.
4 This will be explored further on the next page. Induction Machines - 16 The observant student will note the italicized and bold-face material in this sentence and realize that brainpower may be more important than computer power in getting this right. Figure 14 For no load, s = 0 so that the following equations can be written from the equivalent circuit of Figure 13: ZIN = (R1 + R0) + j(X1 + X0) ZIN = V1/I1. PPH = PCu + PC + PFW = I12(R1 + R0) + PFW . Thus: R0 = [PPH PFW]/I12 - R1 X0 = ZIN 2 (R1 + R0)2 X1. Assuming that phase power PPH, phase voltage V1, and phase current I1 are measured and that friction-and-windage loss PFW has been obtained as shown in Figure 14, R0 and X0 can also be calculated for the motor from the no-load test data.
5 8. Bibliography (1) Langsdorf, Theory of Alternating Current Machinery, 2nd. ed., New York, McGraw-Hill, 1955. (2) Reynolds and T. Bernstein, "The Damnable Alternating Current", Proceedings of IEEE, (64) pgs. 1339-1343, Sept. 1976. (3) Alger and Arnold, "The History of Induction Motors in America", Proceedings of IEEE, (64), pgs. 1380-1383, Sept. 1976. Induction Machines - 17 B. EXPERIMENT 1. Equipment List One Instrumentation Rack with the usual test equipment One 208 Volt, HP, 3-phase Induction motor One dynamometer with torque controller One Phase Sequence Indicator One single-phase wattmeter plus miscellaneous apparatus as needed 2. Initial Data Record all nameplate information for the Induction motor .
6 You should also make a DC measurement of stator winding line-to-line resistance using a DMM. 3. Speed and Direction of Rotation The motor is mounted in a test rig that allows one to control the torque applied to the motor shaft and to measure both rpm and torque. The rpm sensor operates on a Hall effect principle and consists of a disk bearing on its periphery two magnetic pole-pairs and a detector that pulses once each time a pole-pair is rotated past it. Observe that, by counting the output of the detector, you will get a frequency, [Hz] , that is twice the actual rotational frequency of the motor . Therefore motor rpm = n = 60 ( ) = 30 . To observe the rpm sensor in operation, proceed as follows. Energize the detector with 20 VDC ; and attach its output to the oscilloscope, the torque controller, and frequency counter.
7 Power up the motor normally and determine the no-load* rpm when the motor , as viewed from the front, is rotating clockwise (CW); repeat with the motor spinning counter clockwise (CCW). BE CAREFUL !! It can hurt to tangle with a three-phase motor . A successful salesman for General Electric's motor division once remarked to one of your instructors that, when asked by a customer how a motor Induction Machines - 18 * The no-load condition is that which obtains when the controller knob is fully counter-clockwise. Induction Machines - 19 actually worked, he invariably replied "Very well, indeed.". This attitude is typical of a technologically mature discipline: one really can afford to treat the device as if it were a black box.
8 Therefore, in addition to determining the short circuit and open circuit characteristics of your motor you will also have to determine its input and output powers. To this end, it will be assumed that the motor is a balanced three phase wye connected load and that you will therefore need to measure only one line-neutral voltage, only one line current, and only one phase power to characterize Pin completely. That is, Pin = 3 Pline-neutral = 3 Pphase = 3 IrmsVrmscos . Take note that Vrms is the phase voltage Vline-neutral = Vline-line/3 . Further, Pout = 2 fT = 2 n60 T = T, where T is the shaft torque, measured with the dynamometer in-oz, which must be converted to in order to obtain power in watts. 4. Starting Current Wire up the motor for CW motion so that starting current can be measured accurately using the oscilloscope#.
9 With no load on the motor and 120 Vrms, line-line, turn on the power and observe and record the transient starting current&. 5. No Load Test. Precisely 1 h after the scheduled start of the lab, you must be prepared to measure Vrms and (Vrms), Irms(Vrms), Pphase(Vrms). Because there is no way to control Vrms at the bench, all lab groups are required to take their measurements in synchrony as the line-line voltage is varied at the control panel by the instructor. Line-to-line voltage will be varied from 30 to 210 V in steps of 30 V. 6. Locked Rotor Test. This portion of the experiment will begin immediately after the NO Load Test is complete. With the motor de-energized, lock the rotor with the wooden clamp-on fixture provided.
10 Turn on the power. Note that Vrms will initially be low, # Remember that you are working with polyphase power . Therefore it will be essential for you to distinguish carefully between line-line and line-neutral voltages. & Just how this is done is up to you. But it can be done. It just can t be done swiftly unless you design your measurement in advance. Induction Machines - 20 and the instructor will then raise it in steps until Irms(Vrms) = Ifull-load. Measure Vrms and (Vrms), Irms(Vrms), Pphase(Vrms). Turn off the power. 7. Torque vs. Speed Curves. Immediately after the Locked Rotor Test is complete, the instructor will reset the line-to-line voltage to approximately 120 Vrms.