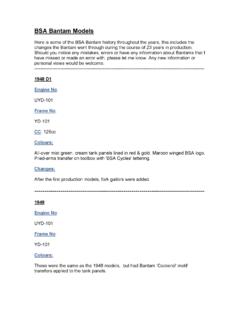
Transcription of INSPECT YOUR WARNING HANDLEBAR REGULARLY …
1 Est. 2002 Jones see overleaf for detailed HANDLEBAR installation H-Bar Manual (version )This manual has several sections; Read this manual before you ride INSPECT your handlebars REGULARLY Jones Bikes H-Bar warranty Detailed HANDLEBAR installation instructionsREAD THIS MANUAL BEFORE YOU RIDEP lease read this instruction manual thoroughly before using your new Jones H-Bar HANDLEBAR ; it contains important safety and maintenance you do not understand the information in this manual, or you have a question about your Jones H-Bar HANDLEBAR that this manual does not cover, consult your Jones Bikes dealer. If you have a question or problem that your Jones Bikes dealer can t handle, contact us at: Jones Bikes, 101 Sunny StreetTalent, Oregon 97540 Telephone: (541) 535-2034 Email: more Jones technical information and manuals go to: Bikes H-Bar crash replacement policy If you crash your bike and the main force of the impact is absorbed by the HANDLEBAR , we strongly encourage you to replace the bar, even if there are no visual indications of this crash occurs within one year from the date of retail purchase, Jones Bikes offers a crash replacement program, substantially reducing replacement cost.
2 To take advantage of this program, contact us using the information listed above, and ask for the Warranty department. Installation, Fit, Inspection The HANDLEBAR , the part you hold with your hands when riding a bicycle, is primarily responsible for your ability to steer and control the bike . In addition, the HANDLEBAR works with the seat to define your posture on the bike , adding comfort and efficiency to your cycling. The HANDLEBAR is connected to the bike by the stem. This section explains how to install, adjust, and INSPECT your HANDLEBAR and stem. ! WARNINGThe Jones H-Bar is not designed or intended to be used with bar ends and doing so could be YOUR HANDLEBAR REGULARLYAs with anything mechanical, every part of a bicycle has a limited useful life due to wear, stress, and fatigue.
3 Fatigue refers to a low-stress force that, when repeated over a large number of cycles, can cause a material to fail or length of the life of a part varies according to its design, materials, use, and maintenance. Although lighter parts may, in some cases, have a longer life than heavier ones, it should be expected that light weight, high performance parts require better care and more frequent inspections. REGULARLY INSPECT your HANDLEBAR for signs of fatigue stress: dents, cracks, scratches, deformation, or discoloration. Large forces can accelerate the fatigue of a material. As an example, a crash may add a great deal of extra stress to your bike .
4 As with this example, jumping your bicycle, performing bicycle stunts, severe off-road riding, downhill riding, or any abnormal bike riding also increase the stress on every part of your bike . If you choose to jump your bicycle, use it for stunts, or use it in a severe off-road or downhill environment, or ride it after a crash, carefully INSPECT your HANDLEBAR for signs of fatigue before and after each you are unsure of the safety of your Jones H-Bar HANDLEBAR , do not ride the bicycle; take the bicycle to your dealer for adjustments. Even if you perform regular inspections, be aware that if you exceed the limit of strength of a given part, it will fail.
5 Once a Month Make sure the stem is in alignment with the front wheel. Test the stem connection to the fork by attempting to turn the HANDLEBAR from side to side with the front wheel locked between your the security of the HANDLEBAR by attempting to rotate it in the stem (below). Make sure that no brake or gear cables are stretched or pinched when rotating the HANDLEBAR . Check that all bolts are tight. The correct tightness varies according to the type of stem on your bike . Check your stem owner s manual for these specifications. If you are unsure how to tighten these bolts, consult your dealer. ! WARNINGAn improperly adjusted or tightened HANDLEBAR or stem can cause you to lose control and fall.
6 Make sure the stem and HANDLEBAR are postioned and tightened correctly before riding the H-BAR WARRANTY Jones Bikes warrants each new Jones H-Bar HANDLEBAR against defects in workmanship and materials for a period of three years from the date of sale. This warranty is expressly limited to the repair or replacement of a defective HANDLEBAR and is the sole remedy of the warranty. This warranty applies only to the original owner and is not under this warranty must be made through an authorized Jones Bikes dealer or directly with Jones Bikes. To facilitate warranty or crash replacement claims, please register your H-Bar by filling out the registration form at Proof of purchase is warranty does not cover normal wear and tear, improper assembly or follow-up maintenance, or installation of parts or accessories not originally intended or compatible with the HANDLEBAR as warranty does not apply to damage or failure due to accident, misuse, abuse, or neglect.
7 Modification, other than trimming the ends of the 710mm H-Bar to the Original H-Bar Width line to make a 660mm H-Bar, shall void this Bikes shall not be responsible for incidental or consequential damages. Some states do not allow the exclusion of incidental or consequential damages, so the above exclusion may not apply to you. Labor charges for parts changeovers are not covered by the warranty gives the consumer specific legal rights, and those rights may vary from place to place. This warranty does not affect the statutory rights of the consumer. ONE LAST : The H-Bar is best when used on a Jones bike !REF: HORIZONTAL (relative to the ground)11 (10 -15 recommended)You can tape as much (or as little)
8 Of the bar as you likeThe wide range of hand positions from the front loop to the ends of the grips gives you a multitude of comfortable riding positions Use long grips with the H-Bar so you can make use of all the available grip sectionAdjust the angle and reach of the levers so that your fingers reach them easily and comfortablyPosition your levers up to but not touching the crossbar jointUse the reach adjust to bring the brake levers close to the barThere s lots of space for fitting bags, lights, and devicesEst. 2002 Jones function | On-road and off | Jones Geometry | Inspirational handling | The high-performance non-suspension bicycleDETAILED HANDLEBAR INSTALLATION INSTRUCTIONS These instructions are written for an experienced mechanic.
9 If you are not sure of your ability to correctly install this HANDLEBAR , or do not have the proper tools for HANDLEBAR installation, have the HANDLEBAR installed by your Jones H-Bar dealer. Before you begin In order to get the full range of hand positions, it is critical to use the correct length grip for your H-Bar. 660mm H-Bars require grips that are approximately 165 long, and 710mm H-Bars require grips that are approximately 205mm /8 long. The Jones H-Grips come in just the right length to fit your H-Bar, and are what we recommend!The Jones H-Bar works best when the main grip area is approximately the same height as the saddle, and far enough back toward the saddle to allow you to sit very upright when holding the rearmost portion of the grip area, so that you have easy access to the front positions as well.
10 To achieve this, you may need a significantly shorter and/or higher rise stem. As with any new HANDLEBAR or stem installation, you may also need longer cables, housing, and/or hydraulic lines in order to accommodate the new position and width of the H-Bar. REPLACING AN EXISTING HANDLEBARTo remove the old grips 1 Lift the edge of a grip with a thin flathead screwdriver or similar tool. 2 Spray some alcohol or water under the grip. 3 Remove the screwdriver. 4 Rotate the grip back and forth, while pulling toward the end of the HANDLEBAR , until the grip slides off the the controls Before removing them, note the order of the brake levers and shift controls on the HANDLEBAR and also the path of the cables.