Transcription of INSPECTION & MAINTENANCE BULLETIN
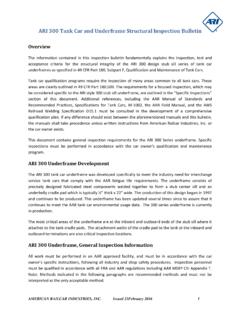
1 INSPECTION &. MAINTENANCE BULLETIN . ARI 1316 2 Plug Type Angle Valves Item # Description Item # Description Item # Description 1 Body 12 Top Stem Nut 23 Seat Gasket 2 Valve Disc 13 Handwheel 24 Valve Seat 3 Roll Pin 14 Washer 25 Stem Gasket 4 Valve Stem 15 Bushing 26 Washer 5 Packing Retainer 16 Bolt 27 Bottom Stem Nut 6 Packing 17 Yoke 28 Cotter Pin 7 Nut 18 Screw 29 Body 8 Stud 19 Yoke Assembly 30 Gasket 9 Packing Gland Nut 20 Chain Assembly 31 Nut 10 Packing Gland 21 Plug 32 Stud Bolt 11 Woodruff Key 22 Plug & Chain Assy 33 Seal Kit 1. Only AAR class F facilities are certified to recondition, repair, retest and qualify tank car angle valves. Personnel performing INSPECTION and test must be certified Level I per AAR. Manual of Standards and Recommended Practices, M-1002, Appendix T, VALVE DISASSEMBLY.
2 Before disassembly, close valve and look at stem threads. If less than one complete thread projects above the yoke bushing, a longer stem should be used when reassembling. Being careful not to damage gasket tongue of valve seat, disassemble the valve as follows: 1) Remove the tag, if any, and plug from the valve. See if tag indicates a malfunction or problem the last user may have had. 2) Open valve 2 or 3 turns. 3) Remove valve seat and seat gasket from body. 4) Unscrew top stem nut and remove woodruff key and handwheel from stem. 5) Screw valve stem out of yoke and pull through the bottom of the valve body. 6) To remove stem gasket, remove cotter pin, unscrew bottom stem nut, and remove washer from stem to free stem gasket and remove. 7) Loosen yoke set screws and unscrew yoke from body.
3 Be careful not to score body threads. 8) Remove both packing gland nuts, packing gland, packing, and packing retainer. INSPECT. Discard packing rings, gaskets and any broken parts. Clean all parts thoroughly. As necessary, clean per Clean and Steam Section of this BULLETIN . Carefully inspect all parts for cracks, particularly the sharp corners of the body and yoke. Discard any cracked parts. Parts must not be thrown on the bench or into boxes, otherwise threads and finished surfaces will be damaged. Be particularly careful with stem and seat. Body Inspect body for general condition. If severe corrosion is evident, body should be discarded. Inspect body outlet threads. If eroded or bent, clean with a 2"-11 1/2 NPT hand tap. Check with a standard plug gage. If threads are badly pitted, or if plug gage screws in more than one turn past the gaging notch, valve body must be scrapped or bushed.
4 Inspect body seat threads. If eroded or bent, clean with a 3 1/4" 12UN-2 hand tap. If threads are badly pitted, valve body should be discarded. Valve Seat 2. Inspect valve seat for general condition. If threads are eroded or bent, clean with a 3 1/4" . 12UN-2 hand die. If threads are badly pitted, seat must be discarded. Inspect closure face; if pitted, galled or otherwise damaged, seat must be refaced. Inspect tongue and body gasket face; any nicks or burrs must be removed. (See Special MAINTENANCE Procedures Section.). Valve Stem Inspect valve stem for general condition. Inspect for straightness and for scratches where stem goes through packing. Discard any stem which is bent; all nicks, burrs and scratches must be made smooth to prevent damage to packing. If necessary, clean thread with a 7/8"-6 ACME-2G.
5 Hand die. Valve Disc Inspect gasket channel; if pitted, galled or otherwise damaged, disc gasket channel must be refaced. (See Special MAINTENANCE Procedures Section.). Valve Plug & Chain Inspect valve plug for general condition. If threads are eroded or bent, clean with a 2"-11 1/2. NPT hand die. If threads are badly pitted, plug must be discarded. Screw valve plug snug in to body outlet thread; if less than one full thread projects, plug should be replaced. Inspect chain and replace if necessary. Yoke Assembly Inspect yoke assembly for general condition. Make sure that the yoke bushing is tight and stem threads are in good condition. Replace bushing if necessary. Miscellaneous Parts Inspect studs, nuts and packing gland assembly. Discard if corroded or if threads are damaged. Inspect handwheel; discard if cracked.
6 It is desirable to replace old style valve plug chains with new type chains which have a circular ring at the body end. If all parts are satisfactory, proceed with assembly, using the same stem and seat. Do not use the stem from one valve with the seat from another valve. CLEAN & STEAM. If examination of the valve indicates dirt and corrosion, the parts should be cleaned. One method of cleaning is called clean and steam . To do this, make a strong solution of soda ash and water in a pail. Place the parts in the pail and boil by injecting steam from a steam hose. Be careful to avoid damaging seating surfaces. Place the parts in a wire basket, wash with water, steam with a clean hose, and dry with an air hose. Wire brush where necessary to remove any scale which has not been removed by the above treatment.
7 Be careful to avoid damaging seating surface. VALVE REASSEMBLY. 3. 1) Insert seat gasket and apply washer, nut and cotter pin to disc. 2) Attach disc assembly to stem using roll pins. 3) Insert stem assembly through bottom of body from which it was removed. 4) Put a seat gasket on valve seat and screw into body. 5) If a new type valve plug chain is to be used, place large ring of chain on body. 6) Lightly screw in valve plug. Plug should be large enough so one full thread projects;. otherwise it should be replaced. 7) Place packing retainer and packing rings in packing box. Be sure retainer is installed right side up. 8) Install packing gland assembly, but do not tighten nuts. 9) Screw yoke on stem threads, place key in keyway and attach handwheel and nut. 10) Screw yoke on body, being careful not to force stem assembly against seat during the process.
8 11) When grooves on yoke and body are lined up, tighten yoke set screws evenly to prevent cocking stem. 12) Lightly close valve. At least one full thread of the stem should extend beyond top of yoke bushing; otherwise stem should be changed for a longer one. 13) Partially open valve and adjust packing gland. Tighten gland nuts evenly to prevent binding. The gland must be loose enough to permit hand operation of the valve. When using PTFE packing rings the minimum suggested packing gland torque is 150 in-lb. and should be rechecked after 24 hours. 14) Protect valve seat tongue with cork or other protection in valve inlet. Proceed with testing. TESTING. Seat Test Remove inlet protection, open valve slightly and bolt it on the adapter. Close valve by hand using steady pull rather than a snap action.
9 Loosen valve plug, apply leak detection solution around plug threads and apply dry air or inert gas at 600 psi to the inlet. 4. If the valve leaks, release pressure, remove valve from adapter flange and turn stem while looking through inlet. This may indicate that the stem is cocked or bent. If the stem appears to be centered, disassemble valve and look for issues with the gasket, disc and seat. Leakage Test If no seat leakage is discovered, tighten valve plug, open valve 2 or 3 turns and test for leakage at packing around seat threads, and around plug. If the packing leaks and it cannot be stopped by tightening the gland, or if leaks occur around seat or valve plug, valve must be disassembled and inspected. If no leakage is discovered, release pressure and remove valve from test chamber.
10 Retighten valve seat as much as possible, replace the cork or other protection in inlet. Be careful not to damage valve seat tongue. SPECIAL MAINTENANCE PROCEDURES. General The principle to be observed when refacing a seat or disc is to produce smooth seating surfaces with minimum removal of metal. It is especially important to keep seating surfaces concentric with the center line of the stem or seat. Care must be taken to see that refaced parts are not damaged in handling or storage. Seat Reface the seat in a holding fixture so that the threads and the seating surface will be concentric to the .75" diameter to within .003" Remove all nicks and burrs from the gasket tongue. The outside diameter must not be machined to less than " and the inside diameter, not greater than ". The gasket surface containing the 1/16" diameter scores may be touched up to remove depressions, but the seat must be scrapped if the height of the tongue is reduced to 1/4" or less.