Transcription of INSTALLATION AND OPERATION MANUAL
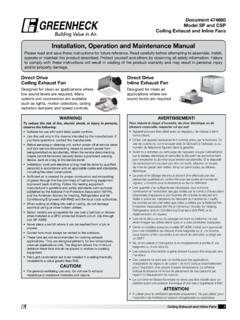
1 4510 Helgesen Drive, Madison, WI, 53718. , , Fax: INSTALLATION AND OPERATION MANUAL . MODEL EV70\EV130\EV200\EV300. ENERGY RECOVERY VENTILATOR (ERV). EV130 (door closed) EV130 (door open). from a space in which chimney-vented fuel burning WARNING equipment is located, take steps to assure that combustion RISK OF FIRE, ELECTRIC SHOCK, OR INJURY. air supply is not affected. Follow the heating equipment OBSERVE ALL CODES AND THE FOLLOWING: manufacturer's requirements and the combustion air 1. Before servicing or cleaning the unit, unplug the unit line supply requirements of applicable codes and standards.
2 Cord. Make sure unit is not running before opening its 10. This unit is intended for general ventilating only. Do not door. use to exhaust hazardous or explosive materials and 2. This INSTALLATION MANUAL shows the suggested INSTALLATION vapors. Do not connect this unit to range hoods, fume method. Additional measures may be required by local hoods or collection systems for toxics. codes and standards. 11. When cutting or drilling into wall or ceiling, do not 3. INSTALLATION work and electrical wiring must be done by damage electrical wiring and other hidden utilities.
3 Qualified professional(s) in accordance with all applicable 12. Use the unit only in the manner intended by the codes, standards and licensing requirements. manufacturer. If you have questions, contact the 4. Any structural alterations necessary for INSTALLATION must manufacturer. comply with all applicable building, health, and safety code requirements. 5. Connect this unit only to a 120 VAC grounded receptacle protected by a 15 or 20 amp circuit breaker. Do not CAUTION. remove the unit's line cord. 1. To avoid motor bearing damage and noisy and/or 6.
4 Do not install unit or controls where they can be reached unbalanced impellers, keep drywall spray, construction from a tub or shower. dust, etc., out of the unit. 7. This unit must be properly ducted to the outdoors. 2. Do not connect power to the units external control 8. Outside air inlet for this unit must be located away from terminals: this will damage the unit. The external sources of hazardous air such as auto exhausts. terminals are for use only with un-powered controls 9. Sufficient air is needed for proper combustion and designed for low-voltage OPERATION .
5 Exhausting of gases through the flue (chimney) of fuel burning equipment that might be installed in the area affected by this equipment. If this unit is exhausting air Due to continuing product development, specifications are subject to change without notice 134777_011 Revised 04/2011 2011 RenewAire LLC Page 1. SYSTEM LAYOUT. exchange core. Before you begin The exhaust outlet and fresh air inlet on the outside of the Read all instructions before installing the unit. Also review building should be at least ten feet apart to avoid cross- supplemental instructions included with any controls that will contamination.
6 The exhaust duct should be about the be installed. Carefully unpack and inspect the unit for same length as the fresh air duct. shipping damage. Open the access door and inspect inside the The exhaust outlet should not dump air into an enclosed unit. Attach the four duct collars to the unit with the screws space or into any other structure. provided in the plastic small-parts bag. Do not install the exhaust outlet and fresh air inlet through the roof or roof soffit. If these are the only available Location of the Unit options call RenewAire technical support for help.
7 Select a location so that: The fresh air intake vent from the outside is placed a The preferred mounting location for the unit is on a concrete minimum of ten feet from any other exhaust vent, and is foundation wall because the foundation wall will isolate any at least 30 long. blower vibration. The two ducts to the outside are as short and straight as possible, for the best performance from the system. If a basement area is not available or practical, use other Shorter duct runs help assure that the system is balanced: mechanical room space such as a closet, garage, storage, or the amount of air brought in is equal to the amount of air accessible attic or crawl space.
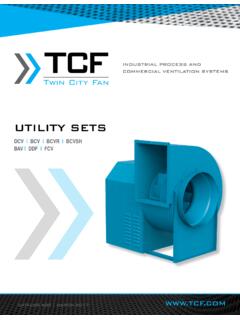
8 Exhausted. The power cord reaches an electrical outlet. NOTE: If you wish to install the unit in an attic or other The door can be opened to allow cleaning the core and unconditioned space, you must insulate all of the unit's filters. Provide at least 24 of clearance at front of unit ductwork that is located in the attic. Use at least R-6. for service access to the blowers, filters and energy insulation. (A) (B). Separate Room Air Pick-up Separate Return Air and Fresh Air Supply Fresh Air to Furnace Return Air Trunkline SA.
9 FA. Living area*. SA EA. EA. FA OA ERV. OA ERV. RA. (from bathrooms, kitchen area) RA (Furnace) Furnace RA. (from bathrooms, dining area) RA (Furnace) Furnace Minimum 3'. Note: ERV Blower may be operated separate from Furnace Blower *Use caution to introduce FA at low velocity and where good mixing Note: ERV Blower may be operated separate from Furnace Blower. will occur to minimize discomfort from drafts. (C) (D). Furnace Return Air Back Into Return Air Furnace Return Air Into Furnace Supply Air Install internal elbow here EA Minimum 3' SA.
10 SA Minimum 3'. FA EA FA. OA ERV. OA ERV. RA (to ERV). Furnace RA (to ERV) RA (Furnace) Furnace RA (Furnace) Minimum 3'. Minimum 3'. Note: The Furnace Blower must be operated any time the ERV is operated. Use furnace fan on continuous low speed or optional FM control Note: ERV Blower may be operated separate from Furnace Blower. to cycle furnace fan on with ERV. RA: Room Air OA: Outside Air FA: Fresh Air EA: exhaust Air SA: Supply Air (furnace). Due to continuing product development, specifications are subject to change without notice 134777_011 Revised 04/2011 2011 RenewAire LLC Page 2.