Transcription of INSTALLATION GUIDE & USER’S MANUAL - XtremeAir USA
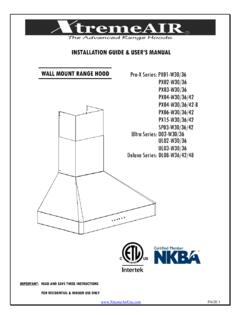
1 Page 1 INSTALLATION GUIDE & user S MANUAL Customer Support Info: Tel: Email: Website: For Under Cabinet Mount Range Hoods Page 2 TABLE OF CONTENTS 1 IMPORTANT SAFETY INSTRUCTIONS .. 2 2 MOUNTING HEIGHT .. 3 3 VENTING REQUIREMENTS .. 3 4 VENTING METHODS .. 3 5 ELECTRICAL REQUIREMENTS .. 4 6 TOOLS YOU WILL NEED .. 4 7 PARTS SUPPLIED .. 4 8 INSTALLATION .. 5-6 9 RANGE HOOD OPERATION .. 7-9 10 HOW TO CHANGE OR REPLACE LIGHT BULB .. 10 11 TROUBLE SHOOTING .. 10 12 USE & CARE INFORMATION .. 11 13 MAINTENNACE .. 11 14 RPRODUCT WARRANTY.
2 12 1. IMPORTANT S A F E T Y INSTRUCTIONS IMPORTANT NOTICE: The Important Safety Instructions and Warnings in this MANUAL are not meant to cover all possible problems and/or situations that can occur upon INSTALLATION of this unit. Use EXTREME caution when installing, maintaining, or operating this appliance. Contact the XtremeAir USA, LLC, Customer Support Team at or email: with any concerns or situations that you do not understand. The manufacturer disclaims all liability for any damages or injuries caused as a result of not following instructions for INSTALLATION contained in this MANUAL . To avoid the possibility of an explosion or fire, do not store or use combustible, flammable or explosive vapors and liquids (such as gasoline) inside or in the vicinity of this or any other appliance.
3 Keep all combustible items (such as aerosol cans) away from cook top burners, ovens and range hoods. Do not store flammable or explosive materials in adjacent cabinets or surrounding areas. Disclaimer: The manufacturer and/or distributor/seller (Manufacturer) decline all responsibility in the event of failure to observe the instructions provided for INSTALLATION , maintenance, and suitable use of the product. Manufacturer shall NOT be responsible for any injury due to negligence and the warranty of the unit shall automatically be voided due to failure to observe proper safety and INSTALLATION procedures. Manufacturer will not be held responsible for any damages to personal property, real estate, or any bodily injuries whether caused directly or indirectly by the range hood.
4 WARNING - TO REDUCE THE RISK OF FIRE, ELECTRIC SHOCK, OR INJURY TO PERSON, OBSERVE THE FOLLOWING: *Use this unit only in the manner intended by the manufacturer. If you have questions, contact the manufacturer. PRODUCT: Do not remove permanently affixed labels, warnings or plates from the product. This may void the warranty. Do not try to alter the hood. INSTALLATION : The INSTALLATION in this MANUAL is intended for qualified installers, service technicians, or person with a similar qualified background. INSTALLATION and electrical wiring must be provided by qualified professionals and in accordance with all applicable codes and standards, including fire-related construction. When cutting or drilling into the wall or ceiling; do not damage electrical wiring and other utilities.
5 It is recommended that two or more people assist with the INSTALLATION . The range hood may have very sharp edges; please wear protective gloves if it is necessary to remove any parts for installing, cleaning or servicing. Read all instructions before beginning INSTALLATION VENTING: For kitchen range or cook top ventilating use only. DO NOT use units to exhaust hazardous or explosive materials and vapors. Ducted fans MUST always be vented to the outdoors. DO NOT vent exhaust into spaces between walls, crawl spaces, ceiling, attics and/or garages. Use only metal ductwork. Old ductwork should be cleaned or replaced if necessary to avoid the possibility of grease fires. Check all joints on ductwork to insure proper connections. All joints should be properly taped.
6 ELECTRICAL: All electrical wiring must be properly installed, insulated and grounded. TURN POWER OFF and un-plug cords from outlet before servicing and/ or cleaning to insure your safety. OPERATION: Caution is suggested when using high settings on cooking range. Keep all fan, baffle filters, spaces, grease tunnel, oil container, and grease- laden surfaces clean. Grease should not be allowed to accumulate on fan, baffle filter, spaces, grease tunnel, and oil container. Never allow the filters to become blocked or clogged. Do not allow foreign objects such as cigarettes and/or napkins, to be absorbed into the hood. Clean ventilating fans and filters frequently. Page 3 2. MOUNTING HEIGHT 4. VENTING METHODS FOR THE MOST EFFICIENT & QUIET OPERTION: A distance of 26 to 30 is recommended between stove top and the bottom of range hood.
7 If the hood is mounted too low this could result in heat and/or fire hazard. If the hood is mounted too high the controls will be hard to reach, and the hood will lose its performance and efficiency. 3. VENTING REQUIREMENTS: It is recommended that the range hood be vented vertically through the roof with a minimum of 6 or larger vent work. ALWAYS, when possible, reduce the number of transitions and turns in the ducting. If a long duct run is required, increase duct size from 6 to 7 or 8 . If a reducer is used, install a long reducer instead of a pancake reducer. Reducing duct size will restrict/decrease airflow. V The size of the vent should be uniform. Use no more than three 90 elbows in the duct run. Make sure there is a minimum of 24 of straight vent between the elbows if more than one elbow is used IMPORTANT: NEVER exhaust air or terminate ductwork into crawl spaces, between walls, ceiling, attics, or garages.
8 All exhaust must be ducted to the outside. Do not use plastic ventilation Do not use 4 laundry-type wall caps ROOF VENTING (2nd choice) This is the most efficient way and highly recommended. Ducting goes vertically above the range hood through the house s roof. SIDE WALL VENTING (3rd choice) Ducting goes through the kitchen ceiling from the top of the hood and then through a nearby exterior wall. BACK WALL VENTING (1st choice) Ducting goes up straight inside upper cabinet then turn and goes horizontally straight through an exterior wall from the back of the hood. This will be the shortest ducting length Page 4 5. ELECTRICAL REQUIREMENTS: IMPORTANT: Observe all governing building codes and city ordinances. A 120 volt, 60 Hz.
9 AC, 15-amp outlet is needed (fused electrical circuit is required) It is the customer s responsibility to contact a qualified electrical installer, and assure that the electrical INSTALLATION is adequate and in conformance with National Electrical Code, ANSI/ NFPA 70 latest edition, or CSA Standards C22. 1-94, Canadian Electrical Code, Part 1 and C22. 2 No. 0-M91 - latest edition and all local codes and ordinances. 6. TOOL & PARTS YOU WILL NEED 7. PART SUPPLIED Body & Main Unit: 1 PC Long oil container: 1 PC (IG20, PX14, UL 14 is excluded) INSTALLATION MANUAL : 1set or find MANUAL on Baffle filter: 1set Screw: 6 pieces Remote control: 1 piece (Only included in Pro-x models) Level Powered Screwdriver Pencil Stud finder Philip screwdriver Hex bit extension Tape measure Jigsaw or key saw Note: about 6 wider than the stove is ok Car jack Cabinet Jack OPTIONAL Aluminum Tape Page 5 8.
10 INSTALLATION NOTE: DO NOT TRY TO REMOVE BLOWER OR ITS HOUSING. YOU WILL BE UNABLE TO PUT IT BACK IN. MORE IMPORTANTLY, THE WARRANTY WILL BE VOIDED. STEP 1: PROTECT THE COOK TOP Put a thick, protective covering over counter top, cook top or range to protect from damage or dirt. STEP 2: CREAT WORK STATION (OPTIONAL ONLY) Have 2 pieces of wood about 2 x 4 x 20 on both sides of stove & a plywood plank on top of them to protect cook top or stove from damage or dirt. This plywood will also create a comfortable work station for easy INSTALLATION . STEP 3: PREPARE DUCTWORK & SINGLE OUTLET STEP 4: ATTACH 2-INCH WIDE W O OD F I L L E R STRIPS (PX14 & UL14 models, skip this step) For installing under the cabinet with recessed bottom, attach a b o u t 2-inch wide wood filler strips (Not provided) to each side.