Transcription of INSTALLATION GUIDE FOR THE 2/4/8-PORT DVI …
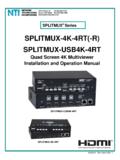
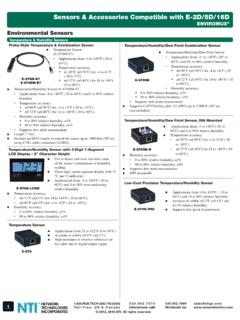
1 1 INSTALLATION GUIDE FOR THE 2/4/8-PORT DVI VIDEO/AUDIO SWITCH SE-DVI-2A / SE-DVI-4A / SE-DVI-2 ARS / SE-DVI-4 ARS/SE-DVI-8 ARS Front and Rear View of SE-DVI-4 ARS INTRODUCTION The VIDMUX DVI/HDMI video/audio switch (VIDMUX) enables one DVI/HDMI display and speakers to be switched between up to eight single-link digital DVI/HDMI video sources. Supports DVI interface for crisp and clear video quality on flat panel display. Supports HDTV resolutions up to 1080p and computer resolutions to 1920x1200 (WUXGA).
2 Eliminates redundant video displays. Compliant with HDMI and HDCP standards. Supports the DDC2B protocol. stereo audio input for each channel. Passes HDMI audio signal through DVI-I port. o Transmit audio and video over a single cable with the DVI-HDMI-xx-MM male DVI-D to male HDMI cable. Control via push button, infrared remote (IR) control, or optional RS232. IR remote control includes power ON/OFF, mute function, and break-away audio (switch audio independent of video). Optional: RS232 Control in models with RS ( SE-DVI-2 ARS).
3 MATERIALS Models SE-DVI-2/4A(RS) Materials supplied with this kit: VIDMUX DVI/HDMI Video/Audio Switch 110-240 VAC, 50 or 60Hz-5 VDC/1A AC Adapter 6 Male-to-Male stereo audio cables (2pcs-2 port, 4pcs-4 port) Infrared Remote Control (RS models only) Model SE-DVI-8 ARS Materials supplied with this kit: VIDMUX DVI/HDMI Video/Audio Switch 110-240 VAC, 50 or 60Hz-5 VDC/1A AC Adapter 5 Foot CAT5e patch cable RJ45-DB9F Serial Adapter (CT6182) Infrared Remote Control Materials Not supplied but REQUIRED: DVI-IS-xx-MM DVI-I cable to connect a DVI-D source or display SA-xx-MM Male to Male Stereo Audio cable to connect an audio source DVI-HDMI-xx-MM DVI-D to HDMI interface cable to connect the video source or display with integrated speakers 2 INSTALLATION 1.
4 Turn OFF power to video source(s), display and speakers. FOR MODEL SE-DVI-2/4A 2. Connect the video port of one DVI video source to the DVI IN 1 port on the unit using a DVI-IS-xx-MM cable (xx= 3, 6, and 10 foot lengths- sold separately.) Repeat for each video source, connecting to each DVI IN x port. 3. Connect the stereo audio port of an audio source to the AUDIO IN 1 port on the unit. Six inch cables are supplied, but for longer cable use SA-xx-MM (xx= 3, 6, 10, 15, 25, 25, 50, and 100 foot lengths- sold separately).
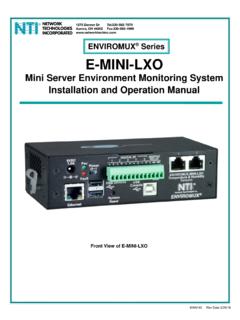
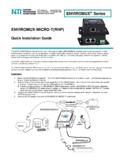
5 Repeat for each audio source, connecting to each AUDIO IN x port. 4. Connect the monitor using a DVI-HDMI-xx-MM cable to the DVI OUT port on the unit (xx- 3, 6, 10 and 15 foot lengths- sold separately). Note: If speakers are not built into your display, connect your self-powered stereo speakers to the Audio Out port. Figure 1- Cable connections to the VIDMUX 5. Secure the power cable to the cable tie on the VIDMUX and connect the power plug from the AC adapter to the connection port.
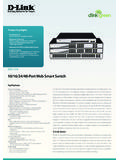
6 6. Plug in the AC adapter and power-up the switch. To switch ON, press and hold the Source Select (or AV Sync ) button for 5 seconds until the DVI 1 LED and AUD IN 1 LED on top of the VIDMUX illuminates, indicating a connection between the display and the video and audio source connected to DVI IN 1 and AUD IN 1 . To switch OFF, press and hold the Source Select (or AV Sync ) button again for 5 seconds. Note: If the RS232 feature is present, the VIDMUX will switch ON automatically when power is applied.
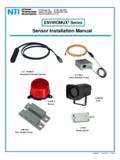
7 3 7. Apply power to the video and audio sources and display. Figure 2- Connect AC adapter to VIDMUX FOR MODEL SE-DVI-8 ARS 2. Connect the video port of one DVI video source to the DVI port in any of the numbered port groups 1-8 using a DVI-IS-xx-MM cable (xx= 3, 6, and 10 foot lengths- sold separately.) Repeat for each video source, connecting to any remaining numbered DVI-I port groups. 3. Connect the stereo audio port of an audio source to any green port with a (headphones) symbol next to it in any of the numbered port groups.
8 Use SA-xx-MM (xx= 3, 6, 10, 15, 25, 25, 50, and 100 foot lengths- sold separately). Repeat for each audio source, connecting to other numbered green headphone ports . 4. Connect the microphone port of an audio source to any orange port with a (microphone) symbol next to it in any of the numbered port groups. Use SA-xx-MM (xx= 3, 6, 10, 15, 25, 25, 50, and 100 foot lengths- sold separately). Repeat for each audio source, connecting to other numbered orange microphone ports .
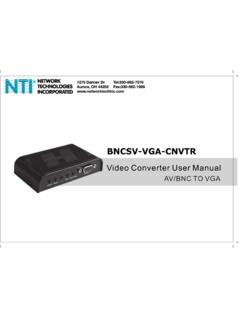
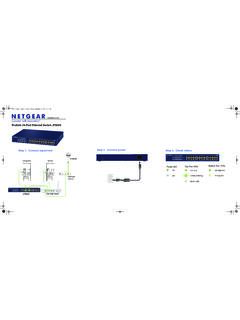
9 5. Connect the monitor using a DVI-HDMI-xx-MM cable (xx- 3, 6, 10 and 15 foot lengths- sold separately). to the DVI I port in the grey DEVICE section on the unit. 6. Connect self-powered speakers or headphones to the green headphone port in the DEVICE section. 7. Connect a microphone to the orange microphone port in the DEVICE section. 4 Figure 3- Connections to an SE-DVI-8 ARS 5 SWITCH CONTROL The VIDMUX can be controlled using either the AV Sync button on the top (SE-DVI-2/4A models only) Source Select button on the front (SE-DVI-2/4 ARS models only) Audio and Video front panel buttons (SE-DVI-8 ARS model only) Infrared Remote Control RS232 Control (SE-DVI-2/4/8 ARS models only)
10 PUSH BUTTON CONTROL 2- and 4-Port Models The push button on the VIDMUX ( AV Sync or Source Select depending upon your model) will change the connected input to the next consecutive input (video and audio together) with each press. To switch video or audio separately, use the infrared control. SE-DVI-4 ARS Front View Source Select Button SE-DVI-2A Front View AV Sync Button Audio and Video Buttons SE-DVI-8 ARS Front and Rear View 8-Port The push buttons on the front of the SE-DVI-8 ARS ( Audio or Video ) enable you to switch the video and audio independently.