Transcription of INSTALLATION INSTRUCTIONS DUMAPAN …
1 INSTALLATION INSTRUCTIONS DUMAPAN decorative panels FOR WALLS AND CEILINGS - Read the INSTALLATION INSTRUCTIONS carefully. If the INSTRUCTIONS are not fully adhered to the guarantee will lapse. Failure to comply with the INSTRUCTIONS below releases the manufacturer from any liability. - All the information is given in good faith and reflects our current knowledge and may consequently not be used against us. - Our products are produced with the greatest possible care. However no guarantee may be given as regards to small differences in look and colour in different production runs and batches. General The panels may be placed on walls and ceilings for example in - private residences: bathroom (also in the shower itself), kitchen, laundry room, garage, cellar, bedroom, living room, etc.
2 - professional applications: office space, food processing industry, sports halls, shopping areas, etc. - prefab houses, caravans and mobile homes, boats, etc. The panels are particularly well suited to humid areas. The panels with a printed foil cannot be exposed directly to water (shower, around a bathtub,..). This is no problem for panels which are printed with ink. The panels may not be installed - outdoors, on account of possible discolouration and the possibility that the product becomes brittle, unless explicitly stated otherwise or shown on the insert in the package. - in spaces with a temperature in excess of 60 C or lower than -20 C, for example in a sauna or refrigerated area. - on walls and ceilings where the contact temperature may be above 60 C, on a chimney breast, by a stove or radiators.
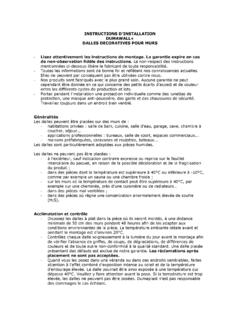
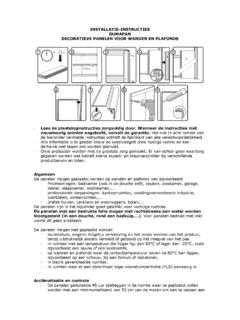
3 - in poorly ventilated areas. - in areas where there is an abnormally high concentration of sulphur (H2S). Acclimatisation and inspection - The panels should be laid flat for 48 hours in the area in which they will be installed with a minimum distance of 50 cm from the walls to adapt to the environmental conditions in the area. The ideal environmental temperature before and during INSTALLATION is approximately 20 C (illustration ). - Check each panel carefully in daylight before INSTALLATION for scratches, dents, damage, difference in colour and any other deviations to the standard quality. A panel installed that shows faults, is excluded from our guarantee. Complaints about inherent defects that were visible before installing will not be accepted after INSTALLATION .
4 - Special panels must be installed when installing in places where high requirements are set on hygiene, in food processing industries. Please check on the insert sheet whether our panels are suitable for this application. - When installing panels in a sunroom/conservatory or similar spaces, please pay attention to the combined effect of intense exposure to sunlight and increased room temperature, since the panel could be exposed to temperatures higher than 60 C. Please check this before INSTALLATION . If the temperature level is too high, then the panels should not be installed. Dumaplast cannot be held liable for damages caused in such occasions. Preparation - A sturdy support framework must be attached to uneven or damaged bases to ensure an even surface on which the panels may be installed (illustration ).
5 Usually wooden lattice work is chosen. Plastic lattice work is also possible. These supports are installed in the opposite direction to the panels ( if the panels are installed horizontally, then the supports must be placed vertically) The supports may be a maximum of 30 cm distance from each other. Providing open spaces in the framework behind the panels is also recommended to allow some circulation of air. - With an even base a simple (silicon) adhesive may be used and no framework is required. The panels may be glued directly onto existing tiling without removing it. This method is only suitable for dry surfaces free from dust and grease. For damp and uneven walls we recommend the use of lattice work. Apply the adhesive in a zigzag pattern onto the panel or the base.
6 Use an adhesive on a MS-polymer base, or a two-component polyurethane adhesive. Please always check that the adhesive is also suitable for use on the base on which the panels will be installed. - Take account of the fact that the panels might expand and contract in the event of major changes in temperature in an area and absorb this by leaving extra space in the support trims. INSTALLATION - The panels may be cut or shortened easily using a handsaw, table saw, portable circular saw, a sabre jig saw or a sharp snap-off blade knife. Please take the necessary precautions when handling sharp tools. - First attach the support trim with screws, nails, staples or adhesive so that it is securely attached (illustration ). Standard support trims are an end trim, H-trim, universal angle for inside and outside corners, ceiling trim, skirting board, multifunctional F-trim and a wainscoting trim.
7 Skirting boards and crown mouldings should be mitred in the corners. - Remove the tooth from the left side of the first panel and cut the panel to the right length. Install the panel with the side with the sawn off tooth in the support trim (illustration ). - Then attach the panel to the side with the groove via the end lip using screws, nails or staples, or use adhesive to attach the entire back to the surface (illustration ). Ensure that the screw, nail or staple is completely level with the end lip. Check whether the panel is actual attached securely before continuing the INSTALLATION . - Take the next panel, put the tooth in the groove of the previous panel until it connects perfectly and attach the new panel to the groove side in the same way as before (illustration ).
8 Repeat this step until you reach the end. Cut off the excess and use a support trim to complete the INSTALLATION . - If the rear of our 10 mm thick panels is cut open in the length, the panels may be bent to make inside and outside corners. For an outside corner cut the panel twice lengthwise and take out the middle piece (illustration ). The corner cannot then ever exceed 90 , and the panels must be fixed extremely securely to the base using screws. If the panel is less than 10 mm thick, this technique cannot be applied. Finishing and maintenance - Do not attach heavy accessories like coat hooks, light fittings, mirrors, etc. directly to the panels but drill holes through the panels and use screws and plugs to attach the accessories securely in the wall or ceiling behind (illustration ).
9 - For INSTALLATION in a shower room, around a bath or other very humid places a line of silicon must always be provided in the connection between the panels themselves and between the panels and support trims to ensure a completely waterproof joint. Also provide a silicon line between the panel and the edge of the shower or the bath. Dumaplast can only guarantee that the panels themselves are waterproof. Making each joint between the panels waterproof is the installer s responsibility and consequently Dumaplast cannot be held liable for any damage resulting from this (illustration ). - When installing halogen lamps holes may be drilled in the panels . The contact temperature with the halogen spot may not exceed 60 C. Ensure that a space is always left of at least 10 mm between the halogen lamp and the panels to prevent distortion of the panel.
10 The halogen spot must never be aimed at the panels . Also pay attention that the light fittings conform to the legal regulations and that the fitting does not conduct the heat from the light bulb to prevent distortion to the panel. - Use ordinary household products for maintenance. For polishing the panels to their original condition use a soft, non-abrasive cleaning agent. Usually only a damp cloth is needed to clean the panels thoroughly. Do not use abrasive, aggressive substances or cleaning products based on chloride. Solvents should also not be used. Adhesive residue or pen marks are best removed using isopropyl-alcohol. - This product is made from PVC and is 100% recyclable. PVC does not contain any hazardous substances.