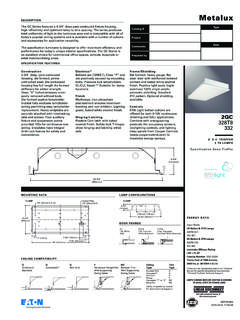
Transcription of INSTALLATIONINSTRUCTIONS 1 - Cooper Industries
1 OPERATION. IMPORTANT! How to identify Wires ON/OFF SWITCH Two location: Press once to turn lights ON at previously selected level. Each switch will have insulated wires connected to three terminal screws plus a green or bare wire connected to a green terminal screw. The three terminals are usually one dark colored screw and two light colored screws (ignore the Green screw). Alternatively, the Press again to turn lights OFF. three screws may be the same color and one will be marked COMMON or COM Find the wires connected to the dark or COMMON screws. Usually these wires are black but may be red or blue. Tag these wires on both switches to identify when wiring. When lights are OFF, press and hold for 2 seconds for full brightness. Three location: When lights are ON, press and hold for 2 seconds until the blue LED blinks. After the Two of the existing switches will be 3-way. The 3-way switches will be located at each end of the circuit with a 4-way switch in between. TAG the two 3-way switches as described in the Two Location Control section.
2 The 4-Way switch has 4 insulated wires connected preset delay, the lights will begin fading to OFF (up to 4 minutes). to 4 terminal screws. VERY IMPORTANT - TAG two insulated wires, which are the same color as the traveller wires noted in Step ON/OFF LED indicates that dimmer is turned on. RF MASTER SMART DIMMER RF9534, RF9536. For Incandescent Fixtures Only Press to BRIGHTEN Single Location Control Installation (requires one RF Master Dimmer). No Neutral Required OFF. ACCESSORY DIMMER RF9542 Light level indicators (blue). INSTALLATION INSTRUCTIONS. Light level may be adjusted with lights ON or OFF. 30. WARNING: OFF. Black Turn OFF circuit breaker or remove fuse(s) and test that power is off before wiring. 30. Never wire any electrical device with power turned on. Wiring dimmer with power on may LED ON/OFF indicator (amber) Press to DIM. 20. cause permanent damage to dimmer and void warranty. OFF. If you are not sure about any part of these instructions, please contact a licensed Bare electrician.
3 ASPIRE RF logo White (RF Master Dimmer only). 30. CAUTION: Black OFF. 1. Use only with 120V AC 60 Hz. Disconnect Switch 2. Do not exceed maximum rating of the dimmer as indicated on the device. Pull out to change bulbs (Master Dimmer only). 3. Must be installed and used in accordance with electrical codes. Turn off power. Remove wallplate and pull out switch. Identify existing wiring (This switch will be a single-pole). Disconnect existing switch and remove. 4. If a bare copper or green ground connection is not available in the wallbox, contact TROUBLE SHOOTING GUIDE. a licensed electrician for installation. Master Symptom Possible Cause Solution 5. For use ONLY with permanently installed 120V AC incandescent/halogen fixtures. 6. To avoid overheating and possible damage to other equipment, do not use to No Function. All LEDs are OFF. A) Light bulb(s) burned out B) Circuit breaker is off or tripped A) Replace light bulb B) Turn on the circuit breaker TOP. Power control receptacles, fluorescent lights, motor-driven appliances, transformer C) Disconnect switch on the dimmer C) Push in the disconnect switch on Hot Black Red supplied appliances, etc.
4 Is pulled out to the OFF position the dimmer Black DIMMER. 120V. MASTER. D) Improper wiring D) Check and correct wiring 7. Use only #14 or #12 copper wire rated for at least 75 C with these devices. E) Defective dimmer E) Replace dimmer Black 8. Minimum Lamp Wattage: DIMMER. MASTER. Green Single Location Control = 60 Watts. Erratic operation or A) Lamp power is less than 60 Watts A) Increase lamp power to at least Multi-location Control = 100 Watts flickering LEDs 60 Watts Blue Light Fixture B) Loose wiring connections B) Check and correct wiring White Green Blue NOTES: Functions normally using the Dimmer is not included in a Include dimmer in a Z-Wave 1. The RF Master Dimmer (RF9534 or RF9536) is wired directly to the light fixture. Red Black dimmer push buttons but not Z-Wave network network using a Z-Wave controller. 2. For multi-location installations one RF Master Dimmer is used with RF Smart from remote control and one Refer to ZWave controller user Ground Accessory Dimmer(s) RF9542.
5 Of the blue LEDs blinks ON and manual for details. Neutral 3. The RF9542 requires hardware connection to the RF Master Dimmer. Refer to OFF about once per second White installation instructions for wiring. Functions normally using the Problem with RF communication Replace dimmer Connect master dimmer as shown. Gently push dimmer into place and secure with mounting screws. 4. The RF Master Dimmer is not compatible with standard 3-way switches. Master dimmer control but on dimmer Make sure disconnect switch at bottom of master is fully pushed in. 5. For multi-location installations, the RF Master Dimmer is the only device that is not from remote control and Turn on power. included in the RF Network. no LEDs are blinking 6. When installing more than one dimmer in a wallbox, the total lamp wattage must Dimmer is warm to the touch This is normal. No action required Two Location Control Installation (requires one Master and one Accessory). be reduced. See Ganging chart below.
6 After a period of time Z-Wave Device Network Installation Instructions for RF Master Dimmer Only: Refer to # and # above. Disconnect power and pull out switch 1. This product may be added to a new or existing Z-Wave network. A Cooper Wiring Master Dimmer Accessory Devices Z-Wave device has a blue LED, which will blink when the device is not included in a Z-Wave network. The LED stops blinking when the RF Master Dimmer Cooper WIRING DEVICES LIMITED 5 YEAR WARRANTY Red Power From is in a network. Master Cooper Wiring Devices (CWD) warrants its RF Smart Dimmer System to be free of defects in materials Dimmer 2. To include this device in a Z-Wave network, select the command on your Z Wave and workmanship in normal use and service for a period of five years from date of original purchase. controller for inclusion (Install, Add Device, Add Node, Include Device, etc.). Then THIS FIVE (5) YEAR LIMITED WARRANTY IS IN LIEU OF ALL OTHER WARRANTIES, OBLIGATIONS, OR. LIABILITIES, EXPRESSED OR IMPLIED (INCLUDING ANY IMPLIED WARRANTY OF Green Black Green Blue press the RF Master Dimmer ON/OFF switch one time to include it in the network.)
7 Bare MERCHANTABILITY OR FITNESS FOR A PARTICULAR PURPOSE THAT IS IN DURATION IN EXCESS OF Tag The LED will stop blinking. Connect White Connect White 3. To exclude this device from a Z-Wave network, select the command on your FIVE YEARS FROM THE DATE OF ORIGINAL CONSUMER PURCHASE). NO AGENT, REPRESENTATIVE, to bare to bare Traveller Wires OR EMPLOYEE OF CWD HAS AUTHORITY TO INCREASE OR ALTER THE OBLIGATIONS OF CWD wire Red wire Blue Z-Wave controller for exclusion (Uninstall, Remove Device, Remove Node, White UNDER THIS WARRANTY. Exclude Device, etc.). Then press the RF Master ON/OFF switch one time to exclude To obtain warranty service for any properly installed CWD RF Smart Dimmer System that proves Tag Black ACCESSORY. ACCESSORY Note the color of it from the network. The LED will start blinking. Traveller Wires this traveller wire defective in normal use send the defective RF Smart Dimmer System prepaid and insured to Quality Black 4. This product works with other Z-Wave products from different vendors and Control Dept.
8 , Cooper Wiring Devices, 203 Cooper Circle, Peachtree City, GA 30269; in Canada: Cooper Blue product categories as part of the same network. Wiring Devices, 5925 McLaughlin Road, Mississauga, Ontario L5R 1B8. Note the color of To Accessory Tag 5. This product is a listening node and it will act as a repeater in the Z-Wave CWD will repair or replace the defective unit, at its option. CWD will not be responsible under this this traveller wire dimmer Light Fixture network. It will perform the repeater function with Z-Wave products from Cooper warranty if examination shows that the defective condition of the unit was caused by misuse, abuse, improper installation, alteration, improper maintenance or repair of damage in shipment to CWD. Identify existing wiring (both existing switches will be "3-way"). Tag Disconnect existing switch and remove. Connect RF Master Dimmer as Shown. Note the color of the traveller Connect the Accessory Dimmer as shown. You must connect the Wiring Devices and from other Z-Wave vendors.
9 Common wire on both 3-Way switches (see How to Identify Common wire you have connected to the blue wire. Connect green wire to tagged wire to the same traveller wire color noted in Step CWD SHALL HAVE NO RESPONSIBILITY FOR INSTALLATION OF THE RF SMART DIMMER SYSTEM, 6. For multi-location install; blue LED will blink on all wired units, when the RF Master OR FOR ANY PERSONAL INJURY, PROPERTY DAMAGE, OR ANY SPECIAL, INCIDENTAL, Wires section). bare wire in box Connect green wire to bare wire in box. Dimmer (RF9534/RF9536) is not included in the Z-Wave network. After including the CONTINGENT, OR CONSEQUENTIAL DAMAGES OF ANY KIND, RESULTING FROM DEFECTS IN THE RF. RF Master Dimmer in the Z-Wave network, the LED will stop blinking. The RF9542 SMART DIMMER SYSTEM OR FOR BREACH OF ANY EXPRESS OR IMPLIED WARRANTY ON THIS. (no neutral) Accessory Dimmer need not be included in the Z-Wave network. PRODUCT. THE EXCLUSIVE REMEDY FOR BREACH OF THE LIMITED WARRANTY CONTAINED HEREIN IS THE.
10 IMPORTANT: REPAIR OR REPLACEMENT OF THE DEFECTIVE PRODUCT AT CWD'S OPTION. IMPLIED WARRANTIES. RF Smart dimmer will not work or will become damaged if wired incorrectly, and warranty (IF ANY) INCLUDING, BUT NOT LIMITED TO IMPLIED WARRANTIES OF FITNESS FOR A PARTICULAR. PURPOSE AND MERCHANTABIITY, ARE LIMITED IN DURATION TO A PERIOD ENDING FIVE YEARS. will be voided. FROM THE DATE OF ORIGINAL CONSUMER PURCHASE. IN NO CASE SHALL CWD'S LIABILITY UNDER. ANY OTHER REMEDY PRESCRIBED BY LAW EXCEED THE PURCHASE PRICE. Some states do not allow the exclusion or limitation of incidental or consequential damages or allow disclaimers or (Cut if necessary) modifications of or limitations on how long an implied warranty lasts, so the above limitations may not ACCESSORY ACCESSORY. apply to you. Some Canadian provinces do not allow exclusion or variance of implied warranties so Light Fixture that some or all of the above limitations may not apply to you. This warranty gives you specific legal Strip 5/8 rights and you may also have other rights which vary from state to state and province to province.