Transcription of INSTALLING YOUR CHAINLINK FENCE - Split Rail …
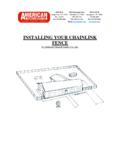
1 2215 IH 456612 Harborside Drive 3501 N. IH 35 League City, TX. 77573 Galveston, TX. 77554 Georgetown, TX. 78628281-332-0511409-744-7131512-930-400 0 Fax: 281-554-2592 Fax: 409-744-7131 Fax: 512-930-4002 Email: INSTALLING your CHAINLINK FENCE by American FENCE & Supply Co., Inc. Step 1: Layout of FENCE Determine where your property lines are located and your desired Terminal Post locations will be. Proper determination of property lines is the responsibility of the property owner. Terminal Posts are your End, Corner and Gate Posts. In the diagram below, Terminal Posts are indicated by a small Red Dot >> <<.
2 There are 9 of them in the diagram. Mark these desired locations with a small wooden or metal stake. Note: For using pre-made gates, refer to Step 10. This step will give you the proper width to set posts on either side of the gate opening. Important: Customer is solely responsible for determining product compliance with all city, county, state and federal codes, restrictions, ordinances, or permit requirements. Also, prior to any digging or excavation, Texas state law requires a 48 hour notice to the "ONE CALL SYSTEM OF TEXAS" (Ph#1-800-545-6005). If you are not in Texas, please call your local or state utilities protection service.
3 Step 2: Set & Level All Terminal Posts In Concrete A : Use a one piece cap For 4' tall FENCE , A= 47" out of ground For 5' tall FENCE , A= 59" out of ground For 6' tall FENCE , A= 71" out of ground B : Use a 3-piece setup (Brace Band, Rail End Cup & Dome Cap) For 4' tall FENCE , B= 48" out of ground For 5' tall FENCE , B= 60" out of ground For 6' tall FENCE , B= 72" out of ground Step 3: Mark Location Of Line Posts Determine the actual distance of the section to be marked. (In this example 55' is the distance) Divide the distance by 10 and round your answer down to the next whole number.
4 This is the required number of line posts. Ex/ 55' 10= . Round Down to 5. You will need 5 line posts for this section. If you place 5 line posts in between these 2 terminal posts, it will yield 6 sections of FENCE . To determine the proper, equidistant spacing of line posts, divide the number of sections into the total distance. Ex/ 55' 6= or 9' 2" Stretch a piece of nylon string from the base of one terminal post to the base of the other. The string must come off one side of the post or the other. You want it to come off of the side your going to have the CHAINLINK fabric on, usually the outside of the yard.
5 Using this nylon string and spacing method above, mark the location of the line posts and dig the post holes 2" deeper than the depth you used for the terminal posts. Side View Step 4: Set & Level All Line Posts In Concrete Make a mark on all terminal posts 2" down from the top (with magic marker). Next, stretch your nylon string between the 2 terminal posts keeping you nylon string on the marks 2" down from the top. Use this line as a guide for the line posts. Set all line posts in concrete. This method should be used where the ground is fairly level.
6 If it is not, ask an American FENCE Salesperson for help. Step 5: Install Post Caps Parts Required For A 3-Piece Terminal Post Cap Step 6: Install Toprail & Base Wire(optional) Top Rail Slide top rail through a couple loop caps and butt end firmly into the rail end cup on the 1-piece terminal post cap. If you have the 3-piece terminal post cap setup (dome cap, brace band & rail end cup), adjust height of rail end cup if necessary. Our top rail has a swedged end, which tapers down so it will fit into another piece of top rail. Fit the non-swedged end into the rail end cup at the end or corner posts.
7 Add sections of rail, sliding each non-swedged end into a swedged end. Be certain to push rails toward your beginning point to 'seat' them all the way into each other. Push firmly. If the top rail has no swedged end then you need sleeves to join top rail together. Add additional top rail until you reach the next terminal post, end, corner, gate post. Cut excess rail off with hack saw or pipe cutter. Mark the cut-off point carefully so the rail will fit snugly into the rail end cup. Any slack in your entire length of rail will allow the chain link, when stretched tight, to pull the end posts in towards each other.
8 Install top rail in all stretches of FENCE . At this point, visually check the height of line posts once top rail is installed. If a post is too high, remove rail and trim as necessary. If a post is 1/4" too short you may also cut a sliver of pipe, the same diameter size as the line post and slip it under the loop cap. Base Wire (optional) For each section of FENCE , stretch a piece of base wire from one terminal post to the next. Base wire should be installed 2" off of ground and on the same side that fabric will be going on. Attach base wire to line posts with aluminum tie wires, 2" off of ground.
9 Step 7: Roll Out CHAINLINK Roll out CHAINLINK fabric in front of framework (usually on outside of FENCE ). On 6' tall and higher, if you want the Twists(points) up on the FENCE , be sure to roll out the wire with the points away from the framework. If you want the Knuckles up on the FENCE , be sure to roll out the wire with the knuckles away from the framework. Note: 4' tall and 5' tall CHAINLINK have Knuckles on top and bottom. Because of this, there is no need to distinguish which side of chinlink is rolled out away from the framework. Now stand up the end that is away from the roll, insert tension bar and attach to terminal post with tension bands.
10 CHAINLINK Framework Step 8: Stretch CHAINLINK FENCE Stand the wire up along the framework and loosely tie it about every 20 feet. This is only to keep CHAINLINK from falling on you as you get further away from the terminal post. Let the wire extend on past the terminal post you are about to tie off to. Attach your come-a-long at the mid-point on this terminal post. Extend the come-a-long cable out about 8 feet or so. Note: Come-a-long must be on the inside of the fabric and framework. Drop a tension bar down through the CHAINLINK fabric and attach to come-a-long with an A-Frame (stretch tool).