Transcription of INSTRUCTIONS
1 1 INSTRUCTIONS Car Seat (Groups I/II/III) Suitable for 9kgs to 36kgs (Approximately 9 months to 12 years) ENGLISH 2 WARNINGS THESE INSTRUCTIONS ARE VERY IMPORTANT. PLEASE READ THROUGH CAREFULLY, AND RETAIN FOR FUTURE REFERENCE. PLEASE READ THOROUGHLY BEFORE COMMENCING INSTALLATION, AS AN INCORRECT INSTALLATION COULD BE DANGEROUS. DO NOT USE THIS CAR SEAT IN PASSENGER SEATS EQUIPPED WITH AIRBAGS. This child seat can be used with the harness for children of 9 18 kgs (approx. 9 months to 4 years) (GROUP 1). This seat can be used for without the harness for children weighing 15 36 kgs (GROUP II/III). This seat can only be installed forward facing using a three point lap and diagonal seat belt . (These INSTRUCTIONS should be retained on the child s car seat for its life period-in the mesh side pocket, and take good care of it for future reference).
2 Do not use this child seat at home. It has not been designed for home use and should only be used in your vehicle. The safest seating position for this child seat is on the rear seat of a vehicle. Never use the child seat without fastening the child s harness correctly, and never attempt to use it without fastening into the vehicle. Do not add to, or modify the seat in any way. Do not leave your child unattended in the seat at any time. Car interiors can become very hot when in direct sunlight, it is therefore recommended to cover the car seat when not in use. This prevents components, particularly those attached to the child seat becoming hot and burning the child. In the event of an emergency it is important that the child can be released quickly. This means that the buckle is not fully tamper proof so your child must be taught never to play with the buckle.
3 3 Luggage and other heavy or sharp objects should be secured in the car. Loose objects are liable to cause injury in the event of an accident. Periodically inspect the harness for wear, paying particular attention to attachment points, stitching, and adjusting devices. Store this child seat in a safe place when it is not being used. Avoid placing heavy objects on top of it. Do not allow your child seat to come into contact with corrosives substances battery acid. The device should be changed when it has been subject to violent stresses in an accident. THE TYPE OF APPROVED SEAT belt YOU MUST HAVE WARNING: The car seat should not be fitted in a passenger seat of a vehicle that has an air bag fitted. Your child seat can only be installed forward facing using a three point lap and diagonal seat belt in the front or rear passenger seat of the vehicle.
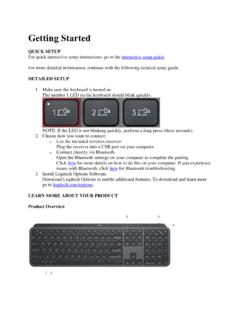
4 4 PARTS AND FITTINGS 5 Assembly Before Use To set up your car seat, remove all packaging and set down on a flat surface. Your child seat consists of two parts; the booster seat and backrest. Ensure both pieces are lying flat before assembly. Insert the two hooks located at the bottom of the backrest into the gaps found at the rear of the booster seat. Place one hand on the booster seat to secure it, and with the other hand push the hooks down until the two pieces are connected, you may need to lift the backrest slightly while pushing. With one hand still on the booster seat, use your free hand to pull the backrest up, until it feels secure. Your car seat is now ready for use. A 6 CORRECT SHOULDER STRAP HEIGHT (GROUP I) CHANGING/ FITTING THE SHOULDER STRAPS - HEIGHT Thread the shoulder straps through shoulder pads, then through the shoulder slot at the front of the seat (1) (see above for correct heights).
5 Push the straps right through the seat out at the back. Pull the straps down to the bottom of the seat to the metal connectors at the back of the booster (2). Slide the straps onto the metal connecter (3). If you need more length of the strap, at the front of the booster seat push the strap lever, and at the same time pull the straps. To remove the straps do the above in reverse order. 1 2 3 7 REMOVING THE SAFTEY HARNESS LAP STRAPS (BOOSTER) Turn the metal connectors at the base of the seat on their narrowest end and feed them through the slots in the base of the seat, then through the slots in the fabric cover. FASTENING THE SAFTEY SEAT BUCKLE Slot the two metal sections of the buckle connectors together. Slot the two buckle connectors into the slot in the top of the buckle until they click into place. Always check the harness is correctly locked by pulling the shoulder straps upwards.
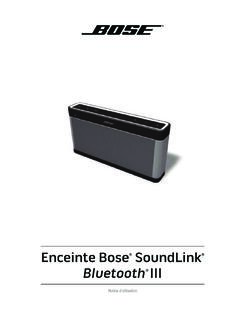
6 To release the harness, press the red button on the buckle downwards. 8 TIGHTENING THE HARNESS SLACKENING THE HARNESS Pull the shoulder straps upwards to remove the slack from the lap sections of the harness. Now pull the adjuster strap until the harness is fully tightened. The harness should be adjusted as tightly as possible without causing discomfort to your child. Straps should not be twisted. Ensure that the lap strap portion is located as low as possible towards the lap not around the stomach, so that the pelvis is firmly engaged. A loose harness can be dangerous. Check the harness adjustment & tighten each time the child is placed in the seat. 1 2 The harness is slackened by pressing the lever (under the seat cover) on the front of the seat. Press down on the lever (1) as you grip the two shoulder straps with your other hand.
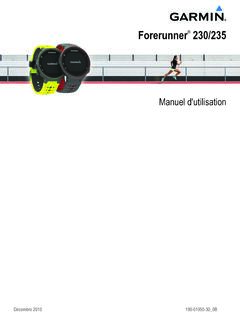
7 Pull the shoulder straps towards you to loosen the harness (2). Take care when adjusting the shoulder straps that you do not trap the harness adjuster strap as you press down on the lever. 9 FORWARD FACING FITTING THE CAR SEAT WITH THE 3 POINT LAP & DIAGONAL SEAT belt 9-18 KGS (GROUP I) Ensure that all parts are locked into place correctly and not trapped in the seats or doors. The backrest of the child s seat has to rest on the back of the vehicle seat. If necessary adjust the inclination of the vehicle seat. Place the child safety seat on the vehicle seat ensuring it is firmly pressed against the seat backrest. 1. Pull the car seat belt (diagonal) under the red seat belt guide. 10 2. Thread the seat belt through the fabric seat belt slot marked by a red arrow under the cushion insert, and the lap strap under the arm of the booster.
8 3. Pass the seat belt through the back of the seat (underneath the harness straps), and through the parallel seatbelt slot. 11 Now you can strap your child into the seat. Make sure the seat belt has not become twisted.. To release your child seat follow the above INSTRUCTIONS in reverse order. SEE BACK PAGE FOR A FULL PICTURE OF THE SEATBELT ROUTINGING GUIDE 4. Hook the seatbelt over the parallel arm of the booster seat, and click the seat belt in place. 5. Tighten the seatbelts until the car seat feels secure 12 ADJUSTING THE HEADREST HIGHT 15-25KG (GROUP II) FORWARD FACING FITTING THE CAR SEAT USING THE belt GUIDE (GROUP II) IMPORTANT: Before fitting the seat, remove the shoulder straps, buckle and crotch strap and lap strap. Place the child safety seat on the vehicle seat ensuring it is firmly pressed against the car seat backrest.
9 (According to the child s height) The headrest can be adjusted up or down. Press the button in, and. Move the headrest up or down as required ensuring the position fits for your child. 13 Place the child in the child safety seat. Fasten the seat belt , making sure that both sections of the seat belt go under the armrests, the diagonal belt goes through the belt guide on the side of the headrest, as shown above. Check that the seat belt has not become twisted, and tighten the seat belt by pulling the diagonal strap upwards. Also check that the cover is not impeding the movement or fit of the seat belt in any way. FORWARD FACING FITTING THE BOOSTER SEAT 22-36 KGS (GROUP III) Remove the backrest from the booster seat and place in a safe place, place with the other fittings. 14 Place the booster seat on the seat of the vehicle ensuring it is firmly against the vehicle seat and backrest.
10 Place child on the booster seat. Fasten the seat belt , making sure that the lap belt goes under both armrests and the diagonal belt goes under the armrest near the buckle. Checks the belt has not twisted, and then tighten the seat belts by pulling upwards on the diagonal strap. Check the seat belt to ensure there is no slack and the belt has not become twisted Also check that the cover is not impeding the movement or fit of the seat belt in any way. To release the child, simply unfasten the seat belt in the normal way. 15 CARE AND MAINTANANCE THESE INSTRUCTIONS ARE IMPORTANT, PLEASE READ CAREFULLY AND RETAIN FOR FUTURE REFERENCE. Backrest cover removal: First release the strap at the bottom of the backrest cover. Slide the cover off. The cover can now be cleaned. Headrest, booster seat cover removal: Slide the cover off. The cover can now be cleaned.