Transcription of INSTRUCTIONS AND WARRANTY - Russell Hobbs
1 INSTRUCTIONS AND WARRANTY MODEL RHCP 021 Russell Hobbs BISCUIT & COOKIE MAKER Congratulations on purchasing our Russell Hobbs Biscuit and Cookie Maker. Each unit is manufactured to ensure safety, reliability and ease of use. Before use, please read these INSTRUCTIONS carefully and keep them for further reference. Pass them on if you pass the Biscuit/Cookie Maker on. Remove all packaging, but keep it till you re satisfied the Biscuit/Cookie Maker is working. IMPORTANT SAFEGUARDS When using your Russell Hobbs Biscuit/Cookie Maker basic safety precautions should always be followed including the following: 1. Read carefully and save all these INSTRUCTIONS safe for future reference. 2. Make sure the power cord used corresponds to the one indicated on the rating label. The cord to this appliance should be plugged into a 220V-250V AC electrical outlet only.
2 3. To protect against risk of electric shock, do not put cord, plug or appliance in water or other liquid. 4. Close supervision is necessary when any appliance is used near children or irresponsible persons. 5. Unplug from outlet when not in use, before putting on or taking off parts and before cleaning. 6. Avoid coming into contact moving parts. 7. The use of attachments not recommended or sold by the manufacturer may cause fire, electric shock or injury. 8. Do not use outdoors. 9. Do not let cord hang over edge of table or counter. 10. Do not let cord come into contact with any hot surfaces, including the stove. 11. Keep hands, hair clothing as well as utensils away from moving parts and Discs while processing to prevent the risk of severe injury to persons, or damage to the biscuit/cookie maker. Handle Discs and Tips carefully when removing, inserting or cleaning.
3 12. Be certain Tube and Tube Cover is securely locked in place before operating appliance. Do not attempt to remove the Tube or Cover while operating. 13. Before using, check that Tube has no presence of foreign objects, 14. Always place the unit on a flat, level surface. 15. Do not operate without nozzle or disc in place. 16. All users of this appliance must read and understand this Use and Care Guide before operating or cleaning this appliance. 17. After you have filled the Tube with dough to make Biscuits/Cookies do not leave unattended for a long period, rather finish or empty the Tube. 18. If this appliance begins to malfunction during use, immediately release the ON/OFF Button. The biscuit/cookie maker will stop when the ON/Off Button is released. Unplug the cord. 19. Do not use or attempt to repair the malfunctioning appliance. 20. Do not operate any appliance with a damaged cord or plug or after the appliance malfunctions, or is dropped or damaged in any manner.
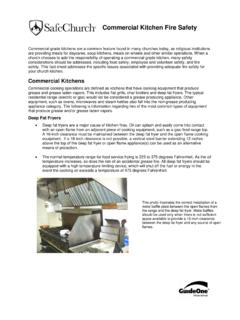
4 We recommend you contact Consumer Service for examination, repair or electrical or mechanical adjustment. If this appliance falls or accidently becomes immersed in water, unplug it immediately. Do not reach into the water! Do not use this appliance after it has fallen into or becomes immersed in water. 21. To reduce the risk of injury to persons or property, never use this appliance in an unstable position. 22. Always turn the power off at the power outlet before you insert or remove a plug. Remove by grasping the plug do not pull on the cord. 23. Turn the power off and remove the plug when the appliance is not in use and before cleaning. 24. Do not use your appliance with an extension cord unless this cord has been checked and tested by a qualified technician or service person. 25. Disconnect the plug from the power outlet if there is any problem during the biscuit/cookie making process or prior to cleaning the appliance.
5 26. Do not use the appliance for any purpose other than its intended use as described in this instruction book. 27. Do not place an appliance on or near a hot gas flame, electric element or on a heated oven. Do not place on top of any other appliance. 28. Once the packaging has been removed, check the appliance is in full working order. If in doubt, do not use the appliance and contact qualified service staff. 29. Packaging material (plastic bags, foam, polystyrene, etc.) should not be left within reach of children as they could be a potential source of danger. 30. This appliance is for domestic use only. Any other use is to be considered improper and invalidates the WARRANTY . 31. For safety reasons and to avoid maintenance by unskilled persons, some appliances are sealed using tamperproof screws. Such appliances should always be returned to the nearest appointed Russell Hobbs agent for adjustment or repair if qualified.
6 SAVE THESE INSTRUCTIONS FOR HOUSEHOLD USE ONLY CHANGING THE PLUG Should the need arise to change the fitted plug, follow the INSTRUCTIONS below. This unit is designed to operate on 230V current only. Connecting to other power sources may damage the appliance. Connect a three-pin plug as follows: The wires in this mains lead are coloured in accordance with the following code: Green/Yellow = Earth Blue = Neutral Brown = Live Electric Power If the electrical circuit is overloaded with other appliances , your appliance may not operate properly. It should be operated on a separate electrical circuit from other appliances . INTRODUCTION Congratulations on purchasing our Russell Hobbs Biscuit/Cookie Maker. Electric means effortless ease of operation, manoeuvrability and newfound biscuit/cookie baking freedom. No more rolling dough to change shapes!
7 Simply change the disc and the batter for a dozen new decorating designs and biscuits/cookies shapes. Push button operation means each and every biscuit/cookie will be fashioned to perfection, quickly and easily. Prepare a tray of biscuits/cookies in 2 minutes! The Electric Biscuit/Cookie maker comes packed in its convenient Storage Box, complete with 12 Stainless Steel interchangeable Biscuit/Cookie Discs, 1 Long Filler Tip, 8 Decorator Tips, and 2 Cannoli Shell Forms. Make bakery style biscuits/cookies in your own change from a Biscuit/Cookie Disc to a Decorator Tip and you re ready to add the final flourishes to pastries, cakes and candies. Use the Filler Tip to fill cupcakes and pastries. Wrap dough around the Cannoli Shell Forms for frying. Create your own fresh, delicious filling to prepare professional looking and great-tasting cannoli for family and friends.
8 Before using for the first time 1. Carefully unpack the Biscuit/Cookie Maker and all the accessories 2. After unpacking wash the Biscuit/Cookie Discs, Filler Tip, Filler Tip/Decorator Tip Adaptor, Decorator Tips, Cannoli Shell Forms, Tube Cover, Tube, Cam Disc, Press Disc and Cam Shaft with warm, soapy water. Rinse and dry thoroughly. 3. Ensure the unit is unplugged and then wipe all surfaces with slightly a moistened, soft cloth and dry thoroughly. Never immerse thee Motor Body, plug or cord in water or any other liquid. Do not use steel, wool, scouring pads or abrasive cleaners as they will damage the finish. 4. Thoroughly dry all parts so that no water enters the Motor Body. GETTING TO KNOW YOUR Russell Hobbs ELECTRIC BISCUIT/COOKIE MAKER Before using your Electric Biscuit/Cookie Maker for the first time, you must become familiar with all of the parts.
9 Read all INSTRUCTIONS and safeguards carefully. 1. Motor Body 2. ON/OFF Button 3. Cam Disc (P/N 70701B) 4. Electric Cord with Polarised Plug 5. Cam Shaft (P/N 70702B) 6. Press Disc (P/N 70703B) 7. Tube (P/N 70704) 8. Biscuit /Cookie Disc 9. Tube Cover (P/N 70706B) 10. 2 Cannoli Shell Forms (P/N 71558- 1piece) 11. 10mm Filler Tip (P/N 71159) 12. Filler/Decorator Tip Adapter (P/N 70705B) 13. Decorator Tip 14. Filler Tip/Decorator Tip Cover (P/N 70707B) 15. Storage Box (not pictured) (P/N 71160) BISCUIT AND COOIE MAKER DISCS & DECORATING TIPS 12 Cookie Discs Figure 2 Cookie Discs Set 8 Decorator Tips (P/N 70708-Set) Figure 3 Decorator Tips Set (P/N 70709- Set) Individual Tips (P/N 70709-1, 70709-2, 70709-3, 70709-4, 70709-5, 76709-6, 70709-7, 70709-8) Individual Discs: (P/N 70708-1) (P/N 70708-2) (P/N 70708-3) (P/N 70708-4) (P/N 70708-5) (P/N 70708-6) (P/N 70708-7) (P/N 70708-8) (P/N 70708-9) (P/N 70708-10) (P/N 70708-11) (P/N 70708-12) ASSEMBLY INSTRUCTIONS 1.
10 Unplug from outlet before assembly or disassembly of parts. Attach the Cam Shaft to the Press Disc by inserting the stem of the Shaft into the Press Disc s centre hole. Press firmly. You will hear a click as the Shaft snaps in place. (See Figure 4) 2. Line the tabs on the Motor Body up with the slots on the Cam Disc. Insert Cam Disc into the Motor Body. Using the two grips on the Cam Disc, turn slightly clockwise until the Disc clicks into position. (See Figure 5) 3. Fit the Shaft all the way inside the unit, the outside contours of the 2 Discs will line up. (See Figure 6). NOTE: Turn Cam Disc one click counter clockwise if Shaft is difficult to insert into Motor Body. Figure 6 4. Select a Disc and place it inside the Tube Cover, then place the Tube into the Tube Cover, turning clockwise until locked. (See Figure 7) 5. If a Filler Tip or Decorator Tip is used, fit the desired Tip over the Filler/Decorator Tip Adapter and secure it with the Filler Tip/Decorator Tip Cover.