Transcription of INSTRUCTIONS - Sure Shot
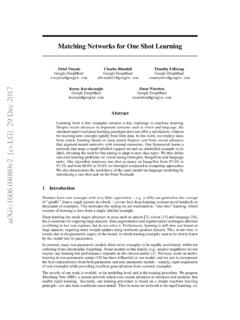
1 SURE SHOT SPRAYERSINSTRUCTIONSR efillable, reusable. Extra by free airDIRECTIONS FOR OPERATING MODEL A SPRAYERS1) ALWAYS DEPRESSURIZE SPRAYER BEFOREREMOVING ANY pressure may be letout of the sprayer one of the two following ways:a) Tip the sprayer upside down and depress thetrigger until no pressure is left. If some liquidis left in the sprayer when you attempt thisprocedure make sure you aim the nozzle at aplace where a little bit of liquid can be ) Remove #122 black cap from filler cap and usesmall probe to depress #121 valve core until allthe pressure escapes. NOTE: Make sure thesprayer is upright and the filler cap stem ispointing away from you when depressing thevalve core.
2 2)Remove the 15/16 hex filler cap once all the air hasbeen let out of the )Fill sprayer 2/3 full (32 ounce maximum liquid capac-ity) with light, clean liquid. Make sure the liquid youare putting into the sprayer is CLEAN and FREE OFFOREIGN PARTICLES. See ACCESSORIES onpage 4 for liquid filling/measuring : ALWAYS CHECK WITH YOUR CHEMICALSUPPLIER IF YOU ARE NOT SURE OF CAUTION LABEL ON SPRAYER BEFORE USE ACIDS IN ANYSURE SHOT )Replace 15/16 hex filler cap and )Charge sprayer with compressed air by holdingstandard air chuck on valve stem of the filler the air chuck on the filler cap until you hear theline pressure equalize with the sprayer.
3 Workingpressure is 80-150 psi. At least 80 psi is needed tospray the full 32 oz. without a recharge of MAXIMUM PRESSURE SHOULD NOTEXCEED 200 )The Model A sprayer is now ready to )For best results, the liquid to be sprayed should belighter than a No. 10 motor oil. (If liquid is too heavya pin stream will result). DILUTE WITH A SUITABLEDILUENT UNTIL DESIRED SPRAY IS :Never point the nozzle of sprayer towardyourself or another person. Always point the nozzleof the sprayer away from yourself and toward yourintended target before depressing the LOAD WITHLIGHT LIQUIDSMODEL A32 WITH AIR CHUCKSPRAYANYWHEREPLEASE NOTE: NOZZLE IN THE OPERATING POSITION IS SET FOR REGULAR MIST.
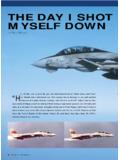
4 FOR PINSTREAM, REMOVE THE #303 SPIRAL WITH NEEDLE NOSE #118 FILLER CAP NOW COMES WITH A SPECIAL CHEMICAL RESISTANT VALVE CORE ANDUSES A REGULAR RIGHT DEPRESSURIZE THE SPRAYER BEFORE REMOVING ANY PARTSSPRAYER NOT RECOMMENDED FOR USE WITH PAINTSMAXIMUM PRESSURE 200 PSIMODEL A#1000 - #1100 - #2000 - #2600 MODEL A#1002 - #1102 - #2002 - #2170#2305 - #2501 - #2602 - #7700 MODEL A#6100 - #6102 - #6200 - #6202 - #6600 - #6602 THIS UNIT IS EQUIPPED WITH A PRESSURE RELIEF VALVE #460. THE RELIEF VALVE HAS BEEN PRESET AT THE FACTORYTO 150 PSI - 180 PSI AND WILL NEED NO ADJUSTMENT. DO NOT REMOVE CAP.(2)#156 TEFLON FILLER CAPFITS ALL MODEL A SPRAYERSOPTIONAL #450(Replacement Parts for CO2 Pressure Charger Filler Unit)156156156121118121121118118 REMOVE #303 SPIRAL WITHNEEDLE NOSE PLIERS TOPRODUCE PIN #DESCRIPTION108 Inner Adaptor Washer110 Valve111 Valve Spring114 Stuffing Box Packing115 Stuffing Box Nut116 Cotter Pin117 Valve Trigger118 Filler Cap Assembly(incl.)
5 120, 121 FFKM, 122)120 Filler Cap Gasket121 FFKMP erfluroelastomer Valve Core Exceptional Chemical Resistance122 Black Cap123 Clean Out Pick*156 Filler Cap AssemblyIncludes 120, 121 FFKM, 122(Right Hand Thread)223 Spray Jet Spiral(for 305)302 Regular Spray Nozzle(incl. 303)Remove #303 with needle nose pliers to produce pin Spray Nozzle(incl. 303)302-CExtra Fine Spray Nozzle(incl. 303)303 Spray Jet Spiral(for 302, 302-B, 302-C)305 Fine Spray Nozzle(incl. 223)307 Valve Seat Adaptor - Male**307-CValve Seat Adaptor - Female1/8 NPT**307 PTValve Seat Adaptor - Male1/8 NPT309 Outer Adaptor Washer451 Piercing Pin Assembly452 Bulb Neck WasherPART #DESCRIPTION453 Retaining Ring456 Bulb Holder460 Relief Valve - Complete501 Flat Spray Nozzle550 Flat Spray Nozzlewith 307-C Adaptor567 Coarse Flat Spray Nozzlewith 307-C Adaptor602 Plastic Adjustable Nozzlewith Adaptor707 Extra, Extra Fine Spray Nozzle771 Packing for 707 Nozzle 772 Spring for 707 Nozzle 773 Spiral for 707 Nozzle 774 Insert for 707 Nozzle * The #156 filler cap assembly enables you to tightenwithout a wrench.
6 Just hand tighten using the pinsprotruding from the 15/16 hex. Use the same valveCore (#121 FFKM) as the #118. Right Hand Thread.** The #307-C and #307 PT can be used in place ofthe #307 adaptor when the need to adapt to pipethread fittings is Extension Washer (for 325 & 335)3203 Extension with Sprayhead3256 Nozzle Extension - Rigid Brass(for 302/302B/302C/501)33012 Nozzle Extension -Long Flexible Teflon Tube(for 301/302/302B/302C/501)33112 Nozzle Extension -Long Flexible Teflon Tube(for 305/550/567/602/707)3386 Nozzle Extension - Rigid Brass(for 305/550/567/602/707)33512 Nozzle Extension - Flexible Brass(for 302/302B/302C/501)33912 Nozzle Extension - Flexible Brass(for 305/550/567/602/707)
7 33712 Plastic Pin Stream Extension3443 Long Hypodermic Tube Extension3453 Extension with Pin Stream Head(3)REPAIR PROCEDURESThe following is the correct order and way toremove and replace all the parts on your Model A ) ALWAYS DEPRESSURIZE SPRAYER BEFOREREMOVING ANY PARTS. (See page 1, #1)b)Remove 15/16 hex filler cap. (See page 1, #2)c)Take a pliers and remove the #116 cotter pin fromthe #117 )Remove the #117 )Remove 1/2 hex nozzle from the #307 adaptor, or ifyour sprayer has no adaptor, remove 9/16 hexnozzle from the front of the )If your sprayer has a #307 adaptor, remove the 9/16 hex #307 adaptor from the front of the )Remove the 3/8 hex #115 stuffing box )Remove the #110 valve.
8 Note that the #111 spring isassembled to the #110 )You will destroy the #114 by removing it. Be carefulnot to damage the inside threads when removing the#114. #114 stuffing box packing may be removed bytaking a small thin straight edge screwdriver andworking the #114 stuffing box packing loose. j)All the removable parts are now off of your Model A )To reassemble start by taking a #114 and placing itinto the position you just removed it from. Take #115and just hand start )Take #111 valve spring and assemble it to #110valve, place whole assembly into )Take a #108 washer and assemble to adaptor.
9 Takeassembly and push face of #110 back into sprayeruntil you can hand start thread. Tighten 9/16 hexadaptor until washer is )Snug 3/8 hex #115 stuffing box nut. Do not )Replace #117 trigger. Line up holes in trigger withhole in back of #110 valve. Insert #116 cotter pin,bend with )Press down on #117 trigger and apply a drop or twoof lubricant to the valve stem of the #110 at the rearof the #115 stuffing box nut. Tilt the sprayer so thatthe lubricant runs into and around the # )Take 1/2 hex nozzle and #309 washer and assem-ble to 9/16 hex adaptor. )Replace 15/16 hex filler cap.
10 Pressurize sprayer. (see page 1, #5).t)Check for and Complete Repair Kits can be ordered for allModel A sprayers. The following is the list of KitNumbers and there corresponding Model KITSK5 Partial Repair Kit - contains 108, 110,114, 116, 120, 121, 302, 309 for Models1000-1100-2000-2600-6100-6200-6600 K10 Complete Repair Kit - contains 108,110, 111, 114, 115, 116, 117, 118, 302,307, 309 for Models 1000-1100-2000-2600-6100-6200-6600K300 Nozzle Assortment Kit - contains 302-B,302-C, 305, 501, 602K5-602 Partial Repair Kit for 1002-2002-2602-6102-6202-6602K10-602 Complete Repair Kit for 1002-2002-2602-6102-6202-6602K5-302 BPartial Repair Kit for 2170K10-302 BComplete Repair Kit for 2170K5-305 Partial Repair Kit for 2305K10-305 Complete Repair Kit for 2305K5-501 Partial Repair Kit for 2501K10-501 Complete Repair Kit for 2501K5-707 Partial Repair Kit for 7700K10-707 Complete Repair Kit for 7700 ACCESSORIES450CO2 Pressure Charger Filler Unit455CO2 Pressure ChargersP07362 Filling/Measuring Device 32ounce capacity - Heavy DutyPolyethylene Container withbrass mesh screening(4)CLEANING THE #110 VALVE1)