Transcription of Introduction to Microsoft PowerPoint
1 Introduction to Microsoft PowerPoint By the end of class, students should be able to: Identify parts of the work area. Create a new presentation using PowerPoint s design templates. Navigate around a presentation. Add slides to a presentation Add text and clip art to a slide Moving and resize slide elements. Format text in a text box. Edit a presentation. Add predesigned transitions and effects. View, Print, and Save a presentation. Open an existing presentation. What is Microsoft power Point? PowerPoint is a powerful yet fun way to create professional presentations using a computer. We will be covering these three key points : 1.
2 How to create a basic PowerPoint presentation 2. Different ways to view and edit a PowerPoint presentation 3. How to add transitions, effects, animations and sounds to your slides Opening Microsoft PowerPoint To open Microsoft PowerPoint : Double click on the Microsoft PowerPoint shortcut on the desktop OR Click on the Start menu, click on Programs, and click on Microsoft PowerPoint . Touring the Work Area Let s begin by getting oriented to Microsoft PowerPoint s interface. The slide pane is in the center. This is where you click to add and edit content in each slide. The outline pane allows you to move easily between slides in your slideshow by clicking on the slide that you want to view or edit.
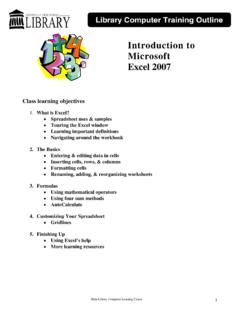
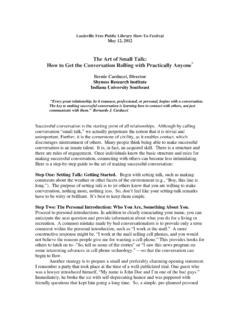
3 Outline Pane Microsoft Office Ribbon Notes Pane Slide Pane Louisville Free Public Library Computer Learning Center 2 The notes pane is below the slide pane. You can type presentation notes associated with the slide in this area. Later you can print the notes pages to assist during a presentation. The notes pane is not visible to slide show viewers. The Microsoft Office Ribbon is above the main work area. The content and choices shown on the ribbon change depending on which tab is active and what tasks you are performing. Creating a New Presentation From Design Template 1. Click on the Microsoft Office Button and click new. 2. A new window will appear with several categories of templates to choose from.
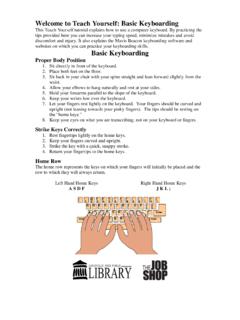
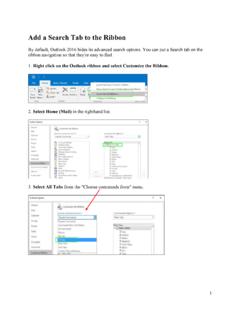
4 Click on the template style that you wish to use and click the Create button. This will allow us to easily a consistent background and style to our presentation. 3. Slides will be added automatically to your slide presentation. Instructions will be included on each slide explaining how to add content to your slideshow. Navigating Around a Presentation When you first create a presentation, PowerPoint starts you out on the title slide of the presentation. Viewing a specific slide To view or edit a specific slide in your presentation, simply click on the slide in the Outline Pane. The slide will then appear in your work area and will be ready to edit. Louisville Free Public Library Computer Learning Center 3 Adding Text and Clip Art to a Slide Text areas Clip Art area Text boxes and clip are the basic slide elements necessary for creating a professional looking presentation.
5 Your template has provided you with these basic design elements for each slide, but you will need to change them or add more of them to create your presentation. Adding and editing text 1. Click on the text area of the slide. 2. Start typing. 3. When typing in a bulleted list area, press the Enter key on your keyboard to create another bulleted line. Adding or changing clip art 1. Click in the clip art area. The clip art gallery will appear. 2. Type a keyword into the clipart gallery search box and click on Go. 3. Click on the desired clip art that appears in the gallery to insert it into your slide. Inserting additional text boxes 1. On the Insert tab, in the Text group click on Text Box.
6 2. The cursor will turn into what looks like an upside down t . Click on the slide and drag the mouse diagonally on the slide to create a new text box of whatever size and shape you need and release the mouse button. 3. Click on the new text box to begin typing text into it. Louisville Free Public Library Computer Learning Center 4 Inserting additional clip art 1. On the Insert tab, in the Illustrations group click on Clip Art. 2. The clip art gallery will open in the task pane. Type in a keyword and click on Go. 3. Click on the art that you would like to include in your slide. The art will appear in your slide and you can drag it with the mouse to wherever you would like it to appear on the slide.
7 Be aware that you can limit your search to a particular collection or a particular media file type. Moving and Resizing Text Boxes and Clip Art Resizing Clip Art 1. Click on the clip art. 2. Notice circles appear around the outside of the clip art. They are called handles. Click and drag inward or outward at a diagonal on the corner handle to resize the object. Moving Clip Art Click in the middle of the clip art and drag it to the desired location. Resizing Text Boxes 1. Click on the text box. 2. Click and drag on one of the circle handles to resize the object. Moving Text Boxes 1. Click on the text box. 2. When the border appears around the text box, click and drag on it to move the box.
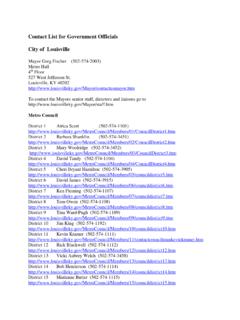
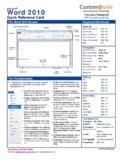
8 Formatting text To format text, first you have to select it and then you make your modifications. Selecting text to format Click and drag over the text with your cursor. OR to format a whole text box at once, click on a text box, then click on the border that appears around the text box. You can hover your mouse over most formatting options to see a preview of how that option will look in the slide before actually applying it. Louisville Free Public Library Computer Learning Center 5 Using PowerPoint s Formatting Options After selecting the text to be changed, select the desired options on the Home tab. Font Size Horizontal Text Alignment Buttons Emphasis Buttons Bold, Italic, Underlined Font ColorTypeface Undoing Accidental Changes Remember, you can always undo accidental changes using the Undo button.
9 Running Spell Check It is always advisable to run spell check before presenting. Misspellings can be very embarrassing for the presenter and distracting for the viewers. To spell check your presentation: Click on the spell check button on the Review tab in the Proofing group. OR Press the F7 key on the keyboard. Editing a Presentation Adding Slides If you want to add additional slides to the ones already included in the template: Click on New Slide on the Slides group of the Home tab. A new slide will be created after your currently selected slide. By default, the new slide has a heading area with a bulleted list area below it. This is the most commonly used slide layout.
10 To select a different slide layout, simply click on the arrow below New Slide and choose from the list of slide styles. Rearranging Slides In the Outline Pane, click and drag the slide to the desired location. A vertical gray line will appear between the slides. This will help you know where you are dropping the slide. Louisville Free Public Library Computer Learning Center 6 Deleting Slides 1. Right click on the slide in the Outline Pane that you wish to delete. 2. From the list of options that appears, click on Delete. Adding Transitions and Effects Changing Transitions A transition refers to how the previous slide changes to the next slide. The new slide can zoom in from the side, come down from the top, unfold like horizontal blinds or appear in any number of other ways.