Transcription of Introduction to Title Blocks (Architectural Board Drafting)
1 This work is licensed under a Creative Commons Attribution-NonCommercial-ShareAlike International License unless otherwise Explore Trades Skills Design and Drafting 2D Drawing Introduction to Title Blocks ( architectural Board Drafting) DescriptionIn this activity the teacher will demonstrate the use of Board drafting tools and equipment to create a Title block. A Title block is comprised of the information boxes found on the bottom right-hand corner of a drawing, which indicate drawing details such as the Title , author name, scale, and date the drawing was is an introductory activity designed to be completed prior to any other Board drawing activities. It will cover basic standards in precision drawing techniques, pencil hardness/selection, and ObjectivesThe student will be able to: Complete a Board and page setup Use tools appropriately to draw a Title block Differentiate pencil hardness relative to line weight, and select a pencil accordingly Understand and identify architectural measurement standards (imperial units of measurement) Use basic line weight techniques Identify and implement lettering techniques AssumptionsThe teacher will have a fundamental knowledge of drafting tools and equipment (see Drafting Dictionary Activity Plan).
2 The student will: Have a basic knowledge of drafting tools and equipment Have a foundational understanding of how to appropriately use drafting equipmentTerminologyBorder lines: thick, dark lines used to create a solid border around a blank Board : a flat, smooth surface usually covered in vinyl to which paper is affixed. The drafting Board has square, parallel edges that allow a T-square to slide easily. Drafting brush: used to sweep away debris from a drawing so the full drawing is not smeared. Eraser shield: a micro-thin piece of metal with cut-outs that allow the user to erase detailed sections of a drawing without erasing the rest of the to Title Blocks ( architectural Board Drafting) Design and Drafting 2D Drawing2 Youth Explore Trades SkillsGuide lines: thin, light lines drawn using the lettering guide for evenly spaced letters. Layout lines: very light lines used to lay out measurements before those measurements are drawn in heavy, dark lines (border lines).Lettering guide: used to assist in the drawing of uniform lines to draw consistent, evenly spaced lettering.
3 Line weight: the thickness and darkness of drawn tape (drafting dots): holds drawing paper and/or vellum to the drafting Board so the paper does not shift while drawing. Pencil: a drawing utensil with a mechanical or solid core (lead). Leads range from hard to soft: 6H, 4H, 2H, H, HB, 2B, 4B, 6B. H is very hard with a fine point and B is extremely soft with a blunt point. A hardness of 2H is recommended for these drawing: the act of creating drawings with specialized tools and equipment. Steel rule: a straightedge made of rigid material and divided into specific increments, found both in metric and imperial block: comprised of the information boxes found on the bottom right-hand corner of a drawing, the Title block indicates drawing details such as the Title , author name, scale, and date a drawing was (right angle and isosceles): drafting guides made of hard, clear plastic that are used to draw lines at vertical and set angles (45 90 45 , 30 60 90 ).T-square: a precision drawing instrument that is used as a guide with other drafting equipment.
4 The T-square has a 90 angle where the head and blade Time30 60 minutesRecommended Number of Students20, based on BC Technology Educators Best Practice GuideFacilities Regular classroom space with desks/chairs for all students, a projector with computer and speakers, and Internet access Drafting boards (any large enough smooth, flat surface will also work)Tools T-square Steel rule Triangles (right angle and isosceles)Design and Drafting 2D Drawing Introduction to Title Blocks ( architectural Board Drafting) Youth Explore Trades Skills 3 Eraser shield Drafting brush Masking tape (drafting dots) Drafting Board Lettering guide Mechanical pencil or drafting pencil with 2H lead (most versatile for drawing at this stage)Materials Handout for students with instructions (suggestion: develop a handout using the instructions from the teacher-led activity that follows).Resources Drafting Dictionary Activity PlanStudent Activity1. Complete Title block Fill in Title block with appropriate information as noted OF EXERCISESTUDENT NAMEDATENAME OF DRAWINGSCALE OF DRAWING PAGE Extension ActivityHave students create multiple Title block pages for further use in subsequent exercises.
5 Assessment Student participation in discussion/demonstration Completion of drawing with overall neatness: Lines are drawn correctly. Border lines cross to ensure closed corners. Lettering is done to a high quality (all uppercase). Title block is filled out correctly with appropriate to Title Blocks ( architectural Board Drafting) Design and Drafting 2D Drawing4 Youth Explore Trades SkillsTeacher-led Activity1. Gather all materials listed Using the T-square and masking tape and/or drafting dots, align blank paper to your drafting Board and securely tape down (Figure 1).Figure 1 Secure paper to board3. Using the imperial ruler, mark out lines with your pencil around the entire page at " from the outside edge (Figure 2). These lines should be small, should align with the direction of the page, and should be very light (layout lines).Figure 2 Mark off borderDesign and Drafting 2D Drawing Introduction to Title Blocks ( architectural Board Drafting) Youth Explore Trades Skills 54.
6 Using the T-square and right angle triangle, join these lines to create a border around the entire page (Figure 3). These lines should be solid, dark lines with no breaks (border/ Title block lines).Note: The border lines should cross over each other to ensure closed corners (Figure 4), but they should not extend to the edges of the 3 Draw borderFigure 4 Closed cornerIntroduction to Title Blocks ( architectural Board Drafting) Design and Drafting 2D Drawing6 Youth Explore Trades Skills5. Mark a point " above the bottom border line (Figure 5) and draw a layout line joining the left and right vertical border 5 Measure layout line " horizontally above bottom border6. Repeat step 5, measuring up another " from the line you just drew (Figure 6).Figure 6 Measure a second horizontal layout line " from the line drawn in step 5 (or 1 " from the bottom border!Design and Drafting 2D Drawing Introduction to Title Blocks ( architectural Board Drafting) Youth Explore Trades Skills 77.)
7 From the vertical border line on the right-hand side of the page, measure in 2 " toward the left (Figure 7) and use layout lines to mark in the Title blockFigure 7 Measure in 2 " from vertical border line8. Divide the Blocks in the small section at ". You should end up with four small sections that are " high and 2 " wide (Figure 8).Figure 8 Small sections divided at 3/8" height (right) Introduction to Title Blocks ( architectural Board Drafting) Design and Drafting 2D Drawing8 Youth Explore Trades Skills9. Demonstrate how to use a lettering guide aligned with the T-square (Figure 9) to draw light guide lines to fill in the Title block (Figure 10).Figure 9 Using a lettering guideFigure 10 Letter guide lines10. Fill in the Title block with the appropriate information. Remind students that drafting convention requires that all lettering be done in Acknowledgment Camosun College. Trades Access Common Core: Competency D-3: Read Drawings and Specifications (pp. 25 33).
8 The Trades Access Common Core resources are licensed under the Creative Commons Attribution Unported Licence ( ), except where otherwise noted. Download for free at Design and Drafting 2D Drawing Introduction to Title Blocks ( architectural Board Drafting) Youth Explore Trades Skills 9 TRADES ACCESS COMMON CORE 25 COMpETENCy D-3: READ DRAwiNgS AND SpECifiC ATiONS LEARNiNg TASk 2 LEARNING TASK 2 Describe lines, lettering, and dimensioning in drawingsThe purpose of engineering drawings is to convey objective facts, whereas artistic drawings convey emotion or artistic sensitivity in some drawings and sketches need to display simplicity and uniformity, and they must be executed with speed. Engineering drawing has evolved into a language that uses an extensive set of conventions to convey information very precisely, with very little ambiguity. Standardization is also very important, as it aids internationalization; that is, people from different countries who speak different languages can read the same engineering drawing and interpret it the same way.
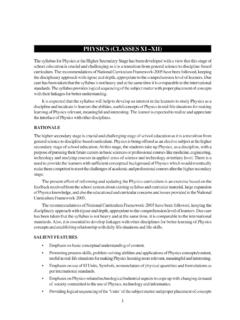
9 To that end, drawings should be as free of notes and abbreviations as possible so that the meaning is conveyed styles and typesStandard lines have been developed so that every drawing or sketch conveys the same meaning to everyone. In order to convey that meaning, the lines used in technical drawings have both a definite pattern and a definite thickness. Some lines are complete and others are broken. Some lines are thick and others are thin. A visible line, for example, is used to show the edges (or outline ) of an object and to make it stand out for easy reading. This line is made thick and dark. On the other hand, a centre line, which locates the precise centre of a hole or shaft, is drawn thin and made with long and short dashes. This makes it easily distinguishable from the visible you draw, use a fairly sharp pencil of the correct grade and try to maintain an even, consistent pressure to make it easier for you to produce acceptable lines (Figure 1). Study the line thicknesses (or line weights ) shown in Figure 2 and practise making them.
10 9H8H7H6H5H4H3H2 HHFHBB2B3B4B5B6B7B8B9 BHardnessBlacknessTechnicalSketchingFigu re 1 Lead grade and usageAppendix Download for free at Introduction to Title Blocks ( architectural Board Drafting) Design and Drafting 2D Drawing10 Youth Explore Trades Skills26 TRADES ACCESS COMMON CORECOMpETENCy D-3: READ DRAwiNgS AND SpECifiC ATiONS LEARNiNg TASk 2In computer drafting, the line shape remains the same, but line thickness may not vary as it does in manually created drawings. Some lines, such as centre lines, may not cross in the same manner as in a manual drawing. For most computer drafting, line thickness is not lineMargin lineHeavySolid line to show visible shape, edges, and body lineMediumBroken line of long and short dashes to show hidden object lines not visible to the lineLightBroken line of short dashes to show alternate positions or movement of a lineLightSteelLeadCast iron/General purposeCopper/BrassUnbroken lines arranged in a pattern, usually straight and at a 45 lineLightUnbroken lines that extend away from the object or feature for lineLightBroken line of long and short dashes to show the centre of an line/Dimension lineLight25 mmExtension lines are small lines that extend outward from an object or feature.