Transcription of K45 Series KSM45–KSM200 Series - KitchenAid
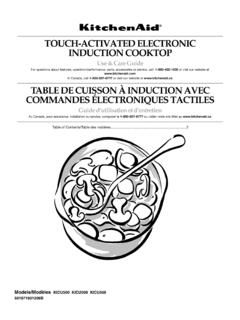
1 K45 Series KSM45 KSM200 SeriesPARTS AND FEATURESPARTS AND ACCESSORIESP ouring shield*Flex Edge beater*Wire whipDough hookSpeed control*Accessory sold separatelyMotor headAttachment hubBeater shaftFlat beaterBowlENGLISHSTAND MIXER SAFETY | 3 STAND MIXER SAFETYIMPORTANT SAFEGUARDSWhen using electrical appliances, basic safety precautions should always be followed, including the following:1. Read all To avoid risk of electrical shock, do not put Stand Mixer in water or other Close supervision is necessary when any appliance is used by or near Unplug the Stand Mixer from outlet when not in use, before putting on or taking off parts, and before Avoid contacting moving parts. Keep hands, hair, and clothing, as well as spatulas and other utensils, away from beater during operation to reduce the risk of injury to persons and/or damage to the Stand Do not operate any appliance with a damaged cord or plug or after the appliance malfunctions or has been damaged in any manner.
2 Return appliance to the nearest Authorized Service Facility for examination, repair or The use of accessories not recommended or sold by KitchenAid may cause fire, electric shock or Do not use the Stand Mixer Do not let the cord hang over the edge of table or | STAND MIXER SAFETYSTAND MIXER SAFETY10. Do not let the cord contact hot surfaces, including the Remove the flat beater, wire whip, or spiral dough hook from the Stand Mixer before washing. This product is designed for household use REQUIREMENTSV oltage: 120 VFrequency: 60 HzWattage: 275 Watts MAX for models K45, KSM45-KSM80 300 Watts MAX for models KSM85-KSM110 325 Watts MAX for models KSM120-KSM200 NOTE: The power rating for your Stand Mixer is printed on the serial not use an extension cord. If the power supply cord is too short, have a qualified electrician or serviceman install an outlet near the maximum rating is based on the attachment that draws the greatest load (power).
3 Other recommended attachments may draw significantly less THESE INSTRUCTIONSENGLISHUSING THE STAND MIXER | 5 USING THE STAND MIXERCHOOSING THE RIGHT ACCESSORYACCESSORYUSE TO MIXDESCRIPTIONFLAT BEATER FLEX EDGE BEATER* Normal to heavy mixturesCakes, creamed frostings, candies, cookies, biscuits, pie pastry, meatloaf, mashed potatoesWIRE WHIPM ixtures that need air incorporatedEggs, egg whites, heavy cream , boiled frostings, sponge cakes, mayonnaise, some candiesDOUGH HOOKM ixing and kneading yeast doughsBreads, rolls, pizza dough, buns*Accessory sold separately6 | USING THE STAND MIXERUSING THE STAND MIXERSPEED CONTROL GUIDENOTE: The speed control can be set between the speeds listed in the chart to obtain speeds 1, 3, 5, 7, and 9 if a finer adjustment is required. Do not exceed Speed 2 when preparing yeast doughs as this may cause damage to the Stand STIRFor slow stirring, combining, mashing, starting all mixing procedures.
4 Use to add flour and dry ingredients to batter and to add liquids to dry ingredients. Do not use Speed 1 to mix or knead yeast SLOW MIXINGFor slow mixing, mashing, faster stirring. Use to mix and knead yeast doughs, heavy batters and candies, start mashing potatoes or other vegetables, cut shortening into flour, mix thin or splashy MIXING, BEATINGFor mixing semi-heavy batters, such as cookies. Use to combine sugar and shortening and to add sugar to egg whites for meringues. Medium speed for cake BEATING, CREAMINGFor medium fast beating (creaming) or whipping . Use to finish mixing cake, doughnut, and other batters. High speed for cake mixes. 8 FAST BEATING, WHIPPINGFor whipping cream , egg whites, and boiled WHIPPINGFor whipping small amounts of cream , egg whites or for final whipping of mashed : To move the speed control lever with ease, lift slightly up as you move it across the settings in either THE STAND MIXER | 7 USING THE STAND MIXERASSEMBLING THE STAND MIXER1 Check to be sure that the Stand Mixer is unplugged, and the speed control is turned to 0.
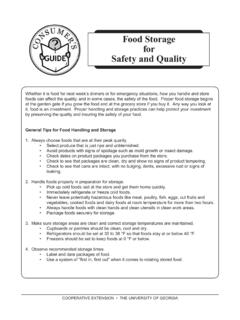
5 2 Raise the motor head: Slide the locking lever to the unlock position and lift the motor head. Once lifted, slide the locking lever to the lock position to keep the motor head the bowl: Place the bowl on the bowl clamping plate and gently turn it in a clockwise direction to lock it into any accessory: Slip the accessory onto the beater shaft and press upward as far as possible. Turn the accessory counterclockwise to hook the accessory over the pin on the : To move the speed control lever with ease, lift slightly up as you move it across the settings in either | USING THE STAND MIXERUSING THE STAND MIXERIMPORTANT: Your Stand Mixer is adjusted at the factory so that the flat beater just clears the bottom of the bowl. If, for any reason, the flat beater hits the bottom of the bowl or is too far away from the bowl, you can easily correct the : When properly adjusted, the flat beater will not strike on the bottom or sides of the bowl.
6 If the flat beater or the wire whip is so close that it strikes the bottom of the bowl, coating may wear off the beater or wires on the whip may THE STAND MIXER(OPTIONAL) To adjust beater to bowl clearance: Tilt the motor head back; then, using a flat-head screwdriver, turn the screw slightly counterclockwise (left) to raise the beater, or clockwise (right) to lower the beater. Adjust the beater so that it just clears the surface of the bowl. If you over adjust the screw, the bowl lock lever may not lock into place.(OPTIONAL) Place the pouring shield*: Slide the pouring shield* from the front of the Stand Mixer over the bowl until the pouring shield* is centered. The bottom rim of the pouring shield* fits inside of the bowl. The pouring chute will be just to the right of the attachment hub as you face the Stand the motor head: Slide the locking lever to the unlock position and guide the motor head down.
7 Make sure motor head is completely down, then slide the locking lever to the lock position. Before mixing, test lock by attempting to raise motor head.*Accessory sold separatelyENGLISHUSING THE STAND MIXER | 9 USING THE STAND MIXEROPERATING THE STAND MIXERNOTE: The Stand Mixer may warm up during use. Under heavy loads with extended mixing time, the top of the unit may become hot. This is the Stand Mixer into a grounded 3 prong outlet. Always set the speed control lever on lowest speed to start, then gradually increase speed to avoid splashing ingredients. See the Speed control guide to select the best speed for your not scrape the bowl while the Stand Mixer is operating. The bowl and beaters are designed to provide thorough mixing without frequent scraping. Scraping the bowl once or twice during mixing is usually : To move the speed control lever with ease, lift slightly up as you move it across the settings in either | USING THE STAND MIXERUSING THE STAND MIXERDISASSEMBLING THE STAND MIXERNOTE: The pouring shield* can be used to avoid ingredients splashing out of the bowl when mixing as well as to easily pour ingredients in the bowl while the motor head: Check to be sure that the Stand Mixer is unplugged, and the speed control is turned to 0 ; then, slide the locking lever to the unlock position and lift the motor head.
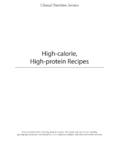
8 Once lifted, slide the locking lever to the lock position to keep the motor head up.(OPTIONAL) Remove the pouring shield*: Lift the front of the pouring shield* clear of the rim of the bowl, and pull away from the Stand the accessory: Turn the speed control to 0 , unplug the Stand Mixer, and tilt the motor head back; then, press the accessory upward as far as possible, turn the accessory clockwise and pull it away from the beater the bowl: Gently turn the bowl counterclockwise to release it from the bowl clamping plate.(OPTIONAL) Pour ingredients into the bowl through the pouring chute.*Accessory sold separatelyENGLISHUSING THE STAND MIXER | 11 USING THE STAND MIXEROPTIONAL ATTACHMENTSK itchenAid offers a wide range of optional attachments such as the spiralizer, pasta cutters, or food grinder that may be attached to the Stand Mixer attachment power hub as shown to be sure that the Stand Mixer is unplugged and the speed control is turned to 0.
9 2 Turn the attachment knob counterclockwise to remove attachment hub attachment into attachment hub, making certain that attachment power shaft fits into the square attachment hub socket. It may be necessary to rotate the attachment back and forth. When it is in the proper position, the pin on the attachment will fit into the notch on the hub the attachment knob by turning it clockwise until the attachment is completely secured to the Stand Mixer. See the Instructions manual that came with your attachment for detailed directions on using the | TIPS FOR GREAT RESULTSEGG WHITESWHIPPED CREAMP lace room temperature egg whites in clean, dry bowl. Attach bowl and wire whip. To avoid splashing, gradually turn to designated speed and whip to desired stage. AMOUNT SPEED1 egg white GRADUALLY to 102 or more egg whites GRADUALLY to 8 whipping stagesWith your KitchenAid Stand Mixer, egg whites whip quickly.
10 Avoid over cold whipping cream into chilled bowl. Attach bowl and wire whip. To avoid splashing, gradually turn to designated speed and whip to desired stage. AMOUNT SPEED less than 3/4 cup (200 ml) GRADUALLY to 10more than 3/4 cup (200 ml) GRADUALLY to 8 whipping stagesWatch cream closely during whipping . Because your KitchenAid Stand Mixer whips so quickly, there are just a few seconds between whipping FOR GREAT RESULTSENGLISHTIPS FOR GREAT RESULTS | 13 TIPS FOR GREAT RESULTSMIXING TIPSM ixing timeYour KitchenAid Stand Mixer will mix faster and more thoroughly than most other electric mixers. Therefore, the mixing time in most recipes must be adjusted to avoid over beating. To help determine the ideal mixing time, observe the batter or dough and mix only until it has the desired appearance described in your recipe, such as smooth and creamy.