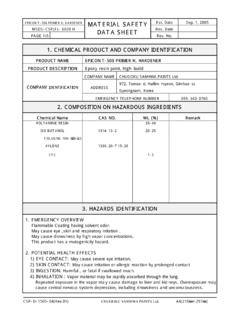
Transcription of Kleer Kote #30 Table Top Epoxy - US Composites
1 Ph. 561-842-6121 Fax kote #30 Table Top EpoxyProduct Information and DirectionsKleer kote #30 is a 100% solids, high-build, clear polymer coating that is commonly seen on bar and Table tops. Eachkit contains a bottle of resin and a bottle of hardener which are mixed together at a 1 to 1 ratio by volume. This product cures toa clear, glass-like finish that resists scratching and will not distort with age. Items coated with it will become permanently pre-served and protected for your enjoyment throughout a lifetime. This product will resist yellowing and is water resistant. However,it does not provide 100% UV protection. This should be carefully considered before applying in an outdoor, high UV exposuresetting. The Kleer kote will not exhibit any blushing or sweat-out even under high humidity product is best applied in two stages. The first stage is referred to as the seal coat.
2 The seal coat is brushed on in athin layer and is used to seal any porosity on the surface which will prevent air bubbles from rising in the subsequent flood the seal coat has set for at least 4 hours a flood coat is then applied. The flood coat should be poured onto the surface andallowed to flow out and self-level. You can use a rubber squeegee or a foam brush to help spread the Epoxy . Generally one tothree flood coats are applied for most Table and bar coatings, however you must wait between 4 to 10 hours before applyingsubsequent flood You Need: Safety Gloves - Epoxy is very sticky. Graduated Mixing Cups - Accurate measurement is extremely important to achieve optimum cured properties. Clean Stir Sticks - Dirty sticks can cause contamination of the Epoxy . Rubber Squeegees - These spreaders will not leave air bubbles behind as brushes can.
3 Brushes - Foam or nylon brushes which do not lose bristles Solvent - Denatured alcohol or acetone for cleanup and wiping Propane Torch, Heat Gun or Hair Drier - Used by sweeping the heat or flame across the surface of the uncured Epoxy to release trapped air bubbles Drop Cloths - Should be used to avoid spills on flooring surfacesBeginners Notes: This product will produce professional results when applied correctly. Take your time to review some of these common problemsthat first time users can VERY IMPORTANT: To avoid most of these common problems, you should always do a trial runwith the product to insure proper understanding of how to mix and Always make sure that your mixing container is clean and your measuring device is accurate. This product requiresthat you mix at a 1 to 1 ratio by volume. Any variances from this ratio will cause the Epoxy to never completely THOROUGH mixing is the most important part of this procedure.
4 Even if you have experience with other typesof resins, it is very easy to underestimate the amount of mixing this product requires. Depending on the quantity beingmixed, it can take anywhere from 3 to 7 minutes of continuous mixing without whipping. During mixing the product willturn cloudy white and you must continue to mix until all signs of haziness and white streaks in the mixture have turnedback to a completely transparent Do not whip this product while mixing. Lifting the stick while mixing can excessively whip the product and will add atremendous amount of air bubbles which are difficult to Always scrape the sides of the mixing container and stick during the mixing process. If any unmixed material remainson the side of the container and falls onto your surface while pouring it will leave an uncured wet or sticky While pouring the Epoxy onto the surface, NEVER scrape or brush the sides or bottom of the container you just mixedin to remove every last drop because no matter how thoroughly you may have mixed, there will always be an unmixedportion stuck which can be dislodged and will leave a wet or sticky Never leave mixed Epoxy in your bucket unattended.
5 The longer the Epoxy sits in your bucket, it will increasethe chances that the Epoxy will generate excess heat, begin to smoke and then cure quickly inside the Cleaning the cured finish should only be done with mild soap and water. Using harsh cleaners or kitchen chemicals cancause the finish to feel tacky. 2004-2014 Composites , Inc. 6670 White Drive West Palm Beach, FL 33407 561-842-6121 Fax StartedProject Preparation: For best results the product should be used in conditions between 70 F to 85 F. The room you areworking in should be clean, dry, dust and insect-free. Settling dust can often cause imperfections on the surface of the Epoxy as itis curing. Make sure your project surface is level. If not level, the Epoxy will puddle in the lowest : Gloves should always be worn when working with Epoxy . This product is nontoxic and safe for indoor use because it hasvirtually no odor.
6 Epoxy may be harmful to skin so proper eye and skin protection should be worn at all Preparation: For most applications the wood surface on the bar or Table should be sanded first and cleaned and dust-free. It is also important that any prior stains or finishes be completely dry before beginning. Any types of moisture, oils, greasesor uncured finishes can potentially cause fish-eye or product curing :For applications requiring stain to be applied to the wood we recommend using alcohol-based NGR stain. Allow 24 hoursfor the NGR stain to fully dry before applying Epoxy . CAUTION when using oil-based stain. Oil-based stain is very slow dryingand can cause the Epoxy to fish-eye or lose adhesion and lift due to the oil not being dry. Oil-based stain must be allowed todry for at least one-week(or until fully dry), then sealed with a clear, oil-based polyurethane.
7 After the polyurethane has cured for48 hours, the Epoxy coating can be applied on top. Fish-eye will appear as crater-like air bubbles on the surface of the Epoxy andcan occur if trying to topcoat an oil-based stain too information contained in this bulletin is based on data considered to be accurate and is intended for use by persons having technical skills and know how, at their own discretionand risk. Since conditions of use are outside our control, we can not assume liability for results obtained or damage incurred due to misuse, nor can we assume customer liability. ** COLD WEATHER WARNING **IDEAL WORKING TEMP IS 75 TO 80 MIXING MAKE SURE THE PRODUCT HAS ACCLIMATED TO AT LEAST 75 BELOW 75 WILL CAUSE MIXING TO BE EXTREMELY DIFFICULT AS WELL AS EXCESS AIR BUBBLES THAT CANNOT BE The Product1. Coverage:In order to determine how much to mix you must know your square footage(length x width).
8 When working on largeprojects it is not necessary to mix the entire amount all at once due to the difficulty in mixing more than two gallons at one multiple batches for one coat is acceptable when they are poured right after each other. Large projects generally requiremore than one person in order to facilitate proper mixing and pouring within the allotted amount of working Coat Coverage Guide (48 square feet per gallon)Area to CoverTotal Volume of Epoxy (resin + hardener amounts)_____1 Sq Foot3oz Total (1 oz Resin+ 1 oz hardener )4 Sq Feet11oz Total (5 oz Resin + 5 oz hardener )10 Sq Feet26oz Total (13oz Resin + 13oz hardener )16 Sq Feet42oz Total (21oz Resin + 21oz hardener )24 Sq Feet64oz Total (32oz Resin + 32oz hardener )For Large Projects: Use formula of 48 Sq Feet per gallon ( gal Resin + gal hardener )2. Measuring:It is extremely important that the product be measured accurately and mixed thoroughly.
9 Clean graduated cups ortubs should be used for measuring. Measure 1 part RESIN to 1 part hardener . Do NOT vary this ratio, epoxies are formulated tocure at a certain mixing proportion and any variances can cause the product to never fully cure. We recommend always pouring theHARDENER into your mixing container first, followed by the RESIN. This will help the two components mix more Mixing- Combine the two components together into a larger container. The mixing container should be about 30% bigger than theamount of product you are mixing so that thorough mixing can be accomplished without spillage over the container Mixing of the product should be done by hand with a clean stir stick. The more product you are mixing the longer it willtake to achieve a complete mixture. Beginners should generally only mix 2 quarts per batch, this should take about 4 to 5 minutesof mixing.
10 Typically one gallon of mixture takes approx. 5 to 7 minutes of mixing. Two gallons of mixture take approx. 6-8 minutesof mixing. Only experienced users should ever attempt mixing two gallons per batch. Timing this with a watch is a good The process of mixing is long and will make your wrist tired, but it is the most important part of the project. As you beginto mix, the resins will almost immediately turn a cloudy white color. This represents the two separate components starting to you continue to mix the level of whiteness will begin to turn more transparent with the end result being a completely transparentmixture in which you can see to the bottom of the mixing container. Mixing must continue until all signs of cloudiness and hazy lineshave completely disappeared. Some air bubbles are normal in the mixture, however do not whip the mixture.