Transcription of KuraStoneTM Installation Guide - Nichiha Fiber Cement
1 Read these Installation guidelines completely and thoroughly before beginning Requirements KuraStone -StackedStone and KuraStone -LedgeStone pieces can be installed on braced wood or steel stud (18 GA or heavier) construction spaced at 16 to 24 It is required that plywood sheathing or APA rated 7/16 or thicker oriented strand board (OSB) be used to ensure fastener holding power. WRB is required when installing KuraStone . Use a dark or black fluid- applied WRB over sheathing or use a code-approved WRB covered with a layer of 15-lb. black felt as defined by the 2006 IRC. Refer to local building codes. Nichiha is not liable for water infiltration. All openings must have appropriate flashing (such as water-proofing tape) to prevent moisture penetration. Follow manufacturer s guidelines and all local building codes. Please consult with your local dealer or Nichiha directly when using KuraStone on large projects, such as buildings taller than 45 or greater than three stories.
2 Special reinforcements may be Inspection Inspect all products thoroughly prior to Installation . Do not install any product which may have been damaged in shipment or displays damage to the primer or finish coat. Should you have a question about your order, contact your local dealer or Nichiha Customer Service toll-free at ProofingBarrier (Black)StarterCorner PiecesKuraStoneTMClipKuraStoneTM Installation GuideStackedStone, LedgeStone and Sill-Chiseled2 Storage and Handling KuraStone MUST be stored flat and off the ground prior to Installation . Storage of siding on pallets is recommended. KuraStone MUST be kept dry and stored in a covered area or covered with wrap before Installation . Carry products on edge. Do not carry or lift KuraStone flat. Improper handling may cause damage or cracking. Nichiha is not liable for damage caused by improper storage or Clearances Always maintain a minimum 2 clearance between KuraStone and steps, driveways and decking products.
3 When installing KuraStone pieces leave a minimum of 6 from soil grade or 2 from hard surface to the bottom of the starter track and pieces. At roof and wall junctures and in accordance to roofing manufacturer s instructions , flashing and counterflashing is required. KuraStone pieces must be installed with a minimum 1 clearance from roofing. Cutting Always cut KuraStone pieces outside or in a well-ventilated area. Do not cut KuraStone in an enclosed area. Always cut pieces from the front to minimize chips on face. Always wear safety glasses and NIOSH/OSHA approved respirator whenever cutting, drilling, sawing, sanding, or abrading pieces. Refer to the safety information in these instructions for more details. Use a miter saw with a diamond-tipped Fiber Cement or masonry blade when cutting KuraStone. Fastening Corrosion resistant screws such as stainless steel or hot-dipped galvanized wood screws, that are appropriate to local building codes and practices, must be used to fasten clips to sheathing.
4 Nichiha is not liable for the corrosion resistance of fasteners. Do not use fuel-cell, pneumatic, powder-actuated, aluminum, staples, nails or fasteners that are not rated or designed for intended use. Use a minimum 1-1/2 , fully-threaded, #8 or greater wood screw. DO NOT USE NAILS FOR FASTENING KuraStone and Maintenance Use exterior-grade, high-quality sealant that complies with ASTM C-920 for all gaps that require filling with sealant. Follow manufacturer s written instructions for use. All field cut edges must be covered with sealant or paint. Any dents, chips, scratches, etc. on KuraStone shall be filled with exterior- grade cementitious filler or patching. Follow manufacturer s instructions for and Handling, Minimum Clearances and Cutting, Fastening, Finishing and MaintenanceKuraStone Piece OptionsKuraStone -StackedStone panels are available in two colors: Desert and Mountain.
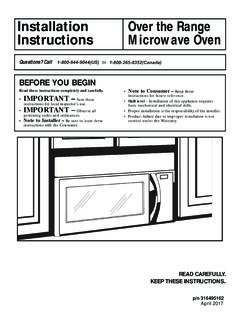
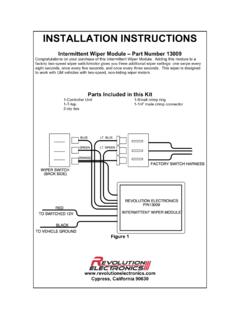
5 All piece options are available in both colors. KuraStone -LedgeStone is available in Bluff. Pieces are designed with no dedicated top or bottom, so that you can flip pieces to ensure a random pattern. KuraStone Wall PiecesKuraStone wall pieces are not ship-lapped, nor are they sealed on the top and right edges as Nichiha panel products. KuraStone pieces feature grooves on four sides, so that clips and starter track can be inserted into any side. Wall pieces are 6 in height and come in three lengths: 10-1/4 , 15-3/8 and 25-5/8 . When installing pieces, randomly use the different lengths in order to stagger piece seams on the wall. One pack contains three long, two short, and two medium pieces. KuraStone Pre-Manufactured Outside Corner PiecesEach KuraStone Outside Corner is manufactured with a short and a long side. Flip corners on each course so that a long side always aligns with a short side and continue the length of the Border Pieces Border pieces come in 17 (large) and 10-1/4 (small) lengths with one 1-1/2 finished return edge.
6 Pieces are designed with no dedicated top or bottom. Use KuraStone border pieces for material transitions or against door and window trim (optional). KuraStone AccessoriesKuraStone clips, starter track and spacer can be used with all KuraStone pieces KuraStone Starter Track / FA100 BKuraStone Starter Track is steel with pre-drilled fastener holes spaced approximately 1 FA100B Starter Track features weep holes spaced ap-proximately 6 There are 10 pieces in a package of the 10-foot long, 2-3/8 high track. KuraStone pieces should sit flush with the starter track. KuraStone Clip / JE602/JE720 The KuraStone clip can be used either horizontally or vertically on all KuraStone pieces. The JE602 clip measures approximately 3-1/8 by 1-11/16 (nominal), and the JE702 clip measures approximately 2-7/8 by 1-3/4 and both come 50 to a box. 3/16 (FS1005) and 3/8 (FS1010) Corrugated Shims(5mm and 10mm actual, respectively)The 3/16 and 3/8 corrugated shims (green plastic spacers) are used to maintain a consistent sealant gap and for use behind pieces to ensure correct distance and ensure panel stability.
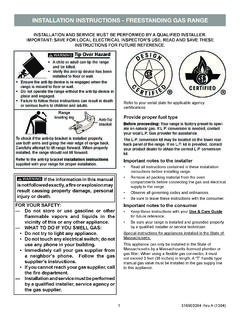
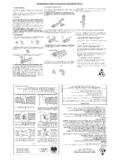
7 Spacers are 48 in Wall PieceKuraStone Clip - JE720 KuraStone Clip - JE602 KuraStone-StackedStone Border PiecesKuraStone-LedgeStone Border PiecesKuraStone-StackedStone Corner PieceKuraStone-LedgeStone Corner PieceKuraStone-LedgeStone Wall PieceStarter Track - cm~ 2-3/8 cm~ 3-1/8 ~ 1-11/16 cm~ 2-7/8 cm~ Corrugated Shims - FS1005, FS10103/8 (FS1010)3/16 (FS1005)Storage and HandlingKuraStone Piece Options and AccessoriesLayout Planning Layout piece placement on paper or set pieces on flat surface prior to Installation . Create a stair-step-like stagger with large and small pieces in each course. Define a pattern going up the wall so that the 4th or 5th course is the same as the first. Avoid having seams line up within two rows of one Starter Track The Nichiha Starter Track (FA100B) must be level and attached at a minimum of 6 above finished soil grade or per local building codes (use a level to verify).
8 When installing over a hard surface such as driveways or sidewalks, a 2 clearance is acceptable. Fasten starter track 8 into sheathing and over WRB. Install flashing tape overlapping the starter track to control moisture penetration, or per WRB manufacturers instructions . Fasten starter track with corrosion resistant #8 or greater fully-threaded pan-head screws. DO NOT USE and HandlingLayout Planning and installing Starter TrackInstalling Starter TrackScrewWater ProofingBarrier (Black)KuraStoneTMPlywood/OSBS heathingStarter4 Install First Panel Course KuraStone wall pieces do not have a dedicated top or bottom. Flip pieces as needed to ensure that stone pattern appears random and courses do not repeat within 4, or less, courses. Place the first course of pieces into the starter track. A rubber mallet or block of wood may be used to seat the pieces firmly in place and tighten.
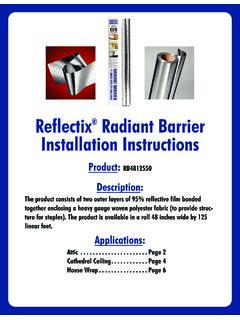
9 Do not hammer directly anywhere on the KuraStone pieces, as direct contact may cause cracks, gouges or chipping. Fit pieces tightly together on both horizontal and vertical joints ensuring that piece edges are properly butted together. Set KuraStone by tapping the edge with a block of wood until piece fits tightly. Attach KuraStone at the top of all vertical joints with Clip (JE602/ JE720CA). Use the claw end of a hammer to set clip tightly in place. Ensure first course is Panel Courses Place a clip at the top of each vertical joint, and place a clip at the center of the bottom of every piece (see illustration below). Attach using appropriate screws Fit the bottom groove of the piece tightly into the clip below it and continue installing course in accordance with these and HandlingInstalling Panel CoursesAn additional clip isrequired at the center of the bottom of each pieceAdditionalClipClip must be at the center of the jointClipKuraStoneTM5 Horizontal Joint DetailVertical Joint DetailScrewClipOutside and Inside Corners Do not install the KuraStone outside corner pieces first.
10 Install them at the same time as the same-coursed pieces. Install the pre-mitered outside corner and butt adjacent to KuraStone wall piece tightly to it. Attach a clip at top of the vertical joints on either side of corner, as well as a clip 2-3 from outside corner on the long length side. When cutting pieces is necessary, cut the adjacent KuraStone wall piece, not the corner piece. At inside corners, KuraStone wall pieces can be butted together. Fill the joint with ASTM C-920 polyurethane sealant. Wall pieces can also be mitered to create a sharp 90 degree angle. Attach panel clips at the nearest joint to the inside corner and within 2-3 of the inside corner on both and HandlingOutside and Inside CornersFlip corners on each course so that a long side always aligns with a short side, and continue along the length of the ReturnsShort ReturnsPlywood/OSBS heathingWaterProofingBarrier (Black)ScrewOutside Corner PieceKuraStoneTMClip6 installing Last Course Install KuraStone pieces in moderate contact with any soffit or ceiling (soffits or ceilings should be installed first).