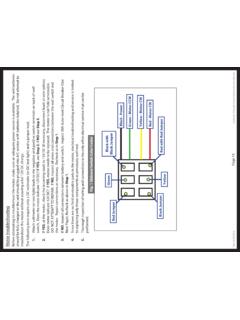
Transcription of L Informational Publication LIP Sheet - 0131 revA ...
1 Lippert Components, Inc. Informational Publication LIP Sheet - 0131 revAHYDRAULIC slideout room ADJUSTMENTSMECHANICAL room ADJUSTMENTV ertical & Horizontal room AdjustmentNOTE: All slideout room adjustments must be performed by certified service technicians. Adjustments made by non-certified persons may void any and all warranty adjustment1. Loosen 2 carriage bolts A on each bracket located at the end of each guide tube. 2. room is ready to be positioned horizontally by pushing on the outside, sidewall or by using a prying devise inserted into the opening between the room and : Use caution when using prying devise so seals do not become adjustment1. Loosen 2 carriage bolts A on each bracket located at the end of each guide tube2. Loosen jam nut3. For vertical adjustment turn vertical adjustment bolt B up or down to locate room room is located, tighten A and Jam Nut B Jam NutFig.
2 A Bolt A Adjusting room so it seals in the IN position:1. Locate cylinder coming through the frame ;2. On the end of the cylinder there is a threaded shaft mounted to the drive bracket with 3 Loosen the Jam Nut-1 and set Jam Nut-2 to desired Tighten down the Nylock Nut against bracket. Make sure Jam Nut-2 is adjusted for FREE TRAVEL (see above). Secure assembly by tightening Jam Nut-1against Jam Nut-2. This will change the location of your seal going to the in position .Jam Nut-1 Jam Nut-2 Nylock Nut2 - 3 FREE TRAVELSYNCHRONIZING room TRAVELFig. 9 ABAdjusting room so it seals in the OUT position:1. Locate actuator coming through the frame ;2. On the end of the cylinder there is a threaded shaft mounted to the bracket with 3 Adjust Jam Nuts 1 & 2 one way or the other this will change the location of your seal going to the out position.
3 4. Make sure all nuts are Components, Inc. Informational Publication LIP Sheet - 0131 revAHYDRAULIC slideout room ADJUSTMENTSThe Lippert hydraulic slideout System room travel (both sides of the room traveling the same distance) can be adjusted withspecially designed synchronizing bracket mounted on the passive slide tube. The passive slide tube is the one that is notpowered. The active slide tube is the one that has the cylinder attached. If one side of the room fails to seal adjust asfollows:1. Loosen bolts (Fig. 9A) on top of the passive slide tube (Fig. 9B)2. Push or pull room (on the passive side) to align with the active Nut-1 Jam Nut-2 Nylock Nut2 - 3 FREE TRAVEL