Transcription of LED S METER - ozQRP.com
1 LED S METER . CONSTRUCTION MANUAL. LED S METER Construction Manual Issue Page 1. Important Please read before starting assembly STATIC PRECAUTION. The LED S METER kit contains components which can be damaged by static discharge: Do not remove these components from the protective anti-static packaging until you have taken precautions against static discharge. If possible use an anti-static wrist strap and conductive mat. These can be purchased readily from electronic retailers. If these are not available then at least ensure you have discharged yourself by touching an earthed metal surface before handling the devices. Try not to directly touch the pins of the devices. Ensure your soldering iron has an earthed tip. LED S METER Construction Manual Issue Page 2. Contents 1 Introduction .. 5. 2 Receive Signal METER .. 6. S units .. 6. The MST and signal strength .. 6. LED S METER 7. 3 Transmit Power 9. 4 Circuit Description .. 10. 5 Parts List .. 13. 6 14. 14. Construction Steps .. 15.
2 7 Power Up 20. 8 Wiring .. 20. 9 Mounting .. 21. 10 Calibration .. 22. Signal METER .. 22. Method 1 .. 22. Method 2 .. 22. Power METER .. 23. Method 1 .. 23. Method 2 .. 23. 11 Installing in another rig .. 24. 24. 24. LED S METER Construction Manual Issue Page 3. List of Figures Figure 1 Op-Amp amplifier outputs for S7 signal.. 7. Figure 2 Op-Amp amplifier outputs for S9+20dB signal.. 8. Figure 3 Circuit diagram .. 12. Figure 4 Resistor preparation .. 15. Figure 5 Diode preparation .. 16. Figure 6 LED lead identification .. 17. Figure 7 LED with formed 17. Figure 8 LED mounted to PCB .. 18. Figure 9 Component overlay .. 19. Figure 10 LED S METER wiring diagram .. 20. Figure 11 Mounting 21. Figure 12 Front panel mounting .. 21. Figure 13 Installing in another 25. List of Tables Table 1 MST antenna voltage, S units and recovered audio .. 6. Table 2 Power METER range .. 9. LED S METER Construction Manual Issue Page 4. 1 INTRODUCTION. The LED S METER is a small microcontroller add-on board designed for the MST transceiver.
3 It displays receive signal strength and transmit power on a colourful 7 LED array. LED S METER Features: 1. Bright multi-colour LED display. 2. During receive displays S' levels S3 through to S9+30dB. 3. During transmit displays output power from to 5W PEP. 4. Default LED display is bar, but may be configured for dot display to minimize supply current. 5. Automatically switches between receive S unit and transmit power displays. 6. While specifically designed for use with the MST, can also be adapted to suit many other QRP rigs. 7. Quiescent current only at DC. In dot mode with one LED on the current is 14mA and in bar mode with all LEDs on the current is 46mA. 8. High quality double sided PCB with ground plane, plated through holes, solder mask and silk screen. 9. Simple and easy to build using all through hole components. 10. Small PCB mounts to front panel with a small angle bracket. A full kit containing a PCB and all onboard components including a pre-programmed microcontroller is available from The kit does not include mounting hardware.
4 LED S METER Construction Manual Issue Page 5. 2 RECEIVE SIGNAL METER . S UNITS. HF receivers use a standardized system called S units to indicate receiver signal strength. S9 is considered to be 50uV RMS across the antenna socket. S8 is 6dB lower or half the antenna voltage of S9. S7 is 6dB lower than S8 and so on down to S1. Signal strengths above S9 are given in 10dB steps, so that S9 plus 20dB equates to an antenna voltage of 20dB greater than 50uV or 500uV. THE MST AND SIGNAL STRENGTH. The MST transceiver differs from most Superhet designs in that it does not have Automatic Gain Control or a gain controlled IF amplifier. This means that the gain is essentially constant from the antenna socket through to the AF gain control. The gain does vary from one MST to the next due to receive bandpass filter tuning and component tolerances but on average is around 1000 or 60dB. Table 1 shows the relationship between voltage at the antenna socket, S units and recovered audio across the AF gain control for a typical MST transceiver.
5 The thing to notice is that the range of signal levels is very large (1:25000 or 88dB). To facilitate this large range the MST gain must be set to provide a usable audio signal with tiny S1 levels, yet not overload the audio stages on strong signals. If we were to simply add a linear reading audio level METER across the AF gain control the indicator would spend most of its time cramped at one end as levels S1 to S9 would only occupy about 1% of the scale. Antenna voltage S unit Audio level across AF gain control (RMS) (pk to pk). S1 S2 S3 S4 S5 9mV. S6 18mV. 13uV S7 37mV. 25uV S8 71mV. 50uV S9 141mV. 160uV S9+10dB 450mV. 500uV S9+20dB S9+30dB S9+40dB Table 1 MST antenna voltage, S units and recovered audio LED S METER Construction Manual Issue Page 6. LED S METER BASICS. The LED S METER overcomes the large dynamic range problem and increases the resolution by dividing the signal range into two smaller ranges and displaying one range at a time depending on the signal level. This is only practical through the use of a microcontroller.
6 The audio input signal is applied to two separate audio amplifiers, one amplifier has high gain and used with low level signals (S9 and below) while the other has low gain and used for high level signals. The negative peaks of the audio waveform from each amplifier are sampled by a microcontroller Analog to Digital Converter (ADC). The microcontroller selects the high gain amplifier by default, but if the negative audio peaks are over range then the signal from the low gain amplifier is selected instead. The microcontroller averages and smoothes the peak readings and drives the LED display to indicate receive signal strength. Note that the LED S METER does not display the full range as shown in Table 1. This is done for a couple of reasons. Firstly to keep the number of LEDs to a manageable number only S3, S5, S7, S9, S9+10db, S9+20db and S9+30dB are displayed. Secondly the minimum S METER indication is S3 due to the limitation of this circuit to detect very small signals, and the maximum is S9+30dB.
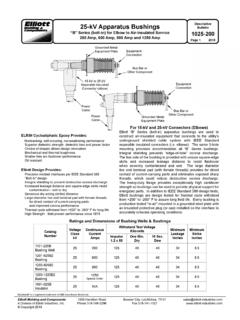
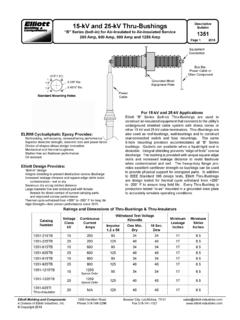
7 Because signals larger than this cause slight clipping in the MST audio preamplifier stage. The oscilloscope screen shots below show typical amplifier outputs. Figure 1 is for a signal level of S7 and Figure 2 is for a signal level of S9+20dB. The top trace in each screen shot is the high level amplifier output while the bottom trace is the low level amplifier output. Figure 1 Op-Amp amplifier outputs for S7 signal. LED S METER Construction Manual Issue Page 7. Figure 2 Op-Amp amplifier outputs for S9+20dB signal. LED S METER Construction Manual Issue Page 8. 3 TRANSMIT POWER METER . The LED S METER defaults to receive S METER mode, however there is a third input to the ADC. which the microcontroller uses to monitor the transmitted signal. If a voltage is detected on this input the LED S METER switches to power METER mode. The microcontroller averages and smoothes the RF voice peaks and drives the LED display to indicate transmitted power. The range of power readings available is shown in Table 2.
8 Power (Watts PEP) Antenna Voltage LED on (peak). 5 S3. S5. 1 10 S7. 2 S9. 3 S9+10dB. 4 20 S9+20dB. 5 S9+30dB. Table 2 Power METER range LED S METER Construction Manual Issue Page 9. 4 CIRCUIT DESCRIPTION. The circuit diagram is shown in Figure 3. The incoming audio signal is fed to the low gain op- amp U1A. This stage has an input impedance of around 100K to minimise loading the external audio stages. The gain of this stage can be set between and by trimpot VR1 to compensate for different receiver gains and is used as a calibration control. The output of U1A is fed to the high gain op-amp stage U1B which has a fixed gain of 50 set by the ratio of R5 and R6. Capacitors C3 and C5 provide some low pass filtering to limit high frequencies and pulse noise and aid in stability. A 78L05 5V regulator supplies a reference voltage for the non-inverting inputs as well as the power rail for the microcontroller and LEDs. With no signal the DC voltage at the op-amp outputs is 5V. When an audio signal is present the AC component of the waveform extends above and below the 5V reference point.
9 The LM358 is chosen because it allows the maximum negative excursion to be very close to 0V. Current limit resistors and clipping diodes are used to protect the microcontroller Analog to Digital Converter (ADC) inputs from the positive excursions of the op-amp outputs. The diodes conduct when the signal goes above the 5V supply rail and limits the voltage at the ADC inputs to between 0V and about The microcontroller firmware monitors each op-amp output in turn and determines which one to use for signal measurement. For low level signals (S9 and below) the output of U1A will be very small, however the output of U1B will be much larger. In this case U1B would be used to determine signal strength and LEDs S3 to S9 would be active. If the signal level increases beyond S9, the negative excursions from the output of U1B will be reaching 0V and clipped. In this case the firmware uses the output of U1B and LEDs S9+10 to S9+30 will be active. The microcontroller is an Atmel ATtiny24 which takes the analog signals, converts them to a number in the ADC and through the internal firmware calculates the signal level and drives the LEDs.
10 One function of the firmware is to act like a capacitor quickly charging to the peak of the audio signal and decaying at a slower rate. This makes the display appear more natural and pleasing in use. The program timing is non-critical, and to save space, and components, U2 uses an internal RC clock rather than an external crystal. When the MST is transmitting the RF detector circuit on the main board provides a varying current directly related to the power level. In normal use this is used to drive a front panel LED. which increases in brightness as the power level increases. When used with the LED S METER the front panel LED is removed and the line is applied to VR2 which converts the varying current to a voltage. VR2 is adjusted to calibrate the power range. R9 and D3 limit the positive voltage to to protect the ADC input. When used with the MST, R8 is not installed and bypassed with a link. If the LED S METER is used with other rigs that supply a voltage feed, R8 may need adding to allow scaling of the detected RF voltage.