Transcription of Lincoln Quicklub Installation Guide for John Deere …
1 Automated Lubrication System Installation /Operator Instructions john Deere S Series Combine 01/12 Rev. 1, CWA 2 Contents Pages Introduction 3 Preparation 4 Bill of Material 5 Component Appendix 6 - 10 System Operation 11 Valve Operation 12 - 13 System Schematic (Overview) 14 Lubrication Point Overview 15 Component Installation Detail 16 - 31 Timer Operation and Settings 32-33 System Start-up 34 System Inspection 35 Troubleshooting 36 38 Off Season Maintenance Procedure 39 40 3 Introduction Thank you for purchasing the Quicklub On Board Grease System for your john Deere S Series Combine. The system has been designed to increase the component life and overall productivity of your equipment, while reducing labor costs related to the traditional method of point-by-point manual lubrication. The system consists of the Quicklub progressive metering valves that positively displace and meter precise amounts up to #2 shop grease down to -13 F temperature.
2 Grease is distributed to each connected point through high-pressure tube and hose. This Quicklub kit is designed to work with your john Deere S Series Combine. This is a fully automated lubrication system utilizing a 12 volt DC heavy duty electric pump with integrated timer that dispenses lubricant to the progressive metering valves at timed intervals. The lubricant is pumped to the primary metering valve, which distributes it to secondary metering valves in specific zones of service. The secondary metering valves deliver measured amounts of lubricant proportional to each lube point in its zone. The components are connected with lengths of high-pressure hose and tubing that are included in the kit. Contents of the kit are specifically marked to coincide with this instruction manual to achieve a consistent and quality Installation . This manual has been included with the system as an easy-to-follow Guide for Installation and operation. Keep it with the equipment, as it is also a trouble-shooting manual to keep your automated lubrication system working properly.
3 This kit also contains Installation and Operation Instructions for the 203 series system supply pump. Please refer to this manual for detailed information on operations, maintenance, trouble shooting and technical data. If missing, please contact Lincoln and request service page form # and reliable, the Quicklub On Board Grease System has been carefully designed using industry proven products to provide long and trouble-free life under the most severe farming conditions. For further information on this system please contact Lincoln Technical Services at 1-314-679-4200 ext. 4782# or fax 1-314-679-4357. THIS DOCUMENT ( Installation INSTRUCTIONS) IS THE EXCLUSIVE PROPERTY OF Lincoln INDUSTRIAL CORPORATION ( Lincoln ). IT CONTAINS PROPRIETARY DATA AND INFORMATION DEVELOPED AT Lincoln S EXPENSE AND IS FURNISHED UPON THE EXPRESS CONDITION, ACKNOWLEDGED BY THE RECIPIENT, THAT IT S CONTENTS SHALL NOT BE DISCLOSED, COPIED OR DUPLICATED, DISSEMINATED, OR USED, EXCEPT FOR THE PURPOSES ESTABLISHED BY WRITTEN CONTRACT OR OTHERWISE AUTHORIZED BY Lincoln IN WRITING.
4 Lincoln RESERVES ALL RIGHTS UNDER PATENT, COPYRIGHT, TRADE SECRET AND OTHER APLICABLE LAWS. Quicklub is a registered trademark of Lincoln . 4 Preparation/ Installation Overview The following steps will assist the installer with a systematic approach for installing the Quicklub Automated lube system on the john Deere 70 Series STS Combine. By following the steps outlined, a successful Installation will be achieved and will increase the service life of all pins and bearings connected to the lube system. Preparation Compare the bill of material with the kit contents Clean machine thoroughly Survey the equipment and locate all lubrication points to be serviced by the lubrication system Lubricate each point with a grease gun prior to removing grease fittings to assure grease acceptance. Any points that will not accept grease must be repaired prior to system Installation . After confirming all points will accept grease, remove all grease fittings. Installation Overview Install appropriate adapters and tube fittings in lube points.
5 Position valve mounting brackets on machine. Attach metering valves to previously mounted brackets. Using tubing cutters, cut to length individual tubing feed lines from secondary valves to lube points and make connections. When installing feed line tubing into the Quicklinc fittings, push until firmly seated. Neatly bundle, loom with spiral wrap provided and tie strap feed lines wherever possible to protect from abrasion. Size, cut and attach appropriate hose ends to all supply lines. The high-pressure hose is used as supply lines from the pump to the primary valve and the primary to the secondary valves. It is recommended that the supply lines be routed and cut only after all valves and the electric pump have been attached to the machine. This assures the supply line is cut to the proper length. Also, allow for unrestricted movement while the machine is in motion. Route supply lines from the pump to primary valve and from the primary valve to the secondary valves and make connections.
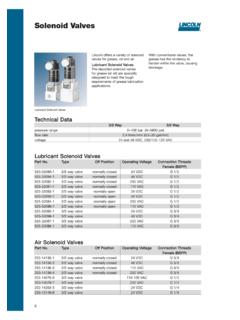
6 Secure supply/feed lines with tie straps, so not in harms way. Mount pump and make electrical connections (electrical diagram included with the pump). 5 Bill of Material Part # Qty Pump/Acc 94012 1 Valves/Acc 619-27122-1 1 619-26396-2 2 619-26844-1 1 67448 5 700506 4 242125 4 246416 4 51304 8 247023 8 272658 3 303-17499-3 12 404-22581-2 1 239857 1 244883 22 Hose/Tube/Fittings 241288 5 272427 4 272394 2 272401 2 246002 2 241289 4 274048 20 244054 3 243699 2 244053 10 244055 1 244048 1 244047 3 20026 3 20028 1 10181 1 20029 2 Mount/Protection 249913 3 241110 6 241054 1 226-12528-3 1 6 Component Appendix Quicklub COMPONENT GLOSSARYPART NUMBER ( Lincoln ) and DESCRIPTION - Divider valve SSV12 with 12 port outlets619-26396-2619-27122-1619-26844-1 - Divider valve SSV8 with 8 port - Plastic Grease fitting cap. - Male run - 203 2 Liter Pump, 12 Volt / - Divider valve SSV6 with 6 port outlets. - Valve closure plug for Black divider - Straight leak-proof grease fitting.
7 7 - 90 Swivel quicklinc - 1/4" tube Quicklinc valve outlet fitting. - 1/4-28 X 1/8" Adapter, 90 - 1/8" NPT Swedge on hose - 1/8" NPT 45 HOSE STUD, - HOSE STUD, 90 .- VALVE, OUTLET - 1/8" NPT field installable hose THREADED NUMBER ( Lincoln ) and DESCRIPTIONQUICKLUB COMPONENT GLOSSARY 8 Quicklub COMPONENT GLOSSARYPART NUMBER ( Lincoln ) and DESCRIPTION243699 - 90 Swivel quicklinc - QL Fitting 1/4 X 1/4 90 Degree. - QL Fitting 1/4 X 1/4 -1/4" Tubing x 1/8" NPT Male 90 Fitting .244047 - QL Fitting 1/4 X 1/8 Straight. - .375 P-style clamp for 12mm - 1/8" Grease filled high pressure hose (40 ft. coil).241288 - 1/8" Straight 9 Quicklub COMPONENT GLOSSARY303-17499-3 - 1/4" tube Quicklinc valve outlet - Valve closure plug for Black divider - Valve mounting - 1/4" Nylon locknut for valve - Plastic Grease fitting - Nylon Ties (100 count poly bag) 7" - Feed Line Bundling Spiral Wrap (10ft.)
8 PART NUMBER ( Lincoln ) and DESCRIPTION - Male run - Grade 8 - 1/4" valve mounting 10 Quicklub COMPONENT GLOSSARYPART NUMBER ( Lincoln ) and DESCRIPTION - Valve outlet - Clamping ring (ferrule)..404-22581-2239857 - 1/4" Grease filled Nylon Tubing (50 ft. coil).274048 11 System Operation The key components of the Quicklub system are: 1. Pump with Integrated Timer 2. Divider valve network consisting of a Primary Valve and Secondary Valves with attached Cycle Indicator Pin. 3. A lubrication event is initiated by actuating the pump via the Integrated Timer based on a preset pause time or time between lubrication events. 4. The Pump dispenses lubricant to the primary divider valve 5. The Primary Valve distributes the lubricant to the secondary valves 6. The Secondary Valves distribute and dispense lubricant to the lubrication points. 7. Lubricant flow through the divider valves actuates the Cycle Indicator Pin for a visual inspection pf proper operation.
9 The pump will run for the preset On-Time 8. The controller now begins countdown for the next lubrication event. Cycle Indicator PinR2 ValveR3 ValvePrimaryValveSecondaryValvesPumpHose TubingLube Point 12 Divider Valve Operation At the heart of every Quicklub System is the metering valve or progressive distributor block, designed to positively meter the input of lubricant (oil up to NLGI #2 greases) out to the connected number of lubrication points irrespective of distance and back pressure. The inlet passageway is connected to all piston chambers at all times with only one piston free to move at any one time. With all pistons at the far right, lubricant from the inlet flows against the right end of piston A (fig. 1). Lubricant flow shifts piston A from right to left, dispensing piston A output through connecting passages to outlet 2. Piston A shift directs flow against right side of piston B (fig. 2). Lubricant flow shifts piston B from right to left, dispensing piston B output through valve ports of piston A and through outlet 7 (fig.)
10 3). Lubricant flow shifts piston C from right to left dispensing piston C output through valve ports of piston B and through outlet 5. Piston C shift directs lubricant flow against right side of piston D (not illus.) Lubricant flow shifts piston D from right to left, dispensing piston D output through valve ports of piston C and through outlet 3. Piston D shift directs lubricant through connecting passage to the left side of piston A (fig. 4). Lubricant flow against left side of piston A begins the second half cycle which shifts pistons from left to right, dispensing lubricant through outlets 1, 8, 6 and 4 of the divider valve. 13 Cross-porting (Divider Valve) Installing a closure plug in one or more outlets may combine outputs from adjacent outlets. Lubricant from a plugged outlet is redirected to the next adjacent outlet in descending numerical order. Outlets 1 and 2 must not be plugged since they have no cross-port passage to the next adjacent outlet. In figure 5 outlets 5 and 3 are cross-ported and directed through outlet 1.