Transcription of Little Free Library
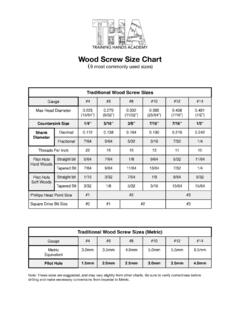
1 Little Free Library Plans so simple even I could follow them Overview These plans will result in a two-shelf Library with optional side shelf for decoration. Drawings are not to scale; dimensions are approximate. Consider width of saw blade in cuts and level of precision desired. Customize Library easily by modifying these concept illustrations. Ingredients Two sheets of thick nominal 4 x 8 CDX (exterior grade) plywood. Four three-inch flat L-brackets. A sheet of 1/16 thick plexiglass, at least 15 x 15 . 12 1/16 or 1/8 window screen clips. Two flush type hinges (hinges that lie flat). A door handle. A box of exterior grade screws.
2 Step 1: Cut Sides 15 in There are two side panels. Cut each side 15 inches wide by 24 inches high. The height varies because the roof should be sloped to keep out precipitation. Cut one end on each piece at a 6 slope. This will result in each side piece being 24 inches high on one side, and 22 on the opposite side. Cut a notch out of the corner of one piece, x . Be sure to cut out of the shorter end of the piece (the 22 end). 24 in 22 in Step 2: Cut Back in Cut the piece 22 x 37 . Cut each side 15 inches wide by 24 inches high. inches in from the right, cut down inches. Shave off from the top a 6 degree angle.
3 22 in 37 in in in 6 Front view Side view 6 Step 3: Cut Bottom Cut the piece 15 x 37 . 15 in 37 in Step 4: Cut Roof Cut the piece x 32 . Cut the long sides at a 6 degree angle. If you re running out of plywood, it s okay to cut the piece shorter than . Don t go less than 18 , though. in 32 in 6 6 Step 5: Frame Assembly Assemble the five pieces using 3 outdoor screws. Use four screws for every two pieces. Predrill all holes to avoid splitting wood. Predrilling also controls direction of screws, making fabrication easier. Counter sink pre-drilled holes to improve aesthetics If you have difficulty keeping the pieces in place while drilling , hammer in small nails first to hold the pieces in place.
4 Left side sits atop of and is flush with bottom piece. Notched side piece fits on back side. Back piece is inside of side pieces. Step 6: Roof Installation Install roof so that it overhangs the left and right sides equally (approximately 2 inches on each side). Ensure that roof overhangs front of Library by 4 inches. Install using outdoor screws. Use four screws for each side. Predrill all holes to avoid splitting wood. Roof overhangs back. Roof overhangs sides. Roof overhangs front. Step 7: Interior Decorating Cut two shelves 14 deep by approximately 36 long. Measure the inside of your Library first, though, to be sure the center shelf will fit.
5 Ensure your shelf will be long enough to bridge from the left side to the right, but short enough so that you can slide it in easily. Using scrap wood, cut two pieces as brackets, about 1 x 1 x 12 . Affix one of them to one interior side of the Library approximately 8 from the bottom. Bracket is higher than center to allow taller books on bottom and shorter books on top. Set the shelf on the bracket you have screwed in. Set a level on the shelf and determine where the other bracket should be affixed. If you plan to paint, stain, or in some way decorate the interior, this is the time to do that. Set the other shelf on the bottom floor of the Library .
6 A bracket will go here, too, but only after ensuring the shelf will be level. There s no need to attach the shelves. Just set them in. Step 8: Cut Front Pieces There are three pieces for the front. Cut two pieces 22 x 3 . Cut one piece x 2 inches. Make a 6 degree cut on one long edge of this piece. It s a good idea to cut these pieces a bit long to compensate for wood thickness and accuracy of other cuts. You can always trim a bit off later, if need be. 2 in in 22 in 3 in Left side of front Right side of front Top of front (above door) 6 6 3 in 22 in Step 9: Front Assembly Affix the three front pieces using 3 outdoor screws.
7 Trim pieces if they re too long. Use four screws for each piece. Predrill all holes to avoid splitting wood. If you have difficulty keeping the pieces in place while drilling , hammer in small nails first to hold the pieces in place. Top of front Screw in from the outside, as shown here. That way, the screw heads will be covered by trim. Clamp the pieces in place while drilling . Ensure the 6 degree cut is oriented correctly. 6 Step 10: Create Door Cut four pieces 4 x . Cut 45 degree angles into each side of each piece, as shown below. Glue pieces. Paint or stain, if desired. Attach L-brackets using screws. 45 B A Center the brackets between points A and B.
8 Step 10: Create Door On the same side of the door as the L-brackets, attach three window screen clips on each side of the center opening, approximately one inch from the opening. Do not screw them on tightly. Cut the plexiglass so that it fits under the window screen clip s tabs, approximately 15 x 15 . Swivel the clips so the plexiglass fits in place, then swivel them to hold the plexiglass secure. Tighten the screws a bit, if necessary, to hold them in place. Loosely screw in clips. Set in plexiglass. Step 11: Exterior Decorating Prior to attaching door, paint or stain as desired. Ensure door fits securely, but not too tight. Sand if necessary.
9 Attach fascia trim, if desired. Trim will help prevent moisture from entering. Caulk edges where plywood and trim meet to further reduce moisture. Seal the roof, or install shakes or shingles. Apply exterior-grade primer or paint. Step 11: Exterior Decorating If installing shakes, lay a sheet of tar paper under each row, but be sure to cut it off 3 inches from the back of the Library so that it does not show through. Nail in a row of shakes so that the row overhangs the back of the Library by 3 inches. Lay another row of tar paper. Ensure it ends six inches higher than the last row. Nail in another row of shakes such that the end three inches higher than the previous row.
10 Repeat until roofing is complete. For the last two or three rows, you will need to cut the thin edges of the shakes; shortening them so they fit. Step 12: Install Door Affix hinges to left side of door, with one hinge in the top third of the door and another on the bottom third. Ensure the hinges overhang sufficiently to allow for proper motion. Predrill all holes. Set door into Library s opening and affix left side of screws. Attach L-brackets using screws. Step 13: Install Latch The simplest latch is a hook-and-eye. Screw bot pieces into a predrilled hole. Another option is a catch with handle, but then you will need to install a piece on the inside that will hold the catch.