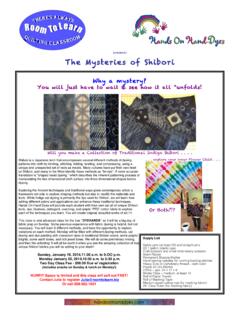
Transcription of Make an origami kimono from beautiful dyed papers!
1 shibori KimonoMake an origami kimono from beautiful dyed papers! (art + social studies) shibori is the Japanese term for dyeing fabrics that have first been shaped into three-dimensional forms. The word originates from to wring, squeeze, or press. Material is either folded, crumpled, stitched, twisted, sewn, or knotted, and then dyed . In the West, a similar process is called tye-die. Often a combination of techniques are applied to the same piece of fabric before dyeing . The piece can then be dyed multiple times, resulting in extremely intricate patterns.
2 shibori methods are often used on fabric to make a kimono . In fact, a single complex kimono can take as long as two years to kimono is the traditional clothing of Japan. kimono styles have changed significantly from one period of Japan's history to another, and today there are many different types of kimono worn by men, women, and children. The cut, color, fabric, and decorations of a kimono may vary according to the sex, age, and marital status of the wearer, the season of the year, and the occasion for which the kimono is being project begins by experimenting with shibori paper - dyeing techniques on traditional rice papers, and concludes with students sharing their papers and folding simple origami kimonos.
3 The result combines a stunning piece of art with a cultural lesson. GRADES 3-12 Note: Instructions and materials are based upon a class size of 24 students. Adjust as Study a brief history of the kimono and look at various types of Provide slightly diluted liquid watercolors in containers across the classroom. Cover (required)Kinwashi paper , 25" x 37" (10414-1005); share one sheet between two studentsBlick Liquid Watercolors, 8 oz (00369-); share at least four non-metallic colors across classFiskars Recycled Scissors, Bent, 8 (57097-1108); share five pairs across classElmer s Tacky Glue, 8 oz (23883-1008).
4 Share three bottles across classOptional Materials White Masa paper (10409-1003)Aitoh Boku-Undo Suminagashi Marbling Kit (01309-1009)Amaco Clay Texture Rollers (30704-)Alvin Cardboard Mailing Tube, 4" x 25" (03271-4525)Gutermann Cotton Thread, 876 yd Spool (66910-)Sargent Art Liquid Metal Acrylics (00730-)Crescent Decorative Matboard, Grays and Blacks, 32" x 40"(13007-); need a half sheet per studentCopyright 2014 Dick Blick Art MaterialsAll rights reserved800-447-8192 paper EmbellishmentBlot- dyeing technique: (suited for younger students)Kinwashi paper is best for this technique.
5 Machine-made from short, thick manila fibers, it's smooth on one side and textured with bark inclusions on the other side. Cut each sheet in half to make two Begin by folding the sheet of paper into accordion folds approximately 4 wide, folding down from top to bottom to make one long folded strip. Next, fold the strip into triangles. Beginning at one end, fold the left tip of the strip up to meet the top edge. Fold the resulting triangle to the right. Keep folding the triangle to the right, alternating from the top and bottom of the strip until the entire strip has been folded into a The folded triangle can now be blot- dyed by dipping the corners into various containers of liquid watercolor diluted with water.
6 Experiment with overlapping of colors by dipping the point of the triangle deeply into one color, and then just dye the very tip in another color. 3. Unfold the paper to reveal the masterpiece and lay flat to method:1. Begin by taping a piece of paper around a large cardboard tube, or piece of PVC pipe that is approximately 4" in diameter. Do not allow the paper to overlap. Wrap thread or yarn around the paper many times, about 1/2" apart. Tie. With slightly wet hands, scrunch the paper on the tube from the top and the bottom until it is very compressed and at least 1/3 of its original length.
7 Tip: Wrap plastic wrap over the tube and under the paper to allow paper to move more Roll the paper -wrapped tube as if it is a rolling pin over a pan of slightly thinned metallic acrylic paint. Open the paper to dry, but leave the wrinkled effect intact. This paper makes a great sash for the Kimono1. After all the paper has been dyed and embellished, it s time to do some swapping! Each 18" square can be cut into three 6" x 18" strips. After the papers have been shared, each student will have three distinctly different patterned papers to work with.
8 Step 1: Fold a half sheet of kinwashi paper into accordion folds, then fold it into triangles down the strip of paper . Step 2: Blot-dye by dipping the tips of the folded triangle into diluted liquid 4: Glue three papers into an 18" x 18" square and fold into a kimono following the 3: Further embellish the paper , if desired, using metallic paints with rollers or metallic kimono , continued2. Glue three strips together to make an 18" square. When glued back together, the top section creates the collar and the sleeves, and the bottom two strips make the skirt portion.
9 Save paper scraps to serve as the sash, or obi. 3. Follow the easy origami steps below to create a folded kimono . Add a sash and mount the kimono on black matboard to After using the blot-dying technique, apply metallic paints with a patterned roller over the top of the dyed paper . Use metallic markers to add patterning. Use the simple Aitoh Boku-Undo Suminagashi Marbling Kit to marble papers. View the process at A good paper for the shibori Kimoni project is a sized rice paper called White Masa. Make sure the sized side of the paper comes in contact with the marbling Standards for vVisual Arts EducationContent Standard #1 Understanding and applying media, techniques, and Students describe how different materials, techniques, and processes cause different Students intentionally take advantage of the qualities and characteristics of art media, techniques, and processes to enhance communication of their experiences and Students apply media, techniques, and processes with sufficient skill.
10 Confidence, and sensitivity that their intentions are carried out in their Standard #3 Choosing and evaluating a range of subject matter, symbols, and Students explore and understand prospective content for works of Students integrate visual, spatial, and temporal concepts with content to communicate intended meaning in their Students reflect on how artworks differ visually, spatially, temporally, and functionally, and describe how these are related to history and ) Fold 18 square in half to make a crease and ) Fold top down at 1/3 point (6 ), or where two papers meet, then fold back up, leaving 1/2 ) Open collar by pressing sides in toward center, forming triangles.