Transcription of Manual&Brake&Bleeding&Instructions&for&Model&10&&&20 ...
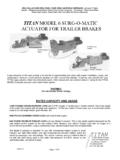
1 Manual Brake Bleeding Instructions for model 10 & 20 Actuators April 12, 2011 The presence of air in brake lines will greatly reduce braking efficiency and cause a spongy brake condition. There are several methods for bleeding air from trailer brake systems. Titan model 10 & 20 actuators may be bled by pressure or vacuum products, or by manually bleeding the system. If using pressure or vacuum equipment, follow the manufacturer s instructions. These products are available at many auto supply stores. The first step in bleeding the brakes is to make sure that the coupler is pulled all the way out of the actuator. It may be necessary to block the wheels and use the tow vehicle to pull forward on the trailer to fully extend the actuator.
2 To manually bleed the air from the trailer system, the breakaway lever on top of the actuator can be used to pump brake fluid back to the trailer. Begin by loosening all 4 bolts on the breakaway lever (see Figures 3 & 4). Remove the back two bolts and rotate the two breakaway locks to the side. Tighten the front two bolts. A pipe may be used to pull the lever forward until nearly vertical. This will pump brake fluid out to the trailer lines. It will also force air in the bore of the master cylinder to bubble up from a small hole in the bottom of the reservoir. When no more air bubbles are seen, brake fluid will squirt up through the same opening.
3 Caution: If the lever is stroked too vigorously, brake fluid may spurt out of the master cylinder and cause operator eye injury or damage to painted surfaces. Start bleeding the brake assemblies that are the longest distance from the actuator first. Check the brake fluid level in the master cylinder frequently and maintain a minimum of 1/3 full reservoir. This will help prevent air from being pumped back into the system. A helper will be needed to open and close the bleeder screw on the brake assembly. An open end wrench, piece of clear plastic tubing and a clear plastic container for the brake fluid are needed. The tubing should be long enough so that an upward loop in the tube (higher than the level of the bleeder screw) can be used to more easily detect air bubbles.
4 Use the top bleeder screw and open it about a turn before the breakaway lever is stroked forward. When the lever is all the way forward, the bleeder screw should be closed. Return the breakaway lever to the near horizontal position and wait for several seconds before repeating the cycle again. Continue the process until no more air bubbles are seen. Tighten the bleeder screw and move to the next brake until the process is completed. To reset the breakaway lever, loosen the front two bolts. Position the breakaway lever to normal operating position (about a 30 degree angle toward the trailer) and rotate the two breakaway locks (item 32 and 33) to their original operating position.
5 See figure 4. Install the two rear bolts and lock washers and tighten all four bolts to 90 - 120 inch pounds of torque. Fill the reservoir to within 5/8 of the top and install the filler cap securely. Do not allow brake fluid to contact painted surfaces since it will damage the finish. Wipe up any spills immediately and wash the area with water.