Transcription of MASTER GUIDE
1 Congratulations on purchasing your very own Razer DeathAdder, which inherits the same death-dealing edge as the revolutionary Razer Boomslang and the Razer Mamba. With all our gamers in mind, the Razer team of specialized engineers presents this perfect right-handed weapon with superb ergonomics and performance for you to strike the killing blow. MASTER GUIDE CONTENTS 1. Package Contents 2. System Requirements 3. Key Features 4. Installation / Registration / Technical Support 5. Configuring Your Razer DeathAdder 6. Using Your Razer DeathAdder 7. Legalese 1. PACKAGE CONTENTS - Razer DeathAdder Gaming Mouse - Quick Start GUIDE - MASTER GUIDE 2. SYSTEM REQUIREMENTS - PC with USB port / Mac with USB port - Windows 7 / Windows Vista / Windows XP - Mac OS X ( and above) - Internet connection (for driver installation) - 75MB of free hard disk space 3.
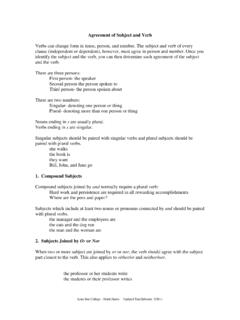
2 KEY FEATURES A. Mouse button 1 Click B. Mouse button 2 Menu C. Mouse button 3 Scroll wheel and PC ~ Universal scrolling (Mac - On-The-Fly Sensitivity ) D. Mouse button 5 PC ~ Forward (Mac - Dashboard) E. Mouse button 4 - PC ~ Backward (Mac Expos ~ All Windows) F. Razer Precision infrared sensor G. Profile change button H. Ultraslick mouse feet I. 1000Hz (1ms) response time J. 16-bit ultra-wide data path 4. INSTALLATION / REGISTRATION / TECHNICAL SUPPORT Windows 7 / Windows Vista / Windows XP installation instructions 1. Plug mouse into the USB port of your computer. 2. Download the Driver Installer from 3. Run the installer. 4. The Razer DeathAdder setup screen appears. Click NEXT. 5. Read the license agreement . Click YES if you accept all terms of the agreement .
3 6. Select the destination folder where the driver software will reside. Click NEXT. 7. Select the program folder for the Razer menu. Click NEXT. 8. Review your settings. Click NEXT and installation will begin. 9. At the end of the installation, follow the instructions onscreen to restart your computer. Click FINISH. Mac OS X ( and above) installation instructions 1. Plug mouse into the USB port of your Mac. 2. Download the Driver Installer from 3. Run the installer. 4. The Razer DeathAdder introduction screen CONTINUE. 5. Important information regarding the Razer DeathAdder driver is shown. Click CONTINUE after reading. 6. Read the software license agreement and click CONTINUE. 7. A confirmation popup screen will appear. Click AGREE if you accept all terms of the agreement .
4 8. If you want to choose the destination folder where the driver software will reside, click CHANGE INSTALL LOCATION. Otherwise, click INSTALL to begin installation. 9. At the end of the installation, follow the instructions onscreen to restart your computer. Click RESTART. REGISTRATION Please visit for online product registration. What you ll get: 2 years limited manufacturer s warranty Free online technical support at 5. CONFIGURING YOUR RAZER DEATHADDER The features listed here require the Razer DeathAdder software driver to be installed and the Razer DeathAdder Tray Icon to be active. Each setting will be saved to the current Profile on the current machine only. MAIN WINDOW Button assignment Assigns various functions to buttons. If the button function is not listed, or if you would like to assign a macro, select ADVANCED FUNCTIONS from the dropdown menu.
5 Macros can be up to eight characters in length, and other tasks such as media functions can be assigned. Polling Rate Sets the polling rate to: 125Hz (8ms), 500Hz (2ms) or 1000Hz (1ms). Note that any change to the polling rate will only take effect after you reboot your computer. DPI Switcher Sets the DPI sensitivity of the Razer DeathAdder. Comes with four default DPI settings: 450, 900, 1800 and 3500dpi. You can also program DPI switching to any button on the Razer DeathAdder ( Program mouse button 4 to 1800dpi, mouse button 5 to 900dpi). Profile Changes the currently active Profile. CONFIG, SAVE/LOAD SETTINGS a. Load Config: Allows you to load a previously saved configuration. b. Save Config: Save your current configuration to file. c. Reset to Default Configuration: Set the Razer DeathAdder to factory default.
6 D. Reset Current Profile: Reset the Current Profile to default. SENSITIVITY TAB Sensitivity Options Adjusts pointer sensitivity. Scroll Speed Adjusts the scroll wheel speed. Universal scroll Clicking the middle mouse button and dragging the Razer DeathAdder in one direction will enable scrolling in the same direction. On-The-Fly Sensitivity Shows On-The-Fly Sensitivity onscreen when active. Activate this\ feature in the Button assignment section. Double-click speed Adjusts the double-click speed. ADVANCED SETTINGS TAB X/Y MASTER Sensitivity Control Adjusts X/Y sensitivity levels. Enable X-Y MASTER Sensitivity Check this option to enable individual adjustments to X-Y sensitivity levels. Windows Pointer Speed [Windows Only] Adjust Windows pointer speed (as per Windows Mouse Control Panel).
7 The adjustment will take effect only after reboot. Acceleration Turns pointer acceleration on/off and adjusts acceleration level. Note that acceleration is not recommended for gaming. 6. USING YOUR RAZER DEATHADDER SWITCHING DPI You can switch between DPI in two ways: a) By selecting the desired DPI in the Razer DeathAdder software driver. b) By assigning the function to a button via the Razer Configurator in the main window. MAKING MACROS A macro is a short sequence of keystrokes. You can make a macro by following the instructions below. 1. Load the Razer Configurator. 2. Choose a mouse button and select Advanced Functions from its dropdown menu. 3. Click on the Macro button in the Advanced Functions panel. 4. Type in the desired sequence of keystrokes.
8 You can also include delays by clicking on INSERT DELAY 5. Click APPLY when done. SWITCHING PROFILES You can switch between profiles in three ways: a) By selecting the active profile in the Razer DeathAdder software driver. b) By assigning the function to a button via the Razer Configurator in the main window c) By using the Profile button located at the bottom of the mouse. Pressing the Profile button will advance one Profile. [Required Razer Configurator to be installed] When the active profile is switched, the Razer DeathAdder will flash the corresponding number of times For example, if Profile 3 is activated, the mouse will flash three times to indicate the profile you have selected. ON-THE-FLY SENSITIVITY If "On-The-Fly Sensitivity" has been assigned to a button, pressing that assigned button and moving the scroll wheel will produce a bar at the lower right-hand corner of your screen, allowing you to dynamically adjust your sensitivity settings.
9 This feature requires the driver to be installed. DRIVER AND FIRMWARE UPDATES You ll be able to update the Razer driver software and firmware by clicking UPDATE in the upper right hand corner of the panel. This will connect you to for the latest driver and firmware downloads. RESTORING FACTORY DEFAULT SETTINGS To reset the Razer DeathAdder to factory default settings, press and hold the Profile Button for 10 seconds while the Razer DeathAdder is connected to a powered-on computer. ADVANCED SETTINGS GUIDE Sensitivity Mouse sensitivity is an internal filter of the driver. The maximum sensitivity setting of 10 is unfiltered. Each incremental stop or setting is a 10% decrease, 1 setting will decrease mouse pointer input to 10% ( a linear graph). Acceleration Acceleration is an internal filter of the driver, and is primarily a legacy option for low dpi mice users.
10 With acceleration enabled, the faster you swipe the mouse, additional movement is added. Windows XP has acceleration turned on by default as a convenience for users assuming that everyone will have 400dpi mice, but this will likely be a hindrance to most gamers and precision users who require greater accuracy. The acceleration off option (default) turns off internal acceleration only and does not affect Windows XP acceleration, which can be turned off via the Control Panel, Mouse, Pointer Options, and unselecting Enhance Pointer Precision . Windows Pointer Speed [Windows Only] Pointer speed is the Windows implementation of Sensitivity. In Windows XP, a setting of 5 means there is no filtering (default). This bar is included as a convenience. DPI switcher - Resolution Resolution is how many counts per inch of movement that is sent by the mouse hardware to the OS.