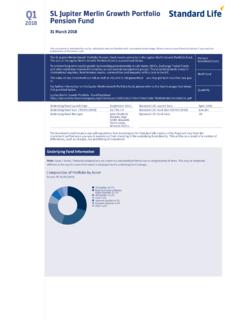
Transcription of Merlin 4 User manual - secutronixaccess.co.za
1 GROUP OF COMPANIES. Merlin 4 Electric Fence Energizer user manual . ELECTRIC FENCE ENERGISER. E-MER4. Merlin 4 user manual Table of Contents INTRODUCTION .. 3. COMPANY PROFILE 3. GUARANTEE 4. USING YOUR KEYPAD 5-8. WHAT THE LIGHTS MEAN.. 9. Merlin 4 Introduction & Company Profile 2. INTRODUCTION. Thank you for choosing our product! NEMTEK Electric Fence Energizers are designed and manufactured to provide many years of reliable use, if installed and maintained correctly. The guidelines provided in this manual will assist you with the basic operation and maintenance of your Merlin 4. The Merlin 4 is designed and manufactured in South Africa for the international market.
2 More information on our products, SABS test reports and general information is available on our web site at: COMPANY PROFILE. The NEMTEK Group of Companies manufacture and distribute intelligent electronic security and perimeter control systems and have been involved in the security industry since 1990. We have our own research and development team, designing and manufacturing a full range of globally competitive electric fence energizers and related products NEMTEK is continually updating its products according to international standards in order to ensure the highest quality products and continuous customer satisfaction.
3 NEMTEK GROUP OUTLETS: Nemtek Security Nemtek Security Warehouse Randburg Edenvale Tel: +27 11 462-8283 Tel: +27 11 453-1970. Fax: +27 11 462-7132 Fax: +27 11 453-1858. Website: E-mail: MANUFACTURED IN SOUTH AFRICA. 3. Merlin 4 Guarantee GUARANTEE. The Merlin 4 energizer, manufactured by IO Tech Manufacturing (Pty) Ltd, is guaranteed for a period of one year from date of sale against defects due to faulty workmanship or materials. IO Tech Manufacturing (Pty) Ltd will, at its discretion, either repair or replace a product that proves to be defective. IO Tech Manufacturing (Pty) Ltd guarantees the product, when properly installed and used in line with the specification as determined by IO Tech Manufacturing (Pty) Ltd from time to time, will execute its function of generating a suitable potential.
4 IO Tech Manufacturing (Pty) Ltd does not guarantee that the operation of the product will be uninterrupted and totally error free. Faulty units must be returned to Nemtek, Units 4 & 5, 64 Vervoer Street, Kya Sand, Randburg, Gauteng, South Africa OR Nemtek Security Warehouse, Unit 4, Meadowdale Park, Cnr. Herman & Dick Kemp Roads, Meadowdale, Edenvale, Gauteng, South Africa. Buyer shall pay all shipping and other charges for the return of the product to Nemtek or Nemtek Security Warehouse. LIMITATION OF GUARANTEE. The guarantee does NOT apply to defects resulting from acts of GOD, modifications made by the buyer or any third party, misuse, neglect, abuse, accident and mishandling.
5 EXCLUSIVE REMEDIES. The remedies provided herein are IO Tech's sole liability and buyer's sole and exclusive remedies for breach of guarantee. IO Tech Manufacturing (Pty) Ltd shall not be liable for any special, incidental, consequential, direct or indirect damages, whether based on contact, tort, or any other legal theory. The foregoing guarantee is in lieu of any and all other guarantees, whether expressed, implied, or statutory, including but not limited to warranties of merchantability and suitability for a particular purpose. 4. Merlin 4 Using your control panel SWITCH THE FENCE ON / OFF. #. To switch the fence On or Off, enter your four digit PIN followed by the # key.
6 If the red ON. light is lit or flashing, the fence is energized. Don't pause for more than 5 seconds while entering the digits, or the control panel will reject your PIN number. If you make a mistake while entering your PIN, press the # key and start again. An incorrect PIN will cause the control panel to beep 5 times. The default master ( user # 1) PIN is 1 2 3 4. The default user ( user # 2) PIN. is 5 5 5 5. AFTER AN ALARM OCCURS. #. Enter your PIN and press the # key. This will silence the buzzer and siren. It will switch the fence off. One of the ALARM lights will flash or stay lit to indicate the source of the alarm.
7 A flashing indicator illustrates that the fault condition persists. A permanently lit indicator notifies the user that the fault no longer exists. CHANGE THE VOLTAGE ON THE FENCE. 3 #. Enter your PIN and press the * key, enter the digit 3, then press the # key. When the fence is on and in low voltage mode, the red ON light will flash. The red ON light will stay permanently lit if the fence is in high voltage mode. Use the low voltage mode when children are in the fence vicinity. BYPASS THE FENCE ALARM. 1 #. Enter your PIN and press the * key, enter the digit 1, then press the # key. The FENCE. ALARM light will start flashing slowly to confirm the fence alarm is bypassed.
8 To cancel the bypass, repeat the same sequence of keys. BYPASS THE SIREN AND STROBE LIGHT (SILENT ALARM). 4 #. Enter your PIN and press the * key, enter the digit 4, then press the # key. The beeper in the control panel will still be active. 5. Merlin 4 Using your control panel UN-BYPASS THE SIREN AND STROBE LIGHT. 7 #. Enter your PIN and press the * key, enter the digit 7, then press the # key. MAKE THE GATE ALARM IMMEDIATE. 2 7 #. Enter your PIN and press the * key, enter the digit 2, followed by the digit 7, then press the # key. The GATE ALARM light will start flashing, with a cadence of one flash every 5.
9 Seconds, to confirm the gate alarm is immediate. MAKE THE GATE ALARM DELAYED. 2 4 #. Enter your PIN and press the * key, enter the digit 2, followed by the digit 4, then press the # key. The default gate delay is 4 minutes. BYPASS THE GATE ALARM. 2 #. Enter your PIN and press the * key, enter the digit 2, then press the # key. The GATE. ALARM light will start flashing slowly to confirm that the gate alarm is bypassed. To cancel the bypass, repeat the same sequence of keys. TURN THE GATE CHIME ON / OFF. 2 #. Press the * key, enter the digit 2, then press the # key. The control panel will beep twice to confirm that the gate chime is turned off and three times if it's turned on.
10 If the chime is on, the control panel will beep twice if the gate closes and three times if it opens. BYPASS THE SERVICE ALARM. 9 #. Enter your PIN and press the * key, enter the digit 9, then press the # key. The SERVICE. ALARM light will start flashing slowly to confirm that the service alarm is bypassed. To cancel the bypass, repeat the same sequence of keys. 6. Merlin 4 Using your control panel CHANGING A user PIN. Master PIN 0 #. user (1-2) #. New PIN #. New PIN #. Enter your master PIN, press the * key, enter the digit 0, then press the # key. Enter the user number (1-2), and push the # key. user number 1 is the master PIN.