Transcription of Microsoft Word 2013 Fundamentals Manual
1 Computing Services and Systems Development Phone: 412-624-HELP (4357) Last Updated: 03/19/15 Welcome Microsoft Word 2013 Fundamentals Workshop Faculty and Staff Development Program File: Microsoft Word 2013 Fundamentals Page 1 of 37 03/19/15 Technology Help Desk 412 624-HELP [4357] Microsoft Word 2013 Fundamentals Workshop Microsoft Word 2013 is a powerful word processing application. This is a hands-on workshop to help University faculty and staff become more proficient with Microsoft Word in creating and editing documents. Topics covered include: Working with the Ribbon, Accessing available templates, Document formatting, Spell and Grammar checking, Inserting and formatting graphic images, Working with page layouts, Using track changes, creating and formatting tables, and Printing a document. Table of Contents I. Launch Word .. 2 II. Window and Ribbon Features.
2 3 III. File Tab .. 5 IV. 6 V. Window Options .. 6 VI. Customize Your Ribbon .. 7 VII. Quick Access Toolbar .. 8 VIII. Non-Printing Characters .. 9 IX. Practice Document .. 9 X. Save a Document .. 9 XI. Select Text .. 11 XII. Margins .. 12 XIII. Line Spacing .. 13 XIV. Format a Document .. 13 XV. Additional Font Options .. 15 XVI. Text 17 XVII. View Modes .. 17 XVIII. Spelling and Grammar Checks .. 18 XIX. Page Breaks and Section 19 XX. Tables .. 20 XXI. Edit a Table .. 23 File: Microsoft Word 2013 Fundamentals Page 2 of 37 03/19/15 A. Move within a Table .. 23 B. Adjust Column Width .. 23 C. Insert Rows or Columns .. 24 D. Merge Cells .. 26 E. Delete Cells, Rows, Columns and Table .. 27 XXII. Format a Table .. 27 A. AutoFormat .. 27 B. Text Format and Alignment .. 28 XXIII. Print a Document .. 28 XXIV. Illustrations Demonstration .. 29 A. Instructor 29 XXV.
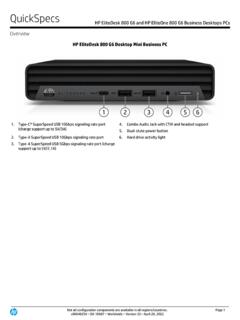
3 Illustrations Quick Reference .. 30 A. Add a Picture .. 30 XXVI. Track Changes Quick Reference .. 33 A. Turning on Track Changes .. 33 XXVII. Additional Quick References .. 35 A. Cover Page .. 35 B. Working with an Image .. 36 I. Launch Word File: Microsoft Word 2013 Fundamentals Page 3 of 37 03/19/15 To start Word 2013, click on the Start button, select All Programs, select Microsoft Office, and then select Microsoft Word 2013 from the menu options. A Microsoft Word Icon may also be available on your desktop for quick access. Double click on the icon to start the application. II. Window and Ribbon Features The screen shot below displays the primary components of the Word 2013 Access Toolbar File tab Insertion point Title bar Ribbon Horizontal ruler Zoom slider View Options Scroll bar Status bar Document window Vertical ruler Ribbon Collapse File: Microsoft Word 2013 Fundamentals Page 4 of 37 03/19/15 A.
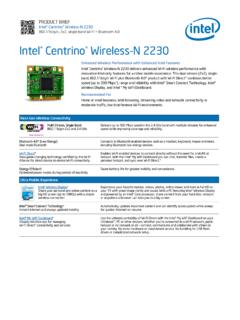
4 Terms The table below consists of definitions for the Microsoft Office features. Term Description 1 Quick Access Toolbar Displays quick access to commonly used commands. 4 File Tab The File tab has replaced the Office button in 2007. This area is called the Backstage which helps you to manage the Microsoft application and provides access to its options such as Open, New, Save As, Print, etc. 2 Ribbon Tab Title or name of the specific Ribbon. 3 Ribbon Displays groups of related commands within tabs. Each tab provides buttons for commands. 5 Group Contain category of command buttons. 6 Show Dialog Box Show additional options. B. Use the Ribbon options to select and process your commands. Microsoft Word 2013 uses Tabs instead of menus to organize various functions. In addition, command buttons have been placed in a Group within the Ribbon. The Dialog Box Launcher in a group shows additional options.
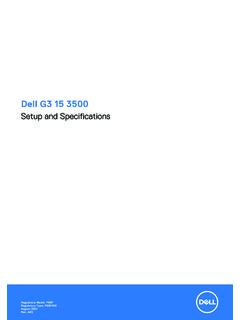
5 Dialog box launcher Group Tabs File: Microsoft Word 2013 Fundamentals Page 5 of 37 03/19/15 III. File Tab The File tab provides you with the Backstage that provides information pertaining to your document and options to help setup your window defaults. The Backstage also contains standard commands such as, Save, Save As, New, Print, etc. File: Microsoft Word 2013 Fundamentals Page 6 of 37 03/19/15 IV. Templates Microsoft Office has a variety of predesigned templates within specific categories. A. Open Templates 1. Select the File tab, and then click on the New option. 2. The Available Templates window will appear. V. Window Options The Microsoft Word application allows you to customize setting and preferences as you work within your Word document.
6 A. Set options 1. Click on the File tab, and then select the Options item. 2. The Word Options window will appear. This is where you can choose your desired settings and preferences. File: Microsoft Word 2013 Fundamentals Page 7 of 37 03/19/15 VI. Customize Your Ribbon You can easily customize the Ribbon to suit your needs by creating new tabs and filling them with the commands you use the most. A. Customize Ribbon commands 1. Click on the File tab, and then select the Options Item. 2. The Word Options window will appear. File: Microsoft Word 2013 Fundamentals Page 8 of 37 03/19/15 3. Click on the Customize Ribbon option. 4. From the Choose commands from list, click on your desired ribbon option, and then click on the Add button to place it in the Customize the Ribbon list.
7 5. Click on the OK button. VII. Quick Access Toolbar Microsoft Word 2013 has a Quick Access Toolbar, so you can have quick access to your most used commands. A. Add Commands 1. To add your most used commands to the Quick Access Toolbar, click on the drop-down arrow next to the Quick Access Toolbar. 2. The Customize Quick Access Toolbar option panel will appear. File: Microsoft Word 2013 Fundamentals Page 9 of 37 03/19/15 3. Click on your desired command option to be placed on the Quick Access Toolbar. VIII. Non-Printing Characters The Show/Hide button displays non-printing characters, including paragraph marks, spaces and tabs. This button works as a toggle switch: click it to turn the display of non-printing characters on and click it again to turn them off. A. Working with Show/Hide 1. On the Home Ribbon in the Paragraph group, click on the Show/Hide button to view paragraph marks.
8 Paragraph, space, and tab marks will not appear on your printed documents. 2. On the Home Ribbon in the Paragraph group, click on the Show/Hide button to hide paragraph marks. IX. Practice Document Open practice document. (Instructor will demonstrate where to access document.) X. Save a Document A. Save 1. Click on the File tab, then select the Save As option to save a document permanently to your hard drive or other storage device. (The instructor will demonstrate where to save document.) File: Microsoft Word 2013 Fundamentals Page 10 of 37 03/19/15 2. The Save As window will appear. 3. In the Directory sections on the left side of the window, click on the icon where you wish to save your document. In this exercise click on the Desktop. 4. In the File Name box, type your desired document name, and then click on the Save button.
9 File: Microsoft Word 2013 Fundamentals Page 11 of 37 03/19/15 XI. Select Text You must select text before you can change the format. You can use the mouse to select text in a variety of ways which is explained in the table below. Select Action any text Click at the beginning of the area and press the Shift key as you click at the end of the area. You can also drag across the text you want to select. a word Double click on the word. a line Place the mouse pointer in the left margin. Position the mouse pointer next to the desired line and click once. multiple lines Place the mouse pointer in the left margin next to the first desired line and click once. Then press the Ctrl key and click additional lines to select them. a sentence Press the Ctrl key and click anywhere in the sentence. a paragraph Place the mouse pointer in the left margin and double click next to any line in the paragraph.
10 Multiple paragraphs Click at the beginning of the first paragraph then hold the mouse button down while dragging through your desired paragraphs. a document Press the Ctrl key then place the mouse pointer anywhere in the left margin and click once. File: Microsoft Word 2013 Fundamentals Page 12 of 37 03/19/15 XII. Margins Microsoft Word 2013 margins are defaulted to 1 inch for the top and bottom, and 1 inch for the left and right. To change your margins, use the Margin button found on the Page Layout ribbon. A. Create Margins 1. Select the entire document text, by pressing the Ctrl key, then place the mouse pointer anywhere on the left margin, and then click once on the right mouse button. 2. Select the Page Layout tab. 3. In the Page Setup group, click on the Margins button. 4. The predesigned margins panel will appear. 5. Change the margin by selecting the top margin button (top and bottom Left and Right ).